Author Topic: Blower motor and resistor replacement (with pics)  (Read 38614 times)

sheepdog

  • Site Admin
  • Administrator
  • Legendary
  • *****
  • Thank You
  • -Receive: 4
  • Posts: 1272
    • View Profile
Blower motor and resistor replacement (with pics)
« on: June 05, 2007, 12:18:17 AM »
Fan resistor and/or blower replacement.


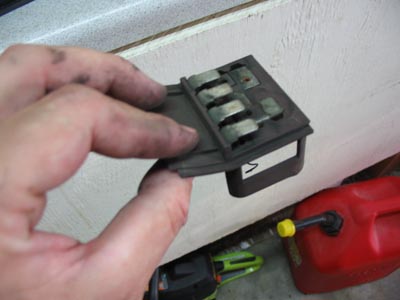
This is an easy job requiring very little in the way of tools.
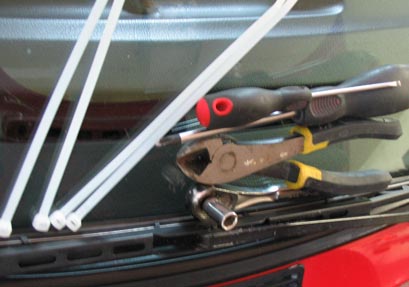
Here is what you will need:
Time: 30-45 minutes for the resistor, 1 to 2 hours for the blower (you could take more, or less)
resistor and/or blower
small flathead
medium phillips
7mm 1/4in socket and ratchet
wire cutters
4 zip ties
wire ties (zip ties)


Removal:
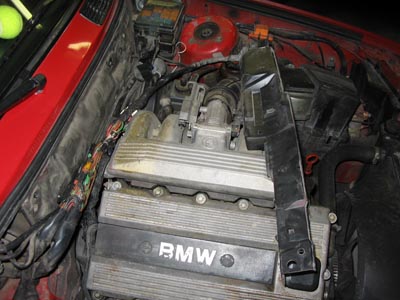
(All pics from here down are clickable for a larger size)

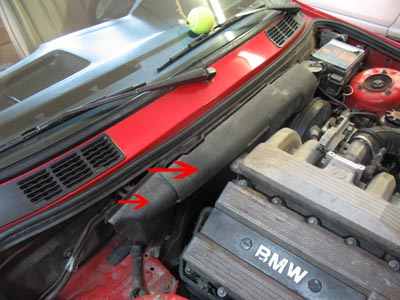
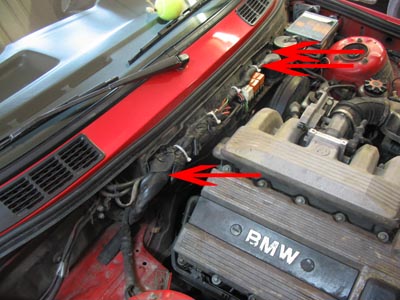
Begin by removing the wiring harness covers, They usually pop off with a tug.


Now snip off the zip ties. Yours may be black, green, or whatever. There are most likely 4 of them.


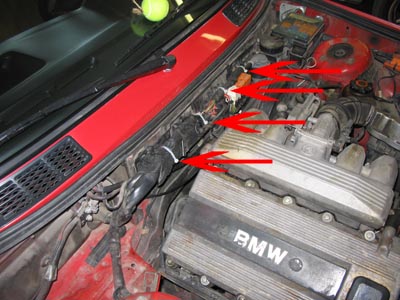
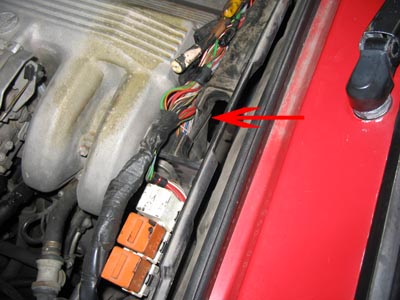
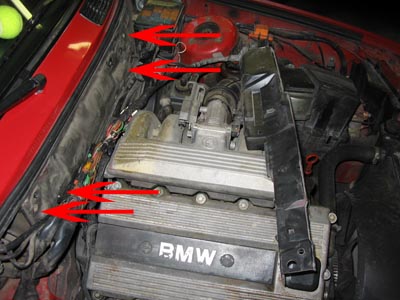
Now remove the 3 (Phillips) screws holding the wire harness shelf in place.
There is one on the passenger side, 2 on the driver side. They hold on one of the diagnostic ports. (yes I re-used the same picture, so sue me)


Now the tricky part, be careful here!
The harness comes up through the center though a tube, that needs to come out. What I do (working from the drivers side) is push the tube up so you are working with a thinner area, then towards the passenger side and squeeze the driver side out. This makes it easier to get the passenger side out where most of the wires will be.


Now pop the relays out. Use a thin (flathead) screwdriver from behind to release the tab.


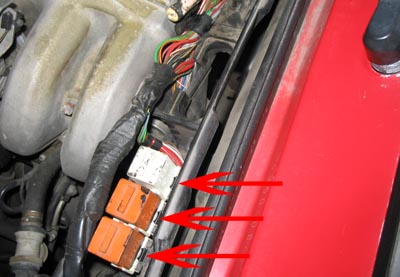
You should end up with this.


Gently(!) move the tray out of the way, I lay it across the engine (yes, I have done this before).


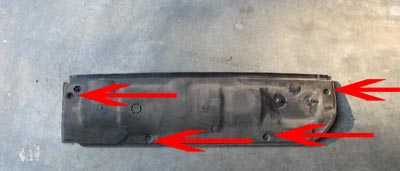
Now remove the panel behind it. There are 7mm screws holding it in place and you need to lift the hood seal out of the way.
I stick mine up behind teh wipers but tape will also work.


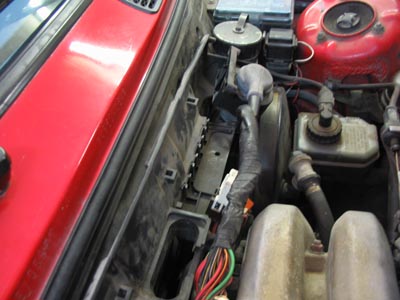
Here is the panel removed to show the screw holes better.


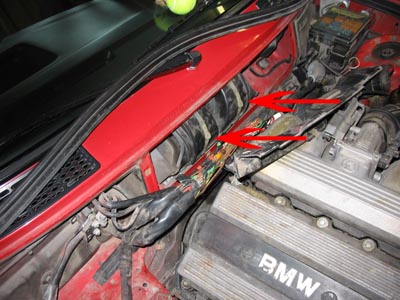
Puling the panel off you should be greeted with something like this, only dirtier.
Unhook the 2 plastic straps. Pull down and out on the tab.
Be careful as the straps may be brittle, try to bend them as little as you can.


Now remove the plastic cover.
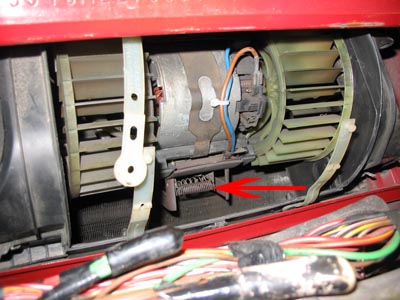
The arrow points at the resistor, simply pull it towards the front of the car. Watch yourself, as it may be quite stuck.
Things that are stuck and quickly become unstuck tend to mean pain for the mechanic. Some will also tell you that if you do not bleed each time you work on your car you did something wrong. Watch your hands.


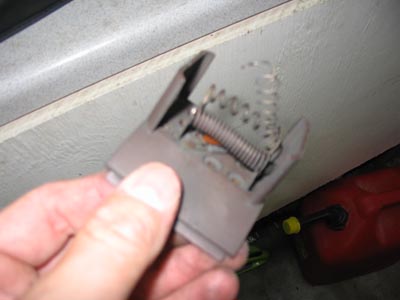
This is what you are after.
The spring was bent up to show you what was broke on mine.


Before closing up, test it with with the switch. After you put the blower cover on, test it again. Make sure the straps are clear first.

Blower
If you are replacing the blower as well, remove this strap. It un-clips at the bottom. I recommend a second person to help on this, as it can be a pain, even more of a pain is putting it back in. You will also need to cut the zip tie, disconnect the wires, and slide it out through the drivers side. Sorry no pics for this part but it is pretty straightforward but a hassle, and no pics will really help.

The bottom of the slot in the middle is good for pressing a flathead screwdriver against and smacking with your hand to remove it.

Going back in, I have a buddy use the screwdriver method again, and have I push it into place as he pushes down instead of hitting it.

Keep in mind, the blower has a certain orientation, if it does not go in right, it will rub and burn out, or catch fire. You will know when it pops into place, but getting it into place along with the clip is a pain in the you-know-what.

Spin it by hand to see if it is rubbing, if not try it with with the switch. After you put the blower cover on, test it again. Make sure the straps are clear first.


Close up and enjoy your multiple fan speeds.
"When trouble arises and things look bad, there is always one individual who perceives a solution and is willing to take command. Very often, that individual is crazy." --Dave Berry

Frankie

  • Full Member
  • ***
  • Thank You
  • -Receive: 0
  • Posts: 165
    • View Profile
Blower motor and resistor replacement (with pics)
« Reply #1 on: June 05, 2007, 01:02:59 AM »
Great info! I just bought a new blower which should be changed.

Cobra Jet

  • Hero Member
  • *****
  • Thank You
  • -Receive: 1
  • Posts: 633
    • View Profile
Blower motor and resistor replacement (with pics)
« Reply #2 on: August 31, 2009, 07:44:51 AM »
I know this is an old tech related "How To" and it was very clear & concise as to how to change the HVAC resistor and/or the HVAC Blower Motor - but I just wanted to add some more tech to this for those who may need to do this type of fix.


I had to replace my blower motor.  After R&Ring my HVAC blower motor, I could not get that metal band clip over the blower motor secured to the bottom of the assembly above the resistor (as seen in the pics above).  I tried everything, using a screw driver, using a scribe (inserted into the small hole at the bottom of the band clip and pressing down), pressing the middle of the clip hoping to get more leverage, readjusting the clip, etc etc etc...  The HVAC blower motor was in the proper orientation and was also "locked" into the HVAC housing properly.  However, no matter what I tried to do for locking down that band clip, I could not get that clip reseated.

So, instead of wasting even more time and getting more frustrated, I opted to use a long nylon "zip tie".  To use a zip tie, it has to be one that is at least 12"-14" in length.  These can be found at nearly any hardware, auto parts store or home improvement store.

BEFORE INSTALLING BLOWER MOTOR:

Remove the blower motor resistor, this will give you plenty of room to work for the fix.

Take the end of the zip tie (pointy or the leading end) and insert this first through the metal bracket found riveted at the center and back of the HVAC housing (the zip will be behind the bracket if inserted correctly).  This is the same metal bracket in which the factory metal band clip would latch onto.  Continue to push the lead end of the zip tie through the lower notch in the HVAC housing (again, this would be the same area in which the factory clip would attach).  You want excess zip tie protruding above and below, coming out of the HVAC cavity or cowl area.

For a visual of the zip tie:
In your mind, picture the letter "C" - the top of the C (your locked end of the zip tie) is protruding out at the top of the HVAC cavity, while the lower end of the "C" (lead end of zip tie) is protruding out from the bottom of the HVAC cavity.

Now, take the blower motor, connect the (2) wires to it and install the motor into it's perch so that the center of the zip tie is BEHIND the motor.  Be sure that the motor is also oriented properly, seated correctly and that the motor is definitely locked into place.  Essentially, it's going to be seated as the above pics show in sheepdog's write up.  Make sure it's locked into place (try to rotate the actual motor upward or downward, if locked into place, you won't be able to rotate the motor).  Also make sure that the blower blades or wheels turn 100% freely.  The ends of the zip tie you installed should still be protruding above and below the motor.  Now connect or lock the zip tie ends together and make sure it's as secure as you can make it (pull as tight as you can against the motor).  If done correctly, the motor will be 100% secure in the housing just as it would be if you had reused (and were able to) lock the metal band clip back into the housing.

Clip off the excess end of zip tie, reinstall the blower motor resistor.

Before closing everything up, be sure your zip tie is holding the motor in place and test the wheels by manually spinning them w/ your hand to be certain the wheels are spinning freely without any obstruction.  If there are no obstructions, turn the fan on and test all (4) fan speeds as well, if everything is well - job well done.

~~~~~~~~~~~~~~


Like I said, I tried and was very persistant with trying to get that metal band clamp back on and I could not get it locked down as it was prior to removal - so a zip tie was my method of securing the blower motor.  The zip tie method does work, as the fan assembly is securely locked into place, all speeds work and there are no interference issues w/ the blades, nor are there any issues at all when driving the vehicle.  This may not be the preferred method by some, but for others, it's definitely a time saver and is a proven fix that works.
- Phil
1994 Cobra coupe #0013
2011 Genesis Coupe
2011 Tucson GLS

quinn11m20

  • Sr. Member
  • ****
  • Thank You
  • -Receive: 0
  • Posts: 389
    • View Profile
Blower motor and resistor replacement (with pics)
« Reply #3 on: August 31, 2009, 05:31:26 PM »
Great write up. I need to replace my blower motor. Not to long ago it started to make this flapping sound, like a baseball card in spokes, but worse. Thanks.

pakman84

  • Newbie
  • *
  • Thank You
  • -Receive: 0
  • Posts: 41
    • View Profile
Trouble...
« Reply #4 on: September 10, 2009, 11:44:19 AM »
I bought my 318is over the weekend and the blower wasn't working...The prior owner even left a spare in the trunk for me....I thought that this would be easy.....NOT.....The tube that you pull up on that contains the wires-Does it have wires through that go into the engine block or are the wires just tucked into this tube for space concerns...Any way, I worked around this issue and removed the old blower assembly and what had happened was the impeller on the driver side was rubbing the housing and apparently started blowing fuses due to the increased amp load as it should....Anyway, I put the other motor/blower assembly in and it's impeller seated directly onto the driver side housing as well.....I kept rotating the motor around but it kept "seating" into a sweet spot where the impeller would rub the housing....The passenger side impeller probably had a  3/8" gap between it and the housing..How do I correct for this? I even pushed the driver side impeller further onto the shaft to gain more clearance but to no avail...Does BMW make a smaller impeller I could use? I pulled the motor out and didn't see anything that would cause this offset to the drivers side....Please HELP!!!
-John

DSP74

  • Newbie
  • *
  • Thank You
  • -Receive: 0
  • Posts: 4
    • View Profile
Blower motor and resistor replacement (with pics)
« Reply #5 on: January 18, 2010, 05:11:25 PM »
Quote from: pakman84;78215
I bought my 318is over the weekend and the blower wasn't working...The prior owner even left a spare in the trunk for me....I thought that this would be easy.....NOT.....The tube that you pull up on that contains the wires-Does it have wires through that go into the engine block or are the wires just tucked into this tube for space concerns...Any way, I worked around this issue and removed the old blower assembly and what had happened was the impeller on the driver side was rubbing the housing and apparently started blowing fuses due to the increased amp load as it should....Anyway, I put the other motor/blower assembly in and it's impeller seated directly onto the driver side housing as well.....I kept rotating the motor around but it kept "seating" into a sweet spot where the impeller would rub the housing....The passenger side impeller probably had a  3/8" gap between it and the housing..How do I correct for this? I even pushed the driver side impeller further onto the shaft to gain more clearance but to no avail...Does BMW make a smaller impeller I could use? I pulled the motor out and didn't see anything that would cause this offset to the drivers side....Please HELP!!!
-John

The squirrel cages just press onto the motor shaft. If you are careful, you can push them left or right on the shaft. They should be sort of towards the outside edges if you have a choice.

DesktopDave

  • Administrator
  • Legendary
  • *****
  • Thank You
  • -Receive: 60
  • Posts: 5076
  • Lives in the 80s
    • View Profile
    • The Iconic BMW
Blower motor and resistor replacement (with pics)
« Reply #6 on: January 18, 2010, 05:34:19 PM »
I tried to do all this on my spare HVAC unit.  I still have it, but I have yet to get the idiotic motor situated correctly.  I eventually closed the panel, but I'm sure it isn't done right.

I'm inspired to go try once more.  Thanks for the great write-up!
'08 Karmesinrot 128i 6MT
'86 Zinnoberrot 635CSi (M30B32/G265/3.46 torsen LSD)

Sold: '97 Montrealblau 318iS, '91 Brilliantrot 318i, '91 Brilliantrot 318iS

rx82000

  • Newbie
  • *
  • Thank You
  • -Receive: 0
  • Posts: 16
    • View Profile
Blower motor and resistor replacement (with pics)
« Reply #7 on: June 03, 2010, 09:07:18 AM »
Great write-up. I've done this twice on separate occasions:

#First time: I had a b*tch of a time getting the clip back on the blower motor. Lots of sweating, bending and cursing.

#Second time: I removed the resistor pack, it just pulls out, before putting the clip back on and it was much easier. The resistor pack interferes with the clip.

****Conclusion put the clip back on the blower motor when the resistor pack is off.

AutoXSS

  • Jr. Member
  • **
  • Thank You
  • -Receive: 0
  • Posts: 62
    • View Profile
Blower motor and resistor replacement (with pics)
« Reply #8 on: September 13, 2010, 09:28:27 PM »
ive heard of alot of people using a cleaner to clean the resistor, trying that first to fix the problem. Anyone have a suggestion of what to use for a cleaner?

also, i read alot that if the resistor is bad, the fan will work only on the #4 setting. mine doesnt work at all on any setting. I havent pulled everything apart yet. Hopefully its just the resistor.

I did pull the fan switch out today(damn i hate the 2 little screws on the bottom that hold the HVAC panel on). I put a jumper wire on the positive and connected it to a couple of the ports. Nothing happened, is this good enough for a testing of the switch failure? Should i have made sure to jump it to the #4 setting port? I wish i would have made sure to do this. Hopefully this doesnt make a difference.

DesktopDave

  • Administrator
  • Legendary
  • *****
  • Thank You
  • -Receive: 60
  • Posts: 5076
  • Lives in the 80s
    • View Profile
    • The Iconic BMW
Blower motor and resistor replacement (with pics)
« Reply #9 on: September 14, 2010, 01:05:40 PM »
I don't think cleaner will help the resistor.  the fan switch sends current through those curly wires...the resistance of the wires themselves drains enough power to slow down the fan speed.  Sloppy system, but cheap & reliable.  If a wire is burned out a bit of solder might do the trick, but replacement resistors aren't that much and will work for years.

If you don't have any fan at all it cannot be the resistor.  It's likely a fuse, the fan motor itself, or the switch.  I'd test the switch with a digital multi-meter in continuity mode.  You'll get a tone if continuity exists.  I can't recall the pins, but it'll take you five minutes to figure it out.

From what you're saying it has to be either a bad fan motor or a power feed problem.  If it's no power I'm guessing you have a burned out fuse, bad ground or chafed/broken wire.
« Last Edit: September 14, 2010, 01:09:46 PM by DesktopDave »
'08 Karmesinrot 128i 6MT
'86 Zinnoberrot 635CSi (M30B32/G265/3.46 torsen LSD)

Sold: '97 Montrealblau 318iS, '91 Brilliantrot 318i, '91 Brilliantrot 318iS

AutoXSS

  • Jr. Member
  • **
  • Thank You
  • -Receive: 0
  • Posts: 62
    • View Profile
Blower motor and resistor replacement (with pics)
« Reply #10 on: September 14, 2010, 05:46:56 PM »
checked fuse in the fuse box. is there another? I'll have to check the switch,.....time to buy/borrow a multimeter. i need one anyway, im sooo used to newer cars, lol

also, in regards to the resistor...if its out, i should only get fan at setting #4? So, can i completely rule out the resistor since i get no fan at all?
« Last Edit: September 15, 2010, 10:13:34 AM by AutoXSS »

carlos318is

  • Sr. Member
  • ****
  • Thank You
  • -Receive: 0
  • Posts: 320
    • View Profile
    • http://www.bimmerowner.co.uk
Blower motor and resistor replacement (with pics)
« Reply #11 on: September 15, 2010, 12:59:35 PM »
Over in the UK the resistor pack is in the car just under the center console just down a bit from the back of the radio
[SIGPIC]www.bimmerowner.co.uk[/SIGPIC]

AutoXSS

  • Jr. Member
  • **
  • Thank You
  • -Receive: 0
  • Posts: 62
    • View Profile
Blower motor and resistor replacement (with pics)
« Reply #12 on: October 24, 2010, 07:03:13 PM »
I tested the switch with a multimeter, so i went to pulling the motor out. I got to the blower and looked at the power connector on it. I pulled the orange wire off and reconnected it. i started the car and turned the fan on,.....IT WORKED.

I put almost everything back together and turned the fan on again to make sure i wasnt dreaming. It didnt work. I pulled everything off again and wiggled the orange wire again. It started working. I put some of that diode protectant on the wire/connector and it worked again. I tested it once more and it didnt work.

I wiggled the orange wire again it started again. Is their any way to pull off the connector where the orange wire plugs into? is it a seperate piece that attaches to the blower?

AutoXSS

  • Jr. Member
  • **
  • Thank You
  • -Receive: 0
  • Posts: 62
    • View Profile
Blower motor and resistor replacement (with pics)
« Reply #13 on: October 26, 2010, 10:36:07 PM »
anyone have an opinion on what could be the cause? i almost want to get another motor and be done with it

///m42 sport

  • Sr. Member
  • ****
  • Thank You
  • -Receive: 1
  • Posts: 331
    • View Profile
Blower motor and resistor replacement (with pics)
« Reply #14 on: November 19, 2010, 01:10:33 AM »
http://r3vlimited.com/board/showthread.php?t=188226

heres my writeup :)

Also IMPORTANT note on infamous clip


LOOK at where the clip attaches in the back.  Its easy to think it goes on that metal strip!!!  I did when the clip popped out and it was IMPOSSIBLE to reattach the clip.  This is the proper position!!!
[SIGPIC][/SIGPIC]