Author Topic: Engine Swap Project & Checklist  (Read 26273 times)

wazzu70

  • Nasty Nick
  • Hero Member
  • *****
  • Thank You
  • -Receive: 18
  • Posts: 671
    • View Profile
Engine Swap Project & Checklist
« Reply #15 on: May 26, 2012, 01:33:10 AM »
is the M20 airbox any bigger? I know on my car since I swapped an M42 into an M20 car I was contemplating just using the M20 airbox since the bracketry was all there for it (m42 and M20 mount slightly different).

Just an idea.
-Nick
91 E30 M42 with VEMS

bmwman91

  • Administrator
  • Legendary
  • *****
  • Thank You
  • -Receive: 33
  • Posts: 2798
    • View Profile
    • http://www.e30tuner.com/
Engine Swap Project & Checklist
« Reply #16 on: May 26, 2012, 02:20:08 AM »
The M20 & M42 use the same paper filter part. So, I wouldn't expect gains from using the M20 box because of that. Surprising, right? Either we got an over-sized filter, or the M20 got an undersized one lol.

From looking on K&N's site at their panel-filter replacement dimensions, here is what I found.

M42 filter is 254 x 146 x 27mm.
M30 filter is 378 x 148 x 29mm.

Assuming that they both have the same pleat spacing (mm/pleat) & foam perimeter size, the M30 air filter element should have up to 62% more surface area through which to draw air. I think that I will have a chance to start working on the retrofit this weekend, so we shall see. The width is very similar, which leaves me hopeful that the M30 box won't hit the alternator!

06/05/2011 - 212,354 miles
Visit HERE for a plethora of 318iS stuff and some other randomness.  Would you say I have a, plethora, of pinatas?

wazzu70

  • Nasty Nick
  • Hero Member
  • *****
  • Thank You
  • -Receive: 18
  • Posts: 671
    • View Profile
Engine Swap Project & Checklist
« Reply #17 on: May 26, 2012, 03:12:12 PM »
Dang, was hoping I had an easy solution for you!

Maybe look at e30 m3?
-Nick
91 E30 M42 with VEMS

bmwman91

  • Administrator
  • Legendary
  • *****
  • Thank You
  • -Receive: 33
  • Posts: 2798
    • View Profile
    • http://www.e30tuner.com/
Engine Swap Project & Checklist
« Reply #18 on: May 26, 2012, 03:31:16 PM »
Good idea, I hadn't thought of that. According to what I can find, the M3 air filter should have 78% more surface area! Now...the real trick will be finding an E30 M3 air box. That sounds like an expensive endeavour! Still, from what I can see, the M30 air box is going to have a really hard time fitting on the driver's side under my hood, so I will have to look around.

06/05/2011 - 212,354 miles
Visit HERE for a plethora of 318iS stuff and some other randomness.  Would you say I have a, plethora, of pinatas?

wazzu70

  • Nasty Nick
  • Hero Member
  • *****
  • Thank You
  • -Receive: 18
  • Posts: 671
    • View Profile
Engine Swap Project & Checklist
« Reply #19 on: May 26, 2012, 05:08:27 PM »
S14.net. People switch to alpha-n systems frequently and do not need the airbox anymore.
-Nick
91 E30 M42 with VEMS

bmwman91

  • Administrator
  • Legendary
  • *****
  • Thank You
  • -Receive: 33
  • Posts: 2798
    • View Profile
    • http://www.e30tuner.com/
Engine Swap Project & Checklist
« Reply #20 on: May 26, 2012, 09:46:24 PM »
I looked around S14.net and it could be promising. The problem is that it seems that no new members can register lol. Do you have an account there that you could post a WTB ad with?

06/05/2011 - 212,354 miles
Visit HERE for a plethora of 318iS stuff and some other randomness.  Would you say I have a, plethora, of pinatas?

bmwman91

  • Administrator
  • Legendary
  • *****
  • Thank You
  • -Receive: 33
  • Posts: 2798
    • View Profile
    • http://www.e30tuner.com/
Engine Swap Project & Checklist
« Reply #21 on: May 27, 2012, 01:19:59 AM »
OK, I have a 1985 325e air box on the way from eBay as well now (the older style metal one). It uses the same air filter as the M3, but the inlet is positioned at the headlights, which is what I need. The M3 box won't work well since its inlet would sit in the radiator expansion tank (M3 used a narrower radiator with remote expansion tank). Stupid expansion tank...the M30 box would work fine too, if it wasn't for that.

I will still give the M30 box my best shot. The issue with it is that it is about 6" longer than the M42 box. It sort of interferes with the PS reservoir, but I think that things can be shifted to accommodate that. The real issue is that the outlet is not co-axial with the intake boot/MAF at all. To get it to fit cleanly, I will chop off the output flange and seal over that entire face. Then I will use a hole saw to make an opening for my MAF's velocity stack (6-8" length of 2.75"OD steel tubing) somewhere more in the middle so that I don't have to bend the hell out of the intake boot. It is nice & narrow, so it has no problem fitting between the ABS unit & alternator. It's the length that makes it tricky...damn you, integral expansion tank!

I think that the M20B27 (1985 & older) box should be an easier fit since it was intended for the E30. I am a little suspicious that it may interfere with the alternator since it is about 1.3" wider than the stock one & seems to sit lower. Still, at least it should work with the brackets in there (maybe, the old 325e ones look sort of different). The thing that I do NOT like about it is that the air filter looks really restricted with the narrow air passages in the upper & lower portions of the housing. All of that extra filter surface area might not be worth it if it is all constricted. That's one reason that I want to try like hell with the M30 box. The M30 filter has ~10% less area than the S14/M20B27 one (but still 60% more than the M42 one), but it is all in a big open box with a lot less restrictive-looking stuff.

Ultimately, I guess it does not matter really. MM did say that the stock M42 box would be restrictive when going WOT, but it won't be an issue for me to swap it on for SMOG testing. I want a clean OEM looking solution just because I am anal retentive like that, and because I do not trust open element filters to keep dirt & grit out of the motor!

Whatever I come up with, I will post pics for everyone!

06/05/2011 - 212,354 miles
Visit HERE for a plethora of 318iS stuff and some other randomness.  Would you say I have a, plethora, of pinatas?

bmwman91

  • Administrator
  • Legendary
  • *****
  • Thank You
  • -Receive: 33
  • Posts: 2798
    • View Profile
    • http://www.e30tuner.com/
Engine Swap Project & Checklist
« Reply #22 on: May 29, 2012, 03:23:58 AM »
I made some good progress with the M30 air box today. It looks like I should be able to use it after all! While the old-style 325e filter panel may be a bit larger, the design of the air box looks kind of restrictive, whereas the M30 box is very open. I measured the M42 and M30 air filter elements and here were my findings:

M42 filter: 68 pleats, 46mm x 137mm
M30 filter: 112 pleats, 46mm x 137mm

So, the M30 air filter has 65% more pleats / surface area. That should more than account for the ~53% increase in power that my new M42 will be making. Sweet. Enough talk though, let's see what the situation looks like under the hood!

This first shot shows the general positioning & fit of the M30 box under the hood. Easy, right? Well, I had to make some modifications to the PS reservoir bracket, charcoal canister position, the brake lines coming out of the ABS unit and the M30 air box itself. It isn't exactly plug & play lol (well, it sort of is now).


That intake boot sure looks close to the box right? Right. The top will be chopped and I am thinking about what will be the cleanest way to attach an adapter plate over the cut-out. The MAF needs a 6" or longer tube / velocity stack in front of it to work best. The easiest thing for me to do would be to cut the box, bend some 20ga mild steel sheet metal to cover the opening, and weld in some 70mm steel tubing...then the MAF can couple to that and it also serves as my velocity stack.


The line I marked on the box shows where the MAF ends when put into the boot, and its approximate angle.


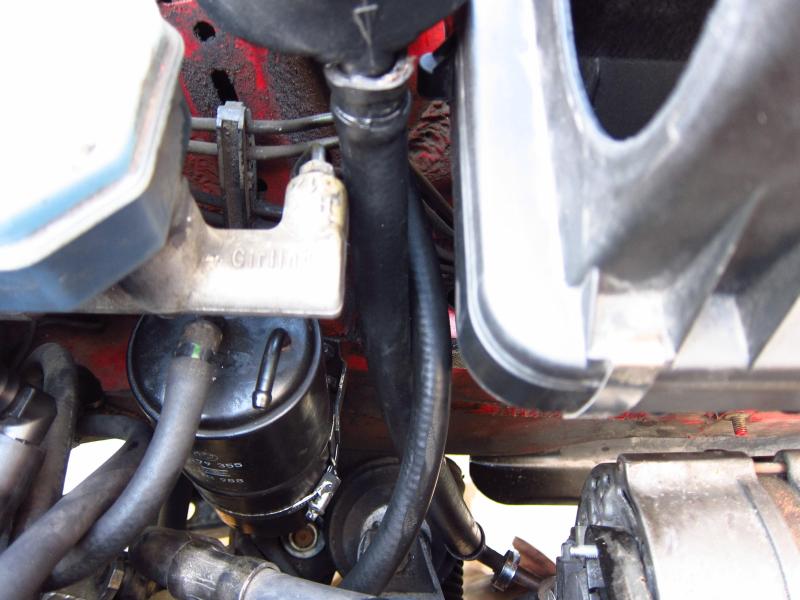
So, how tight IS the M30 box in there? Well, it just clears the PS reservoir. I can always push it up a little before tightening the band to buy more clearance, but the air box goes in & out fine as it is now.


The hoses have a decent amount of room now too. Just for reference, the reservoir bracket was modded to move things back 13mm and up about 25mm (more on this later). I hand-bent the brake lines a tiny bit here to keep them from contacting the PS lines, although it probably doesn't matter much.


LOTS of room up by the expansion tank. It seems like a lot compared to how it fit before I moved the PS reservoir & charcoal canister, anyway.


The rear stock rubber foot of the M30 box actually manages to sit nicely on the chassis. I do not like this though, and I will be machining a "socket" for the box so that it locks into the rubber cap thingy that the stock M42 air box uses.


The front rubber foot is just a few millimeters off of the sheet metal. No matter though, they are both going away!


Alternator clearance...check! servicing it is not an issue. The M30 box is actually the same width as the M42 box, and even a little less tall. It is just a LOT longer.


The fit around the ABS unit is very tight. I hand bent a couple of the brake lines to make sure that they weren't going to touch anything, and chopped off a couple of plastic ribs on the M30 air box that were interfering. The box now stays at least 5mm away from all parts of the ABS unit, and it will sit further once I make the box use that rubber mounting cap under it.


I needed to space the box out from the bracket to get the right clearance from the ABS unit. This was easily accomplished with washers. I may opt to bend the bracket though, to get an even cleaner stock look to this.


This is the area now that it is all cleared out. The black rubber thing in the middle is what I was talking about earlier. I'll get this box to sit nicely on / around it to keep it constrained while driving. As it is now, it can bounce up & down on its rubber feet, which is not tolerable.


So, what did I do to the PS reservoir bracket? First, it needed to move back toward the firewall about 13mm. That was fairly easy. I drilled a new bolt hole in the bracket 13mm from the original, and then cut off 13mm from the locking tongue at the bottom.


Next, I needed to move it UP. I drilled-out the spot welds holding the hoop to the mount. I then rotated the clasp so that it was not hitting the air box, and then I moved the hoop up on top of the bracket where I welded & ground it. I will probably clean & paint this to avoid rust.


Aaaah the MIG welder...the hot glue gun of steel!


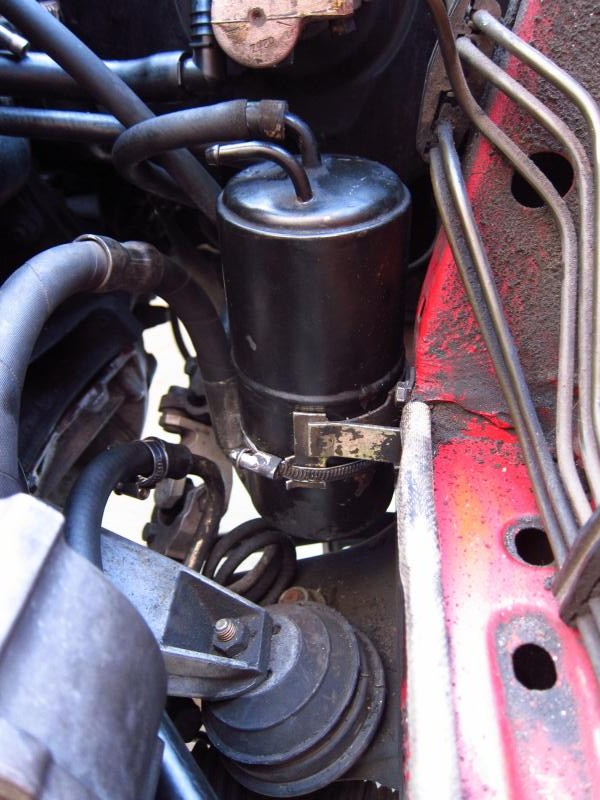
Moving the charcoal canister was super easy. All I had to do was take the bracket off of the car, turn it upside down and reinstall everything. DONE!


Gee, it sure was convenient that I could just screw those rubber mounts into the air box! Well, not really. I had to drill some holes and put panel fasteners there (the M30 box comes with the nice one, on its other side).
« Last Edit: May 29, 2012, 12:33:17 PM by bmwman91 »

06/05/2011 - 212,354 miles
Visit HERE for a plethora of 318iS stuff and some other randomness.  Would you say I have a, plethora, of pinatas?

bmwman91

  • Administrator
  • Legendary
  • *****
  • Thank You
  • -Receive: 33
  • Posts: 2798
    • View Profile
    • http://www.e30tuner.com/
Engine Swap Project & Checklist
« Reply #23 on: May 29, 2012, 03:30:20 AM »
The front mount wanted to be right IN a rib in order for the box to be where I wanted it. I settled for moving the mount ~5mm forward (so the box moved back) to clear the rib, rather than chopping it out.


The rear mount also wanted to be in a rib...sheesh. To finish fitting it, I ground down an M6 nut so that it could fit & hold the mount.


I also chopped off some extraneous plastic mounting bosses. The M30 box came with a heat shield since it is next to an exhaust manifold in the E34 535i. Since it is not near the exhaust in my application, I removed it and chopped off the screw bosses. There isn't really any good reason for it, but I am nit-picky like that. The plastic stuff holding the rubber feet will also go away eventually.


So, I was saying that I am nit-picky. This may not look like a nit-picker's cutting job. Oops.


A little sanding helped things a bit. Ultimately, I will fill this with black RTV to smooth things over a little.


Another hack-job lol.


Interestingly, the M42 air box's muffler tube fits the M30 box. It won't work like this since the M30 box sits so far forward. I plan to chop it down so that it will mate nicely to the plastic headlight shroud to try to keep hot engine air away from the intake.


So that is where I am now. Obviously, I have some heavy chopping to do to get the MAF to interface with the box, but that is fine. My main concern was getting it under the hood cleanly, which seems to have been accomplished. More to come!

06/05/2011 - 212,354 miles
Visit HERE for a plethora of 318iS stuff and some other randomness.  Would you say I have a, plethora, of pinatas?

zacrl1230

  • Jr. Member
  • **
  • Thank You
  • -Receive: 0
  • Posts: 78
    • View Profile
Engine Swap Project & Checklist
« Reply #24 on: May 29, 2012, 04:04:34 AM »
Looking good
I love the "OE" look you are going for, despite the effort involved
Fight the good fight!!
87 325 \'vert~~~~~~89 s50~~~~~~~~~91 318i~~~~~~~~87 325is~~~~~~~R.I.P. \'91 318i

WTB:318 \'vert
WTB:SIR tools
WTB:junk

bmwman91

  • Administrator
  • Legendary
  • *****
  • Thank You
  • -Receive: 33
  • Posts: 2798
    • View Profile
    • http://www.e30tuner.com/
Engine Swap Project & Checklist
« Reply #25 on: May 29, 2012, 12:34:58 PM »
Thanks. My goal is to have this setup pass CA SMOG testing without having to swap anything around. That really depends on which shop I go to lol. It is also nice to pop the hood and have something relatively OEM looking living in there. I did my years as a silly kid with cone filters and bad wiring...I am well past that now!

06/05/2011 - 212,354 miles
Visit HERE for a plethora of 318iS stuff and some other randomness.  Would you say I have a, plethora, of pinatas?

bmwman91

  • Administrator
  • Legendary
  • *****
  • Thank You
  • -Receive: 33
  • Posts: 2798
    • View Profile
    • http://www.e30tuner.com/
Engine Swap Project & Checklist
« Reply #26 on: June 01, 2012, 01:46:13 AM »
Well, no turning back now!

I got the box top mounted on the mill as best I could. The initial chopping was done with a hack saw, and then I refined it on the mill with a long 1" cutter. This was the most clamping that I could get on it. It would have been nice to find a way to clamp the top & sides, but that wasn't really possible.


It came out reasonably clean. This material is sort of a pain in the rear. It was chipping in a few places, probably because the sides are tall & unclamped. This thing was making awful vibrating noises while cutting lol...sounded like some sort of wild animal howling.


From the other side. I ended up needing to cut it an extra 0.5" further back because a big fat piece chipped out just as I was finishing it the first time. #&%(@)$*(*@$#! Oh well.


On the inside I chiseled out the support ribs around where the cover/adapter plate is going, and where the intake tube (velocity stack) will be to buy me some room. It was too dark to take pictures of how it sits under the hood, unfortunately. It is going to be tight, but no worse than the stock setup really. I am not wild about how low the cut had to go to knock out the original outlet since it will restrict air flow from the back of the filter a bit. I am thinking about  building up an air cavity to the side in the rear to permit more air flow. Then again, maybe I am obsessing over nothing.


The plan is to use some 16ga mild steel sheet metal to make a cover. At its simplest, it will only require one 90 degree bend, as tight as I can get it. A 2.75" OD steel tube will be welded in at the proper angle & position, which will serve as the coupling for the MAF and the velocity stack. I will paint it black to keep things sort of uniform. It will be attached with a combination of screws and black RTV adhesive.
« Last Edit: June 01, 2012, 02:06:26 AM by bmwman91 »

06/05/2011 - 212,354 miles
Visit HERE for a plethora of 318iS stuff and some other randomness.  Would you say I have a, plethora, of pinatas?

bmwman91

  • Administrator
  • Legendary
  • *****
  • Thank You
  • -Receive: 33
  • Posts: 2798
    • View Profile
    • http://www.e30tuner.com/
Engine Swap Project & Checklist
« Reply #27 on: June 03, 2012, 03:42:13 AM »
Alrighty, a bit more progress today. I am almost done with the intake!

I figured out how I want to build the adapter onto the air box. It is roughly modeled like this (tabs & tube are to be MIG welded to the flat plate).


From the outside, it will look pretty clean. The actual part will get a coat of satin black epoxy paint to help it blend in. If I can clean the air box cover well enough, I will see about painting that too. The seal will be made with some standard black silicone RTV adhesive, which will also help to hide cosmetic imperfections in the joint. There will also be some countersunk screws in the plastic that thread into nuts behind the little tabs. The heads will be filled with black RTV as well, unless I can find some black oxide coated ones.


This is more or less how it will sit on the inside. This many tabs may seem overkill, but I do not want this thing moving or breaking the thin RTV "gasket". Better safe than sorry. I will run a bead along the seams, and a heavy one along the inside perimeter. The inlet tube will get 3 or 4 1" weld seams to hold it in place, and the perimeter sealing will also be done with RTV.


So how did the actual article turn out? I started with some heavy art-board paper + masking tape and mocked up the flat portion. Once I was satisfied with the fit, I traced it onto some 16ga mild steel sheet (0.065") and cut it out with a band saw. The inlet pipe hole was done on a vertical mill with a rotary table.


For a first-try, it came out surprisingly well. It is good enough that I will use it. RTV can hide the cosmetic imperfections!


Since I do not have a sheet metal brake (bender), I had to improvise. I ran a 1/8" end mill at 3000RPM down the bend line I had marked on the back side, about 0.030" deep. Then I put the flat part into a vise and used a big aluminum plate to bend it over this groove. Since the metal was much thinner there, it bent easily & accurately. This isn't structural at all, so the thinner section is of no concern.


From about 1ft away, it looks like a perfect fit. It isn't perfect in reality, but it is more than good enough functionally and cosmetically.


Here it is with a 2.75" x 6" long tube inserted. I have not welded it yet. The tube is stainless; I found it at a local place with a scrap of 2.75" OD tubing. I have some mild steel tubing on order though...I don't have stainless MIG wire, and this stuff is a pain in the rear to cut since it is really hard. It ate a parting tool when I was trying to trim it on the lathe!


So, once I get the mild steel tubing I will weld that and the mount tabs into place. I need to order up some fasteners (thinking M6, may go smaller to make sure that the head gets below the surface of the plastic so I can hide it.

06/05/2011 - 212,354 miles
Visit HERE for a plethora of 318iS stuff and some other randomness.  Would you say I have a, plethora, of pinatas?

thedguy

  • Administrator
  • Jr. Member
  • *****
  • Thank You
  • -Receive: 0
  • Posts: 78
    • View Profile
Engine Swap Project & Checklist
« Reply #28 on: June 03, 2012, 04:28:27 PM »
I've only skimmed the thread, for now.  

All I can say is you'll f-ing love that motor.  If I could afford one when my motor goes tits up I'd be all over one.

bmwman91

  • Administrator
  • Legendary
  • *****
  • Thank You
  • -Receive: 33
  • Posts: 2798
    • View Profile
    • http://www.e30tuner.com/
Engine Swap Project & Checklist
« Reply #29 on: June 03, 2012, 04:43:32 PM »
Added in some fasteners...

I have black oxide ones coming from McMaster (M4), so I may not need to fill the holes with RTV after all. The nuts are nylon locking ones.


06/05/2011 - 212,354 miles
Visit HERE for a plethora of 318iS stuff and some other randomness.  Would you say I have a, plethora, of pinatas?