Super charging my M42 (UK)

Author Topic: Super charging my M42 (UK)  (Read 52800 times)

visionracingdevelopments

  • Full Member
  • ***
  • Thank You
  • -Receive: 0
  • Posts: 133
    • View Profile
Super charging my M42 (UK)
« on: January 15, 2009, 01:46:48 PM »
Right this is my first post and my first proper car project.

Those who are also on e30zone will have seen this.

End of November I took the plunge and decided to start a super charged project. I'll be using the trusty M45 Eaton blower from a Mini Cooper S

Here's my m42 :)


I'd already started work hence why half the bumper is missing. It had horrible chrome wing mirrors on it so put some nice oem ones straight back on.

My electric push fan conversion, this will free up some space in the engine bay for all the hosing:


The rad I have has a threaded boss in the side so I bought the BMW temp switch for the fan and will be wiring it into the fuse box.

I bought a new gearbox as mine is shot.

I have had my fly wheel lightened, managed to loose just over 3kg of weight which will be good, also bought a 30% uprate clutch:


I'm getting a nice intercooler sized 540x140x63 which should sit nicely accross the front.


To make sure it was all going to be ok, I wasn't taking any chances so thought I'd make up a model of the cooler to test how it would fit :)

Some wood, tape and paint can lids later I came up with this:


It fitted in either way up (inlets at the top and the bottum) but it sat much better with the inlets at the bottum:


It'll require having some bits removed to allow the actual cooler to fit but just need the real thing to work out the mounting points and bolt it on :) It also sits just clear of my electric fan so I can keep it hidden away and out of the engine bay.

I've also got some 15inch wheels on the way (to take the bigger brakes I have planned) and some Toyo R888 road legal slick tyres:


Thats about it for the minute :) comments welcome
http://www.visionracingdevelopments.co.uk

For sale:
COP converion kits
M42 Silicone coolant hose kits
Braided brake line kits
Performance clutches
Performance brakes

PM me

Appletree IS supercharged

  • Jr. Member
  • **
  • Thank You
  • -Receive: 0
  • Posts: 66
    • View Profile
Super charging my M42 (UK)
« Reply #1 on: January 15, 2009, 01:54:11 PM »
Hello! Nice tyres! What did they cost a corner? If you dont mind me asking. Quite fancy a set for my spare rims when the cars running again.

visionracingdevelopments

  • Full Member
  • ***
  • Thank You
  • -Receive: 0
  • Posts: 133
    • View Profile
Super charging my M42 (UK)
« Reply #2 on: January 15, 2009, 01:57:08 PM »
Hi mate,

I got the from Shorty73 on the zone, they were £15 each with 3mm tread :) he had them left over from last years racing season. I did ask but he doesn't have any more at the moment.
http://www.visionracingdevelopments.co.uk

For sale:
COP converion kits
M42 Silicone coolant hose kits
Braided brake line kits
Performance clutches
Performance brakes

PM me

irish79

  • Newbie
  • *
  • Thank You
  • -Receive: 0
  • Posts: 6
    • View Profile
Super charging my M42 (UK)
« Reply #3 on: March 01, 2009, 02:11:40 PM »
hi mate,

i would much appreciate more info on your project, have a 1990 318is and plan on doing similar alterations, could you mail me more info, spec, how and where to get parts, fan, flywheel, inter-cooler,t/charger, price etc ..

many thanks,

irish mark

///Harlis

  • Guest
Super charging my M42 (UK)
« Reply #4 on: March 24, 2009, 07:18:58 AM »
Appletree isnt it...:P seen the video on youtube. I'm potentially doing the same. I actually just posted a thread asking for help on the pulley size/location etc. any chance you could shed some light. i'd appreciate ANY info. bracket location etc. mainly my problem is pulley size. i dont want to mess this up and end up out revving the charger. or accidentally putting 20psi through my motor.

thanks mate.

visionracingdevelopments

  • Full Member
  • ***
  • Thank You
  • -Receive: 0
  • Posts: 133
    • View Profile
Super charging my M42 (UK)
« Reply #5 on: April 13, 2009, 02:13:07 PM »
Sorry I haven't updated it for those interested:


New cooler


Simple L shaped bracket to bolt onto the chassis


Managed to get a stuck bolt out and removed the front end


Bolted the cooler to the bracket, offered it up and checked it with a spirit level, then drilled holes for the Rivnuts to go into.


Checked it then drilled a second set of holes to make it secure and painted it brilliant red.


It was still abit wobly as expected so had to pretty much guesstimate where the top mount would line up with but got it smack on :) Put a bolt through it and now it's rock 'ard.


Put the front end back on althought will probably come off for a new one as the lower part is bent out of shape where some one has probably driven it into a kurb.


Whats also really good it my fan and radiator setup fits in perfectly behind it so nice neat little arrangement for cooling. I will need to trim some small bits out of the bumper to allow for the hoses to clear it but appart from that it's brilliant.

I also took the ali door cards off and to my shock I found the windows where held up with two bits of wood  :eek:

I had been planning to fit some manual window mechanisms so bought a set of them but was a bit worried that the center sections of the doors had been removed previously for weight saving, thankfuly when I got the cards off the middles where still in so that saved me a job (althought the handle parts were removed to add to the door cards).


Ok well here’s something that I hope will benefit every one doing F/I projects with FMICs.

I have done a dual to single head light unit conversion to so the inner high beam units to be removed to allow for IC pipe work.

I managed to source some single units which house side, dip and main beam from Vehicle Wiring Products.


First thing I did was get the lens off the dip beam E30 unit. It wasn’t easy to get off to say the least. It requires running a Stanley knife blade around the lens several times to try and remove as much of the sealer as possible; then need to wedge a screw driver underneath and try to get the lens moving all the time still cutting away the sealer. It takes quite a long time and on the first unit I ended taking some chunks out of the plastic rim with the screw driver oops.

Once it’s free the silver backing to the light comes out and left me with the shell which will hold the new light unit.

I had to make some modifications to the inside to make sure the unit sat in nicely. Did the first bits with snips then tidied it up with my die grinder. Then I painted the inside black just for effect.


The lighting units had little prongs on them, I didn’t fancy taking a grinder to them and cutting them off so just cut some slits into the casing to allow the lights to sit in them. As can be seen I also cut the holders in half to allow for the hoses etc and they aren’t needed. I used the OEM side light fixing and wire as it was easier just to bung it in and clip the wire to the frame.


Then the light literally drops in it’s a very nice fit. Just needed filling with silicone sealer to hold it in place. The unit sits a few little higher than the standard unit but you cannot tell one bit and the silver rings slip on over just fine. The only difference is the lens is domed as opposed to flat.


http://www.visionracingdevelopments.co.uk

For sale:
COP converion kits
M42 Silicone coolant hose kits
Braided brake line kits
Performance clutches
Performance brakes

PM me

visionracingdevelopments

  • Full Member
  • ***
  • Thank You
  • -Receive: 0
  • Posts: 133
    • View Profile
Super charging my M42 (UK)
« Reply #6 on: April 13, 2009, 02:13:43 PM »
Wiring:

I have been lead to believe that the H4 bulb cannot take both the current of the dip and main beam as it would just get too hot and bye bye bulb. So I'm going to use a 5 pin relay to switch between the two filaments.

What I'm going to do is use the dip beam 12v feed as the 12v feed for both the dip and main beam and switch between the two using the full beam circuit. So when the dip beam is switched, power goes to pin 87a to power the dip beam, when the full beam stalk is switched, it will send a current to pin 86 pulling the contact over to pin 87 (full beam side). This shouldn't be a problem with fuses as both lights use a 7.5amp fuse.

Then send the outputs to a water proof plug to allow seperation if I wanted to which then go to a plug on the bulb.

Diagram:


Note: DO NOT earth pin 87.


My new engine has now arrived really chuffed, means I can get on sorting out how it’ll all go together etc.

I bought my self a nice new engine stand to put it on, now I can start looking how the S/C and alternator will go on, get my newly balanced clutch and lightened fly wheel on and also my new pulley wheel.

I want to give it a good clean and maybe a splash of paint to smarten it up.


I invested in a new set of gaskets for the inlet and exhaust manifolds as well as new thermostat gaskets and seals, some bits were ok on the engine but I wanted the piece of mind that I had fitted new ones and nothing would be a problem.


Also, I have wanted to do an oil filter relocation set up. No major advantages just doesn’t look like any one else has done it (or got any pictures up) and thought it could be a nice addition to ye old engine bay. If I ever felt the need could always add a cooler too.

Got a good price on the take off plate to be bolted to block.


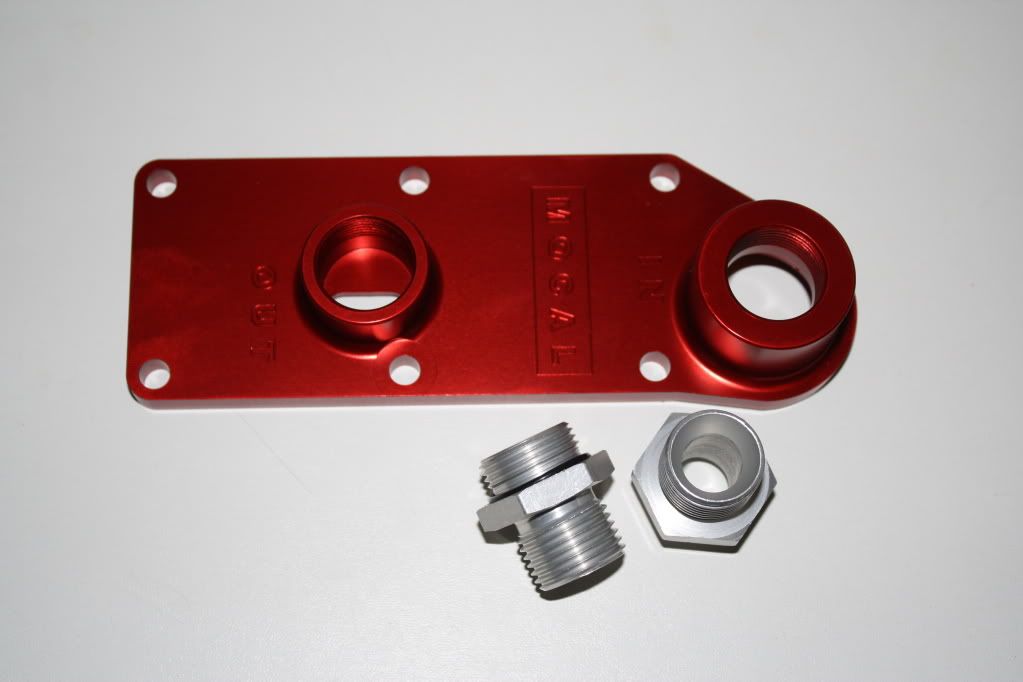
Got all my unions and bits today too:


Now for another of my wood, glue and metal, blue peter stylee mock ups  winkeye I made a mock up of a remote head so I could find a position for it.


I was going to put it behind the N/S head light but thought there's already alot going on on that side so decided against it. I then remembered that I'm going to be moving the battery to the boot freeing up the space over there. There's space behind the engine to run the pipe work so its won first prize on going there, comme ca:


Big thanks to 'Think Automotive' who supplied me with the take off plate and also a custom remote head tapped to M12 x 1.5 thread for the OEM pressure switch.

UPDATE: Head arrived and got the pressure switch fitted:


Then placed it where it will eventualy live:


I also got a new front valance. Mine was bent where it must’ve hit a kerb previously and was a bit tatty so got a nice new one. Cut some material out so that the cooler hosing doesn’t rub and fail. Loads of room there now.


Got both my head lights in and wired up, whacked the grilles on to see how it looked  :D


http://www.visionracingdevelopments.co.uk

For sale:
COP converion kits
M42 Silicone coolant hose kits
Braided brake line kits
Performance clutches
Performance brakes

PM me

visionracingdevelopments

  • Full Member
  • ***
  • Thank You
  • -Receive: 0
  • Posts: 133
    • View Profile
Super charging my M42 (UK)
« Reply #7 on: April 13, 2009, 02:14:19 PM »
Been out in the garage doing more bits and bobs, finaly built my engine stand so just gotta get the bolts to bolt the engine onto it with and an engine crane and get it up on there.

Started pulling bits off of the engine today though, removed the alternator and associated brackets (to be relocated), the OE oil filter housing and the clutch. Also did some constructive work, cleaned up the thermostat housing and fitted the new ring and gasket;  then to see how it fitted, I loosely bolted my oil take off plate onto the engine, as can be seen it still needs a fecking good clean:


Then put my exhaust wrap insulation on the.......exhaust  winkeye


(that black cable tie will be replaced for a stainless one when the new ones arrived)


Also wired up my electric fan, just need to get my 12v over there from the fuse box and will test the thermo-switch with a heat gun or something:


Just a pic of the SFS coolant hoses that I had made:


Also planing with how the charge hoses will go:


And here's my white board of thoughts and daily jobs:


Had a stab at the super charger bracket. Had a play with a thin sheet of aluminium and a piece of wood t make some sort of holder.

My idea is to have a 'square root symbol' shaped bracket to use the 4 OE alternator mounting points fot the charger to essentialy 'sit' on. The base of the 'stand' will have the out let of the charger sitting on it and subsequently have a pipe leading away from it to connect up to the FMIC pipe work. Here's some pictures any way:


My first random stab proved to be a bit too high as the pully hit my shiney new SFS hose  :nono: :


With a bit of modification  winkeye I lowered it a tad so it cleared the hose nicely:


There is bundles of room under neath for the pipe work to exit and connect to the rest:


I have an idea for an adaptor box to fit onto the back of the charger and 'convert' it to a 63mm hose to then attach the air filter, excuse the fact its lacking all meaning of the word technical but you get the idea (I hope):


A version of that random thing will the go here (all bit it with a bit of fettling):


More to come
http://www.visionracingdevelopments.co.uk

For sale:
COP converion kits
M42 Silicone coolant hose kits
Braided brake line kits
Performance clutches
Performance brakes

PM me

JoeDellio

  • Sr. Member
  • ****
  • Thank You
  • -Receive: 0
  • Posts: 266
    • View Profile
Super charging my M42 (UK)
« Reply #8 on: April 13, 2009, 03:26:50 PM »
Looks good. Id like to see a pic of the SC bracket when its done. How much $ was the hose you are using?

As far as your air filter piece, is there anyway to get the piece that fit on the SC when it was in the mini and fab something out of it?
« Last Edit: April 13, 2009, 03:29:58 PM by JoeDellio »
[SIGPIC][/SIGPIC]1995 318i

visionracingdevelopments

  • Full Member
  • ***
  • Thank You
  • -Receive: 0
  • Posts: 133
    • View Profile
Super charging my M42 (UK)
« Reply #9 on: April 17, 2009, 02:31:54 PM »
The coolant hose kit is £85 + the delivery (special price through me RRP is £130).

I am looking into how the mini induction workes but it should be a fairly simple bot to make, abit of rolled Ali with plates welded on etc.
http://www.visionracingdevelopments.co.uk

For sale:
COP converion kits
M42 Silicone coolant hose kits
Braided brake line kits
Performance clutches
Performance brakes

PM me

RouteZeroDesign

  • Full Member
  • ***
  • Thank You
  • -Receive: 0
  • Posts: 136
    • View Profile
Super charging my M42 (UK)
« Reply #10 on: April 17, 2009, 07:41:40 PM »
Very, very impressed with your work, you certainly don't hang about.

Can i ask how much your remote oil filter kit cost you?
I'd love to remote mount my filter when cleaning up my engine bay.

Ill be watching this thread closely :D

visionracingdevelopments

  • Full Member
  • ***
  • Thank You
  • -Receive: 0
  • Posts: 133
    • View Profile
Super charging my M42 (UK)
« Reply #11 on: April 18, 2009, 03:54:01 AM »
The remote head was about £20 odd from Think Automotive, they make them and supply every one else so they're the ones who can tap it for the OE pressure switch (M12 x 1.5) :)
« Last Edit: April 18, 2009, 03:52:23 PM by visionracingdevelopments »
http://www.visionracingdevelopments.co.uk

For sale:
COP converion kits
M42 Silicone coolant hose kits
Braided brake line kits
Performance clutches
Performance brakes

PM me

RouteZeroDesign

  • Full Member
  • ***
  • Thank You
  • -Receive: 0
  • Posts: 136
    • View Profile
Super charging my M42 (UK)
« Reply #12 on: April 26, 2009, 04:38:45 PM »
Thanks very much for the reply mate,
actually when i went and googled "mocal remote head", think automotive came up, so i got on their website :D

Good luck with your build :D

visionracingdevelopments

  • Full Member
  • ***
  • Thank You
  • -Receive: 0
  • Posts: 133
    • View Profile
Super charging my M42 (UK)
« Reply #13 on: April 27, 2009, 04:43:13 PM »
No worries :)


Just a small thing. I finaly got hold of an oil pressure valve for my take off plate. Was having no luck getting one from my housings and Cotswolds sorted me out with the correct part. For the record its part number: 11 42 1 432 228 and at time of purchase was £4.88 all in  8)  it also does come with O-rings fitted.

Just lubed up the plate with some oil and pushed it in:


Also started my COP conversion:

I started my COP (Coil On Plug) conversion. Big thanks to Odbod for doing the buy on the mounting plates. For those unfamiliar I used coil packs from an M52.

To bolt them on I put a washer between the bolt and coil pack, coil pack and plate (to protect the coil pack and the plate) and a washer on the other side with a nylock to help secure it:


Plug 1 needs to be modified to allow it to fit in between the rocket cover:


Now the wiring was something I was really looking forward to :roll:

I marked the plugs according to their number (1,2,3,4) and set about connecting them up to see how they fitted. Was tight but not un-comfy to get them in there as standard, but wouldn’t really suit long term IMO.

So back came the cable wrap. Irritatingly coils 1 and 2 are furthest away but have the shortest wires.


I ran coil 1 over the top of coil 2, then taped them together:


Ran them both past coil 3, taped them together:


Then up and past coil 4 and did them all together:


Ran over the connectors again with some more insulation tape:


I then decided to bolt a P clip the sticky outy bit to hold it in place.


« Last Edit: April 27, 2009, 04:51:44 PM by visionracingdevelopments »
http://www.visionracingdevelopments.co.uk

For sale:
COP converion kits
M42 Silicone coolant hose kits
Braided brake line kits
Performance clutches
Performance brakes

PM me

quinn11m20

  • Sr. Member
  • ****
  • Thank You
  • -Receive: 0
  • Posts: 389
    • View Profile
Super charging my M42 (UK)
« Reply #14 on: April 27, 2009, 06:00:54 PM »
Man thats awsome. I can't wait to see the finished project. Good Luck. And by the way Great photos.