M42 ECU Conversion: Link G4X/E36X

Author Topic: M42 ECU Conversion: Link G4X/E36X  (Read 15810 times)

bmwman91

  • Administrator
  • Legendary
  • *****
  • Thank You
  • -Receive: 33
  • Posts: 2798
    • View Profile
    • http://www.e30tuner.com/
Re: M42 ECU Conversion: Link G4X/E36X
« Reply #15 on: December 23, 2020, 02:51:24 PM »
I have been been a little quiet in here lately, but I have been working on this more. Specifically, I have been drawing up the fully detailed wiring diagram for the new harness and a pin-board to get length estimates with. Although I do not plan to make a physical pin-board since enough of the original harness will remain intact to keep things properly sized, I will probably install it into the chassis after removing all of the tape and cleaning it so that I can route all of the new stuff in-place to get the lengths exactly right. The pin-board drawing is more for determining quantities of wire to buy.

PDF links are the full-size drawings of the "thumbnail" images.

For the pin-board drawing, I started out by measuring out everything on a 100% stock harness. Dimensions probably vary a bit since these things are all 30 years old and varying amounts of tugging/abuse have been applied, but everything is likely within 1cm of where it should be.

OEM E30 M42 Harness Dimensions
http://www.e30tuner.com/assist/e36x/PinBoard-OEM.pdf


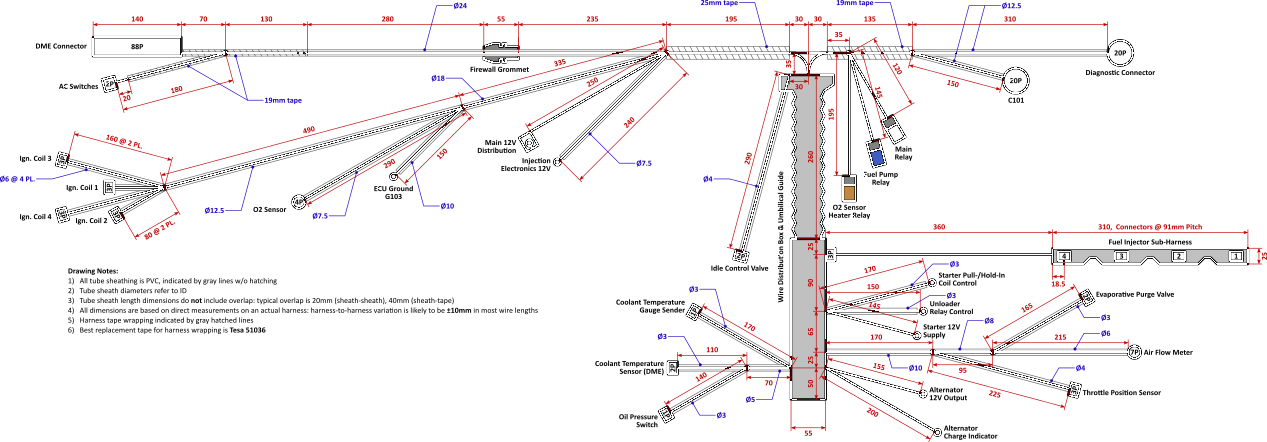
I have already posted this elsewhere, but here are the OEM E30 M42 wiring diagram and the modified one I am using currently with my MAF conversion & WBO2 on stock Motronic, in full color:
http://www.e30tuner.com/assist/m42wireharness/EngineHarness_M42B18_E30_318iS_OEM.pdf
http://www.e30tuner.com/assist/m42wireharness/EngineHarness_MM2100.pdf


Anyway, it took a fair bit of work to figure out exactly how I wanted to add & route all of the new stuff for the Link ECU. A primary goal was to have a single wire loom coming from the ECU, which means that I will need to void my warranty and solder some jumper wires inside the thing from the "extra" I/O pins on the G4X ECU and unused pins on the main 88 pin connector. Also, while it has a built-in MAP sensor, I do not want to have a vacuum line running through the firewall (both from a SMOG/visual standpoint, and just for cleanliness). So that means that I will be using a Bosch MAP+IAT sensor, mounted directly in the plenum of the intake manifold.

The other thing I had to think about a lot was the fuel injector wiring. The stock setup has a pluggable sub-harness for the injectors. The ONLY reason I can see for this is to make engine removal/installation simpler at the factory. Removing the injector harness requires removal of the upper intake manifold. In my experience, the M42 is much more easily removed/installed without the upper manifold anyway, and (*FINGERS CROSSED*) I don't anticipate removing the engine again anytime soon. With the "mess under the intake" mod, the upper manifold can be removed without messing with the TB, and is a 10 minute job. So, with that said, the fuel injector wiring will run through the little side-port in the rubber umbilical that the ICV wires previously exited from. This is the most direct route for the injectors. The ICV, MAP & fuel P&T sensor wiring will exit where the fuel injector connector used to be (with a 3D printed PEEK filler/adapter for the grommet). It just makes more sense that way.

New stuff which I will be routing through the wire box under the intake manifold:
- Oil pressure + temperature (mounted in oil filter housing where the pressure switch was, with some custom machining to adapt the existing M12x1.5 hole to take the M10x1 sensor)
- Fuel pressure + temperature (will machine an inline tee adapter for the fuel feed line)
- Manifold pressure + temperature (no long vacuum lines to mess with, and nice direct measurements in the plenum)
- Dual knock sensors (mounted to the existing knock sensor bosses on the block)
- M50 ICV (still not quite sure where or how I will mount it...it is a fair bit longer than the M42 ICV and has larger in/outlet ports)

As previously mentioned, I will be adding 4 wheel speed inputs. On top of that, I will be adding connections to the brake switch, and adding a clutch switch. The ECU supports "flat shifting" and since that only requires one additional wire to be run from the clutch switch, why not? If I am going to expend all of this effort, then I am going to take advantage of every possible feature. The only thing I do NOT plan to do is convert to electronic throttle...that is just way too much work for minimal gain in anything, at least for now.

That is a lot of typing. Here are the drawings of the new & improved pin-board & wire diagrams. These are certainly a bit busier than the OEM ones! I shudder to think about what these would look like on a modern BMW engine.
http://www.e30tuner.com/assist/e36x/PinBoard-E36X-Prelim.pdf
http://www.e30tuner.com/assist/e36x/EngineHarness_E36X-Prelim.pdf


If you are thinking "damn, this guy has a bit of OCD...he's only making one of these" then you are at least partially correct. Regardless of whether or not I actually have OCD, graphic design has always been a little side passion of mine, although I am really mostly into technical drawings rather than "art." More than that though, I have found that with wiring projects, the Seven P's of Life apply very heavily. Proper Prior Planning Prevents Piss Poor Performance. When I was younger and far less patient, wiring/electrical work was done much more ad-hoc and always ended up messy, buggy and ultimately causing many headaches. At least for me, fully documenting & detailing a project like this means that the experience will be a lot more enjoyable and likely to work on the first try. And of course, my E30 brethren might find this useful. If documenting some of this work inspires someone else to do this (or something similar) then it is all worth it.

Anyway, I got the drawings done enough today that I can finish my list of materials and start ordering wire, connectors and other supplies. The next big task will be to completely tear-down the spare donor harness and clean it up. There is an unreasonable amount of "goo" all over it from the decaying harness tape, which will probably require me to go through at least 500mL of isopropyl alcohol. I have already been through this once when fully rebuilding/modding the harness that is in the car now, and it is a pretty tedious task!

Can you guys recommend some sources of good molded hoses? I will need some 90 degree elbows and whatnot, probably with a pretty tight radius, to make the M50 ICV work. I'll also need some reducers and other things like that. The M5x vacuum hoses for the ICV might work if I hack them up, but they seem to be needlessly expensive.

Lastly, what are your thoughts on the following. The opening in the rubber umbilical guide where the ICV wire exits is sized for a ~4.5mm OD wire sheath. In order to run the 5x16ga wires for fully sequential injection, I need to use a sheath that is ~9mm OD. I have test-fitted this, and physically I can get it to run through there. However, I have some concern that over time the rubber may split open, being stretched to ~2X its original circumference. Information I have found online indicates that vulcanized rubber can be stretched to well past 3X its original length without issues, but if anyone here happens to know a lot about rubber compounds I'd appreciate thoughts on whether I should reconsider this. It really is the ideal spot to route the injector wiring through!

06/05/2011 - 212,354 miles
Visit HERE for a plethora of 318iS stuff and some other randomness.  Would you say I have a, plethora, of pinatas?

bmwman91

  • Administrator
  • Legendary
  • *****
  • Thank You
  • -Receive: 33
  • Posts: 2798
    • View Profile
    • http://www.e30tuner.com/
Re: M42 ECU Conversion: Link G4X/E36X
« Reply #16 on: December 23, 2020, 02:57:28 PM »
Quote
Question...I have seen some places mention that MAP sensors (and oil pressure) should not be mounted on the engine itself as the vibrations will cause premature failure. Other places make no mention of this. What is your thought on it?

Like so many things its on a spectrum, the answer is if you can remove mount the sensors you they will last longer.  The more high-frequency vibrations your motor has, the worse its going to be.  I've had customers direct mount them and they are fine.  We hard mounted them to some Rousch v8's in early Grand-Am days, they wouldn't last a race that way.

Bosch motorsports sensors are great, for your application just find their OEM application. 0261230030 1 bar TMAP is used on all sorts and will work great.
The PST-F1 is just a Mazda CX9 part.

That KS4 is super, super common.  Just google it.

I can't comment on whether the ones bought directly from Bosch Motorsports are in some way superior, but in my experience the OEM sourced ones have never failed me.  And its really, really hard to mess up something like a KS4.  If I was running a pro-racing team, I'd buy them from Bosch Motorsports for the peace of mind.  On my car?  I'd find the cheapest alternate supplier version - not to save money, just to see for myself if there's any difference in performance or longevity.


Great info, thanks. Do you have a PN for the CX9 oil P+T sensor? I can't seem to find it.

I am going to take my chances with mounting the oil & MAP sensors onto the engine. Again, it is on stock hydraulic mounts and will not be operated in an excessively harsh setting, so I figure it is at least worth a shot. Only the MAP sensor would really be a big problem if it crapped out, and it looks like it was designed to be installed in a manifold anyway.

06/05/2011 - 212,354 miles
Visit HERE for a plethora of 318iS stuff and some other randomness.  Would you say I have a, plethora, of pinatas?

apexspeedtech.com

  • Newbie
  • *
  • Thank You
  • -Receive: 0
  • Posts: 6
  • Freshly Registered!
    • View Profile
Re: M42 ECU Conversion: Link G4X/E36X
« Reply #17 on: December 25, 2020, 02:19:30 PM »
Come to think of it the Mazda ones are for boosted applications.  But there's another Bosch one used on a lot of bikes that would be perfect:

https://www.ebay.com/itm/Bosch-1-Bar-TMap-Manifold-Absolute-Pressure-Sensor-with-IAT/264607384540?epid=1323920385&hash=item3d9bd443dc:g:gHsAAOSwoPJeJ-8E

bmwman91

  • Administrator
  • Legendary
  • *****
  • Thank You
  • -Receive: 33
  • Posts: 2798
    • View Profile
    • http://www.e30tuner.com/
Re: M42 ECU Conversion: Link G4X/E36X
« Reply #18 on: December 28, 2020, 10:59:55 AM »
I spent a number of hours yesterday tearing-down my spare harness and cleaning it. It took nearly a pint of 99% isopropyl alcohol to get the tape residue and grime off of all of the wires. If you have ever worked on one of these old harnesses, you know the pain of dealing with that nasty tape adhesive! It was a task that I had not been looking forward to one bit, since I had done it once before at the start of 2020 when I cleaned up and modded the harness that is in the car now (integrated MAF & WBO2 wiring, properly routed/trimmed ignition coil leads: all for the stock ECU). This time was a little easier since I COMPLETELY took the harness apart...I completely de-pinned the ECU plug & relay sockets, chopped off all of the JPT plugs for the various sensors & actuators and permanently removed all but 5 terminals from the diagnostic plug (leaving only the ones needed for SI light reset & the tach signal). Most of the wire sheaths were removed, with only the little pieces near C101 and the diagnostic plug are going to remain. The sheaths on the main power & ground wires will be removed when I chop apart the splices, since I need to add / change wires in those bundles. My pile of "scrap" harness wires is as large as what remains! I took some pictures, but they are at home on my camera, so I'll see about posting some of those up later today.

As of last Thursday, my big order for new wire, parallel splices, heat shrink tubing & new PVC sheathing have shipped, so I should have a big pile of new stuff to start roughing-in this week. A big beef I have had with the harnesses is that a lot of wires are all tangled & twisted. This is why I completely took the harness apart...all wires will be bundled a LOT more neatly, with no needless weaving/twisting, no loop-backs and more than a dozen splices completely removed. Every signal / analog wire that ran from the ECU to the wire box has been removed since they all had little splices on them in the wire box. This was done to make harness assembly easier...pig-tails from each connector were made, routed in to the box and then joined to the long wire from the ECU, rather than running a single wire and having to assemble the connectors onto the ends at the end. Also, I chopped off all of the connectors (except for the crank & cam position sensor ones, those are fine the way they are) because they were heat-staked to prevent terminal removal. You can actually release the terminals if you knock out the little staked sections with a hobby knife, but that leaves openings in them right at the edge of the boot. Maybe I will take some pictures of this, just in case anyone is interested.

Other than roughing-in the wires, not much else will be done until I can yank out the existing harness and put this disassembled one into the car. I am going to size & route all of the new wires in-place before installing any connectors, tape or other fixings. A big pet peeve I have is that all of these are "too long" inside the car where the main loom runs to the ECU. I'd guesstimate that they are close to 10cm too long, requiring a bunch of bending & brute force to cram the wires out of the way to get the ECU plug into place. As it is, 75% of the wires going to/from the ECU have been removed and new wires+terminals have to be installed, so I will chop the terminals off of the remaining wires and cut them to a proper length once I have it all dry-fitted in the car.

More to come.....

06/05/2011 - 212,354 miles
Visit HERE for a plethora of 318iS stuff and some other randomness.  Would you say I have a, plethora, of pinatas?

bmwman91

  • Administrator
  • Legendary
  • *****
  • Thank You
  • -Receive: 33
  • Posts: 2798
    • View Profile
    • http://www.e30tuner.com/
Re: M42 ECU Conversion: Link G4X/E36X
« Reply #19 on: December 28, 2020, 06:38:34 PM »
Here's a picture of what remains of the original harness that will be used going forward...


...and here is what is being discarded. Well, most of it. I am keeping the relay sockets, which were removed for cleaning & wire re-routing.


Part of me was tempted to just build a whole new harness from scratch, but that would have ended up being a few hundred dollars in needless extra cost. The stock wire has PVC insulation as far as I can tell, which is not amazing or anything, but it is perfectly fine for an engine harness. The new wire I have ordered all has Tefzel (ETFE) insulation, which is considerably sturdier while also allowing for thinner wall thickness. Smaller overall wire diameter makes for slightly easier routing, and since I am going to be increasing the number of wires coming from the ECU plug by 28, I want to have some extra help in being able to fit them all out of there!

06/05/2011 - 212,354 miles
Visit HERE for a plethora of 318iS stuff and some other randomness.  Would you say I have a, plethora, of pinatas?

bmwman91

  • Administrator
  • Legendary
  • *****
  • Thank You
  • -Receive: 33
  • Posts: 2798
    • View Profile
    • http://www.e30tuner.com/
Re: M42 ECU Conversion: Link G4X/E36X
« Reply #20 on: December 29, 2020, 10:15:29 PM »
Today I started in on some CAD for adapting the Bosch pressure/temperature sensors to fit on the engine. The one for the oil will go in the oil filter housing where the stock pressure switch was. Since the existing hole is M12x1.5, and the sensor is M10x1, I need to drill it out a bit larger and install a thread repair sleeve. It is also a bit longer than I'd like since (ideally) the thermistor tip in the sensor would be in the actual flow of oil. I can't trim it enough to get the sensor that far in, but I can certainly get it a bit closer. I got out the calipers and made some measurements with which I modeled the threaded boss area. The main limiting factor for pushing the sensor further in is the big open cavity inside where the oil bypass valve is (the one that should never open unless somehow the filter gets totally clogged).


So with a little trimming that can all be done pretty easily on a manual mill, here's how the sensor will end up fitting in there.


For the fuel sensor, I am planning to have a little inline tee fitting CNC machined from some 7075 aluminum rectangular bar stock I have laying around. This will install into the 8mm ID hose that feeds fuel into the rail, as close to the rail as I can get it. I'd expect the fuel to heat up minimally overall since it flows at a fairly high rate and has a lot of metal tubing to dump heat from between the front & rear of the car, and it probably does not spend enough time in the rail to significantly heat up much more after the sensor, so I figure I will get a decent reading of it like this. The other option was to get a spare fuel rail and have a friend TIG a little threaded boss onto it, but that seems very unnecessary, and would be a pain in the butt to access if I needed to replace the sensor.


The other open items I have are to figure out where & how to mount the M50 ICV, and how to mount the MAP+IAT sensor. I'd like to fit the ICV in approximately the same location as the original, but it is pretty tight and will likely require even more custom machining. The other option is to mount it vertically in the open(ish) area behind the intake boot and a little to the left of the intake manifold. For the MAP+IAT, I am thinking I am going to mount it on the rear-most sloped face on the top of the intake manifold since that is the only spot I where I am confident that it'll clear the hood insulation. Maybe I will try sticking some foam blocks on the top flat part to see if I can clear the insulation closer to the middle, but it seems iffy. Either way, it needs 9~10mm of material thickness to get a seal with the o-ring it uses, so I will need to machine a little mount plate or flanged sleeve or something.

06/05/2011 - 212,354 miles
Visit HERE for a plethora of 318iS stuff and some other randomness.  Would you say I have a, plethora, of pinatas?

bmwman91

  • Administrator
  • Legendary
  • *****
  • Thank You
  • -Receive: 33
  • Posts: 2798
    • View Profile
    • http://www.e30tuner.com/
Re: M42 ECU Conversion: Link G4X/E36X
« Reply #21 on: December 31, 2020, 08:37:11 PM »
I started doing some basic routing and roughing-in of new wire runs today. There are still a number of items and some of the heavier gauge shielded cable which I am waiting to receive, but I can get a lot of stuff into place while I wait. The plan is to just get the wires in there, but I will not be crimping/splicing/taping anything at all until I can get this fitted into the car. Once I do that, then I can make the final decisions about lengths of things and begin making permanent crimps. I also want to see how things actually end up being positioned, specifically some of the big parallel splice bundles. The big one with all of the switched 12V outputs from the main & fuel pump relays needs to have one of its smaller wires replaced with a longer run, so I either need to cut the existing splice off and make a new one with the longer wire, or just make a butt connection to extend it. The latter is far easier, but the former is cleaner. I only really pause thinking about this because the exposed copper strands from that splice are all greenish, and if the oxidation extends too far up into the wires then I might have to trim off a lot more than I want (or attack them with some fine sandpaper). Overall this is just me having fun over-thinking things, which I am sure you have figured out by now!

Here's what the big wire box looks like with new runs pulled through to it. The existing wires were fine, but they all had those obnoxious splices + rubber caps which ate up almost 50% of the available volume. I understand why they did it that way, to make mass production easier, but I don't want to have to deal with the mess. There are some other splices like that in other places in the harness which I am also removing.


Here's where I left things today. I am going to take it easy and spend the evening relaxing and enjoying the last few hours of 2020. It's been a rough year in a lot of ways, so I can't say I will miss it too much!

« Last Edit: December 31, 2020, 08:41:45 PM by bmwman91 »

06/05/2011 - 212,354 miles
Visit HERE for a plethora of 318iS stuff and some other randomness.  Would you say I have a, plethora, of pinatas?

bmwman91

  • Administrator
  • Legendary
  • *****
  • Thank You
  • -Receive: 33
  • Posts: 2798
    • View Profile
    • http://www.e30tuner.com/
Re: M42 ECU Conversion: Link G4X/E36X
« Reply #22 on: January 05, 2021, 03:04:02 PM »
More progress...

I finished designing a small PCB to condition the 4 wheel speed sensors' signals. It measures 32x32mm, with most of that size being driven by the wire-to-board terminal blocks. I'll 3D print a small enclosure to secure the board & wires, which will be mounted up near the knee bolster inside the dash next to the ABS computer. These little boards are in production now, and I expect to have them in a week or so. The minimum order quantity is 5, so I will have some extras that I can sell (bare board, or assembled) if anyone with a stand-alone ECU wants a quad-VR conditioner board.


Other than that, I have not done too much since the last post since I am waiting on the last of the shielded cable & some connectors to arrive.

06/05/2011 - 212,354 miles
Visit HERE for a plethora of 318iS stuff and some other randomness.  Would you say I have a, plethora, of pinatas?

bmwman91

  • Administrator
  • Legendary
  • *****
  • Thank You
  • -Receive: 33
  • Posts: 2798
    • View Profile
    • http://www.e30tuner.com/
Re: M42 ECU Conversion: Link G4X/E36X
« Reply #23 on: January 08, 2021, 12:26:34 AM »
Today's updates...

I finally found a cheap crimp tool that works really well with the 2.5mm (unsealed) terminals. It is not really ideal for the JPT and SPT type terminals where the insulation grips are parallel and supposed to crimp into an "M" shape, but they are fantastic for ones like this with staggered insulation grips. They are low-leverage ones, and the crimps take 2 operations, but that is fine since I do not need to do too many of these.
Crimpers: https://www.bmotorsports.com/shop/product_info.php/cPath/111_112_170/products_id/364

Here is how my new wire runs for C101 wound up (oil pressure light will now be controlled by the ECU, and I ran a new coolant gauge sender wire to eliminate the splice in the wire box). It is not production quality, but it is plenty good for this.


Here is what the crimps look like with the "wrong" tool.


Next, I played around a bit with different methods of shield termination. The factory wiring strips the cable sheath back a number of inches, twists the exposed shielding into a bundle, sticks plastic tubing over it and then crimps all of them together with a grounding wire outside of the DME connector housing. I have never liked that arrangement, since all of the sensitive sensor lines are packed right in there next to the unshielded lengths of ignition lines and stuff. So, I decided to see how compact of a termination I could make really close to the end at the DME terminals. It looks like I can get within a few millimeters.

(top) A parallel crimp is the simplest way to go, but it is just too bulky once you put heat shrink over it.
(middle) Stripping the sheath off and soldering a ground run is very compact, but it leaves jagged soldered edges poking against the central conductor's insulation which could poke through. No good.
(bottom) Stripping the sheath and folding the shield braid back, and THEN soldering the ground termination made the cleanest arrangement. It is only marginally larger than the middle setup, and it is what I plan to go with.


Here's how I will be doing all of the shields. First, strip 10mm of outer sheath off. Then bend the shield braid back over the outer sheath and trim it down to 5mm.


Next, get your ground termination wire and strip enough insulation so that you can wrap the conductor around the folded shield 2-3 times (2 seems like enough). Separate 4-5 strands for the lashing, and trim the other ones down to ~5mm.


Tightly bind the ground wire onto the shielded area. TIGHT! Also make sure that none of the strands (shield or ground) are poking up or out. It should all be nice and smooth.


Solder it all together. Don't use too much; you do not want blobs or bulges. Just use enough to wet everything. Normally, I say that solder has NO place in an automotive wire harness, and I generally abide by that. I’d certainly never use solder to splice conductors together or attach a terminal, but shield terminations are a bit different in many ways. Also, sometimes space constraints demand it, and all of these joints will be inside the cabin where temperatures and the elements won't be a factor nearly as much as under the hood. Additionally, I will be cleaning all of these with alcohol to remove as much of the flux as possible (flux will slowly attack the wire and insulation, although it would probably take decades to actually be any kind of an issue).


For those who are interested, here is NASA's guidance for workmanship standards in wire harnesses (or some of it at least). Being that NASA sends ships to space, and I am working on God’s Chariot which will fly majestically in the heavens, it makes sense to draw from their expertise.
https://workmanship.nasa.gov/lib/insp/2%20books/links/sections/407%20Splices.html
https://workmanship.nasa.gov/lib/insp/2%20books/links/sections/210%20Shield%20Crimps.html
https://workmanship.nasa.gov/lib/insp/2%20books/links/sections/401%20General%20Requirements.html


I roughed-in a little more of the wiring as well, specifically for the fuel injectors which will be controlled fully sequentially. The wiring for them now runs through the opening where the ICV wires used to come out. It is the most direct route, and it allows me to salvage the 2.5mm2 red/white wire that comes out of the fuel pump relay to power them (it is long enough to reach the injector wire box via this route, but not long enough to go down into the main wire box and then back up).


It was a chore to stuff this 8mm sheath through the opening which was designed for a 4mm sheath. I am hoping that this will not lead to an issue in the future, like splitting open. From the technical info I can find online, it sounds like vulcanized rubber can easily stretch to 5-10x its original length and not creep or suffer other issues. I didn't take pictures of how I got it in there, but it involved folding an end length-wise, stuffing it in about an inch, forcing as many wires into the un-folded side as possible and then pulling that part through with pliers to get it in there at full diameter. Also, Windex makes for a great lubricant...very slippery, not really harmful to anything and it dries fast!


I also replaced the rotten shrink tubing on most of the lugs. For the big ones, I used some 4:1 ATUM shrink...you can use a size large enough to slip over the lug, and it'll still cinch down onto the wire when heated. Most shrink tubing is 2:1 ratio, but if you look around online you can find the higher ratio stuff (I bought a lot of my wire and materials at prowireusa.com).


My new favorite type of splice is the parallel splice. They are much more compact than butt splices, and I really like that the working conductors are in direct contact with each other (they overlap inside the sleeve). I needed a longer wire run for the ICV since the fuel injector wires now occupy its old exit point, and the ICV power wire will now go down through the main wire box. Although I swore I would not have any splices in the harness at the beginning, splicing on some more red-white wire from an old scrap harness was just a much more practical solution than chopping off the existing parallel splice holding the bundle of red/white wires together. Although I have plenty of large parallel crimp sleeves, the factory crimps are really nice, and most of the copper wires are pretty heavily oxidized at this point, even many inches under the insulation. It would be a chore to clean up all of the wires to get a quality connection with a new splice, so just doing it for one little wire was the way to go.


Here's what the splice looks like before covering it up. A very good parallel splice crimper which is also very economical is in the link below. It is the one I am using.
https://www.parts-express.com/pro-crimp-tool-for-non-insulated-terminals-18-6-awg--360-644


Also, I received a bunch of goodies today! For some reason, knock sensors are a lot bigger than I thought they would be. That reminds me of some British humo(u)r...
https://www.youtube.com/watch?v=yHLZ4Rz2Kgk


06/05/2011 - 212,354 miles
Visit HERE for a plethora of 318iS stuff and some other randomness.  Would you say I have a, plethora, of pinatas?

bmwman91

  • Administrator
  • Legendary
  • *****
  • Thank You
  • -Receive: 33
  • Posts: 2798
    • View Profile
    • http://www.e30tuner.com/
Re: M42 ECU Conversion: Link G4X/E36X
« Reply #24 on: January 12, 2021, 12:12:06 AM »
I had a chance to play around today and start figuring out where things would go and how they would fit. First, I used a 3D print of the MAP sensor and connector (Bosch provides 3D models thankfully) to see if I could clear the hood insulation with it mounted on top of the intake plenum. My preferred location would have been the flat-ish area right beyond the throttle body, but there just is not enough clearance there and I don't want to chop out the insulation (although that would probably be the simplest solution. The next best place seemed to be on top, more or less aligned with the runner for cylinder 3.

To check clearance, I taped my cheap USB "endoscope" camera in various places and looked at how things fit with the hood closed. You can get these cameras on Amazon for like $20. They are sort of useless for checking inside cylinders and stuff since you can't control the articulation, but they come in handy in a lot of other places.


Here's the clearance with the sensor sitting on top of the cosmetic rib things on the plenum. I am going to machine a depression there to give this thing a nice flat surface to sit on, and to install a little sleeve thing to allow the o-ring on the sensor to seal (I removed the thermistor & inlet portion of the sensor that stick out the bottom before printing).


To gauge how much clearance I actually had, I adjusted a piece of tape until it just touched the insulation. With the MAT sensor there, I have 3mm of clearance at the tallest part. I expect to gain another ~1.5mm when I machine down the ribs.


I investigated M50 ICV placement a bit more as well. It looks like I can keep it in the same location (roughly) as the stock one, with a little modification to the stock metal bracket and a small machined part that allows that bracket to move up ~7mm and toward the rear by ~20mm based on eyeball measurements when holding stuff in place. I couldn't get any pics, but once I 3D print some test parts I can show you what I mean.

The other main thing that I started looking into, and determined that I have a problem with, is the front knock sensor. If you have never handled one before (like me), they are a lot bigger than you might think. Additionally, the ones I bought are even larger because they have the 2-pole plug molded into them, at a slight upward angle. The stock ones have the same size body, but no giant plug (or receptacle that needs to also fit onto it). Here's the existing boss where the front knock sensor goes. Thanks to the engine mount arm, water pipe, alternator mount bracket and oil pressure switch, it is pretty crowded in the area.


The only remotely plausible way to get the sensor + plug + boot in there is to position it like this. It is not jammed against either of the brackets, but there is at best 0.5mm of wiggle room. If I skipped the rubber boot and just used some wire seals instead, I think that it would likely be OK, but I really would prefer not to skip the boot since I have to tie the cable's shield to one of the terminals and don't want it exposed.


Furthermore, the oil pressure + temperature sensor is fairly large thanks to its connector, and since I am going to skip machining the oil filter housing and just use an M12 to M10 adapter fitting, the sensor will stick out even further than the pressure switch. Boot or no-boot, I don't think that the knock sensor can go here.


If I wanted to have the right amount of clearance for it, it would need to point this way, and the oil sensor could not possibly go here.


So that brings me to a decision between 2 options.

Option 1) Install the oil sensor in the back of the head where there is an M12 plug which I think (still not sure, trying to confirm) is for the head's main oil gallery. There is enough room between the head and firewall that the sensor, adapter and connector will fit fairly well. This way, I can keep the knock sensors I have and use them.

Option 2) Put the oil sensor in the oil filter housing, but get stock M42 knock sensors. I assume that the sensors themselves are either approximately the same as the ones I have, or at the very least tuned approximately right to work with my bore size (87.5mm, vs 84mm stock). The stock sensors are a lot more compact since they just mold the wire in and have the connector at the end of the small harness (same connector as the sensors I have too). In fact, the Bosch branded stock ones are a little cheaper than the KS4P sensors I already have, which is a big plus. I am 99% sure that these will enable everything to fit in there, with the only drawbacks being that the integrated harnesses will make things a little cluttered and these will probably become NLA at some point.


That's it for today. Progress is going to be a little slow as I make measurements and finalize positioning for things, but at least it all looks fairly plausible at this point.

06/05/2011 - 212,354 miles
Visit HERE for a plethora of 318iS stuff and some other randomness.  Would you say I have a, plethora, of pinatas?

bmwman91

  • Administrator
  • Legendary
  • *****
  • Thank You
  • -Receive: 33
  • Posts: 2798
    • View Profile
    • http://www.e30tuner.com/
Re: M42 ECU Conversion: Link G4X/E36X
« Reply #25 on: January 13, 2021, 10:00:50 PM »
I got a little more done today, this time focusing on the ICV and how to mount it. Thankfully it does look like I can position it behind the intake manifold like the original one, although it is a tight fit!

Here is how it will sit (solid) relative to where the stock bracket holds the ICV (transparent).


This is how the new one will look compared to stock.


It is a part that can pretty easily be laser cut from some 3/32" (2.4mm) mild steel sheet and then bent in a vise.


As far as being sure that it works, I 3D printed a number of test parts to hold the M50 ICV. Looking at the M42 and M50 ICVs side by side, you can see how much longer the M50 one is.


It took a few tries to get things exactly where I wanted them.


Here's the final 3D printed test bracket assembled onto the ICV and grommet.


You can see that it is a TIGHT fit back there, but there is enough clearance everywhere. This thing sort of nests into the manifold runners a little, but there are 3-5mm of space all around. I have no idea how awful it will be to get the lower hose on there, but I guess I will find out. Selecting hoses and adapters is the next thing I need to look into, but now that it is in place I can narrow things down a little.


« Last Edit: January 13, 2021, 10:03:59 PM by bmwman91 »

06/05/2011 - 212,354 miles
Visit HERE for a plethora of 318iS stuff and some other randomness.  Would you say I have a, plethora, of pinatas?

monty23psk

  • Legendary
  • ******
  • Thank You
  • -Receive: 17
  • Posts: 1291
    • View Profile
Re: M42 ECU Conversion: Link G4X/E36X
« Reply #26 on: January 14, 2021, 08:46:39 PM »
when I mounted the m42 ICV using the silicone hose and removing the heater plate, inverted the mounting point for the ICV. I am going to look for a picture of it.
Alex  88 m5 | 91 318is | 19 Subaru Ascent
BMW Tool Rentals & Fender Roller

monty23psk

  • Legendary
  • ******
  • Thank You
  • -Receive: 17
  • Posts: 1291
    • View Profile
Re: M42 ECU Conversion: Link G4X/E36X
« Reply #27 on: January 14, 2021, 08:57:39 PM »
Here is the pic from when I delete the mess under the intake delete in 2011.

IMG_8814
Alex  88 m5 | 91 318is | 19 Subaru Ascent
BMW Tool Rentals & Fender Roller

bmwman91

  • Administrator
  • Legendary
  • *****
  • Thank You
  • -Receive: 33
  • Posts: 2798
    • View Profile
    • http://www.e30tuner.com/
Re: M42 ECU Conversion: Link G4X/E36X
« Reply #28 on: January 15, 2021, 10:28:01 AM »
Which part of the mount did you invert?

06/05/2011 - 212,354 miles
Visit HERE for a plethora of 318iS stuff and some other randomness.  Would you say I have a, plethora, of pinatas?

monty23psk

  • Legendary
  • ******
  • Thank You
  • -Receive: 17
  • Posts: 1291
    • View Profile
Re: M42 ECU Conversion: Link G4X/E36X
« Reply #29 on: January 15, 2021, 10:29:25 PM »
I can't recall exactly but I believe it is the bracket that attaches to the intake, or maybe I bent it to allow the ICV to sit better with the hose coming in from a new direction. It was over 10 years ago. I am currently out of town but if you need me to confirm, I can do so Tuesday.
« Last Edit: January 15, 2021, 10:33:02 PM by monty23psk »
Alex  88 m5 | 91 318is | 19 Subaru Ascent
BMW Tool Rentals & Fender Roller