Author Topic: Suspension and Driveline Overhaul 2016 (Photo Log)  (Read 12559 times)

bmwman91

  • Administrator
  • Legendary
  • *****
  • Thank You
  • -Receive: 33
  • Posts: 2798
    • View Profile
    • http://www.e30tuner.com/
Re: Suspension and Driveline Overhaul 2016 (Photo Log)
« Reply #15 on: March 12, 2016, 01:18:32 PM »
Good question. The biggest drawback is that the viscous types wear out much faster than clutch types if you drive them hard. The heat that is generated when there is a slip condition breaks down the viscous fluid pretty rapidly, and  the thing becomes an open diff. I do agree that the operation will probably feel smoother, but it isn't a reliable setup in my opinion, at least not for any sort of performance driving.

And yes, good suggestion about the OEM Torsen units. If I can find one from a 1999 Z3 2.8L Auto it will have the 4.10 gearing, and I think that it just requires the E30 diff cover and output flanges. Unfortunately, those are pretty hard to find! Alternatively, I can probably find one with any of the other ring/pinion ratios and have the 4.10 parts swapped in since I would want it to be professionally rebuilt before use anyway.

06/05/2011 - 212,354 miles
Visit HERE for a plethora of 318iS stuff and some other randomness.  Would you say I have a, plethora, of pinatas?

bmwman91

  • Administrator
  • Legendary
  • *****
  • Thank You
  • -Receive: 33
  • Posts: 2798
    • View Profile
    • http://www.e30tuner.com/
Re: Suspension and Driveline Overhaul 2016 (Photo Log)
« Reply #16 on: March 12, 2016, 10:24:26 PM »
So, it looks like we are at the end of the overhaul (for now). This is probably the most images I have ever posted in a single thread lol.


The project is finally done! Six hours of wrenching this morning/afternoon got the last of it buttoned up, and it's on the road again.


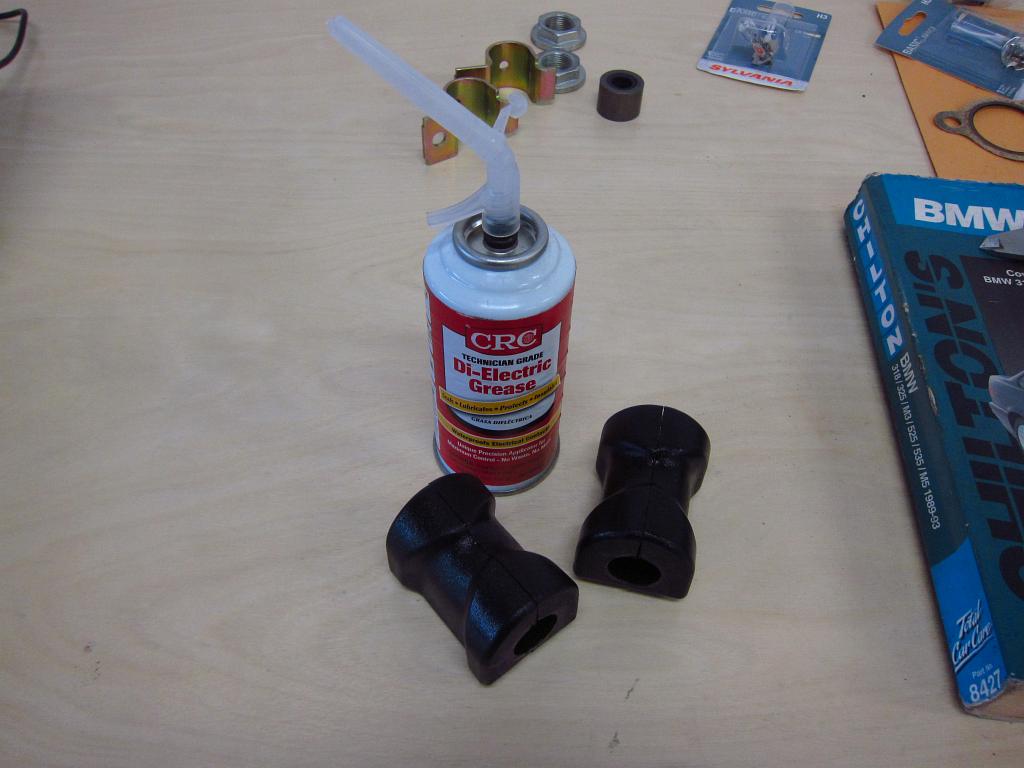
What all did I do today? Well, I am glad that you asked (I know you did, don't lie). Well, I did a couple of things that I didn't take pictures of. For one, I removed the rear brake discs so that I could wipe off excess anti-seize from the parking brake shackles and pull the cable ferrules out to apply some to them. I also took the reinforced sway bar brackets off so that I could apply a little bit of silicone grease to the inside of the bushings. After that I put the exhaust back on the car and tightened the big bolt that secures the diff mount to the chassis (I used the jack to lift the diff up before tightening).

The topic of greasing stock rubber bushings seems to be one of those topics that nobody really has a solid answer for and it causes lots of debate. Overall, I am of the opinion that it is probably unnecessary unless specified by the factory. You want to be particularly careful not to use any pretroleum- or lithium-based lubes on the rubber bushings because it is going to shorten their life. Silicone lube is fine in most cases, and is what I used. So, why did I grease them? Well, remember that with any suspension bushing that involves a moving part through it, you absolutely do not want to tighten it down until the car is resting on the wheels with the suspension in its normal neutral position (don't just lower the car onto the wheels, roll it around a little so that the wheels settle). In this case, I didn't feel like dicking around under the car trying to tighten up stuff with it sitting down on the ground, so I lubed these bushings to allow the sway bars to move to the suspension's resting position without applying any undesired torque to the bushings. Recall that for the control arms and rear trailing arms, I did move the wheels to their normal position before tightening things up, and I did it without lube since those are much more critical.

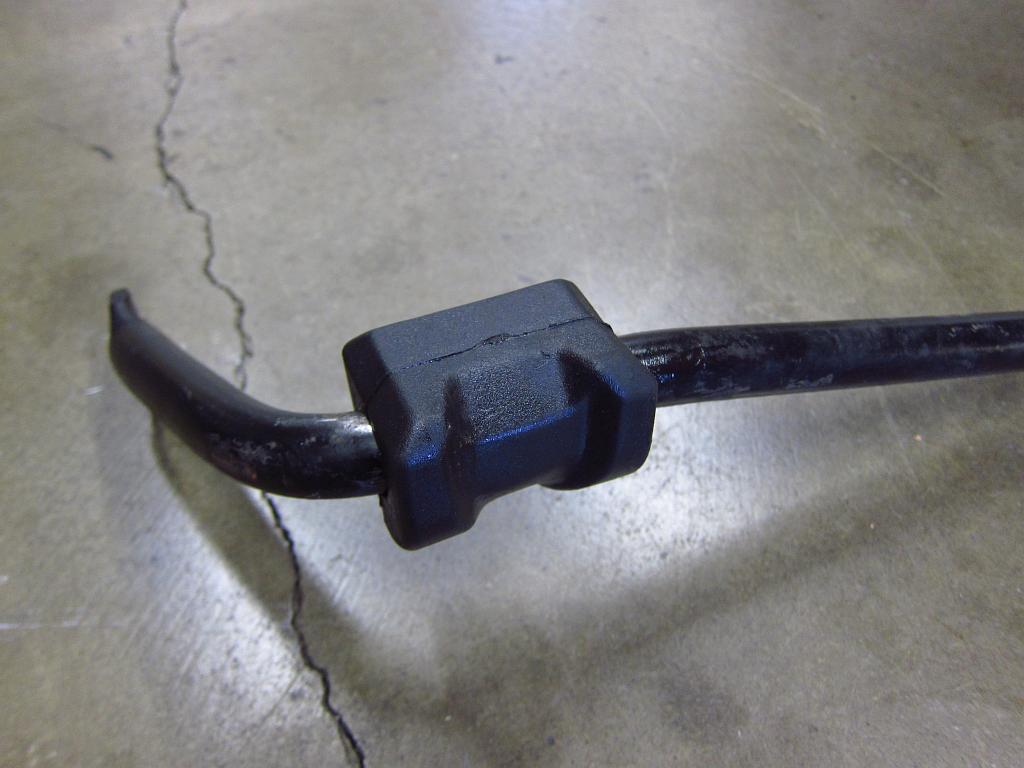
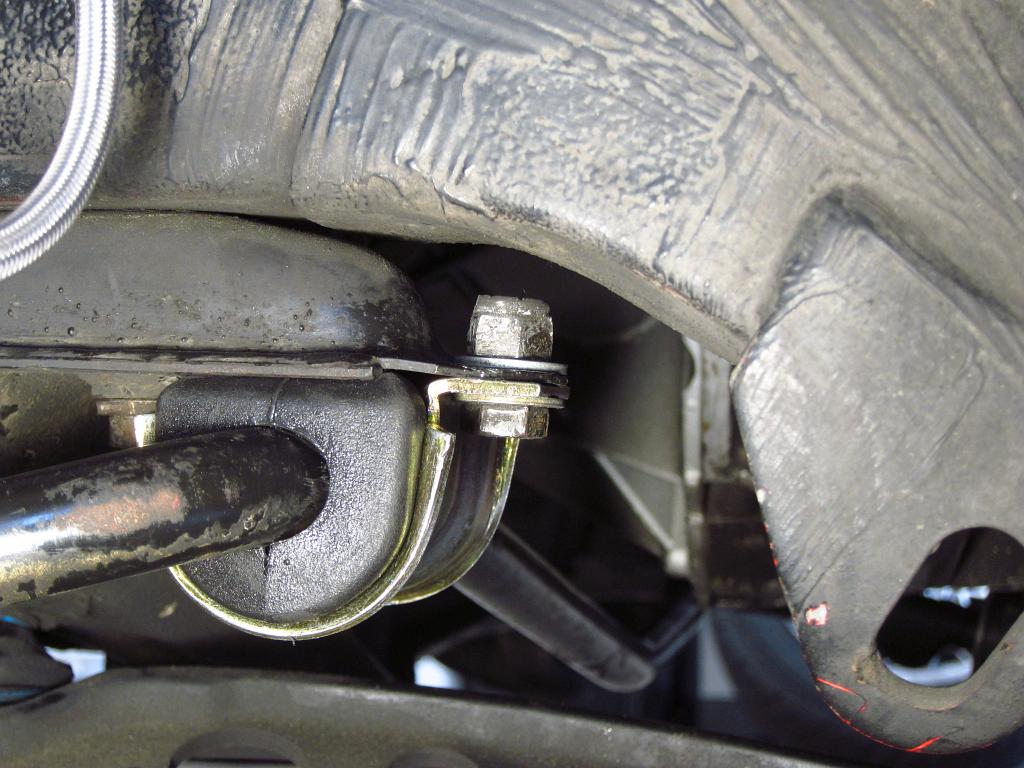
Replacing the front sway bar bushings is a bit of a pain if you are using stock ones. I put a TINY amount of lube on the outside to allow them to slide into the shackles, and I put a little on the inside where they contact the bar as well. The rubber bushings need a lot of squeezing to get things into place! They have an orientation as well. Notice the chamfered side...this goes on the rearward side to clear the protruding portion of the subframe.


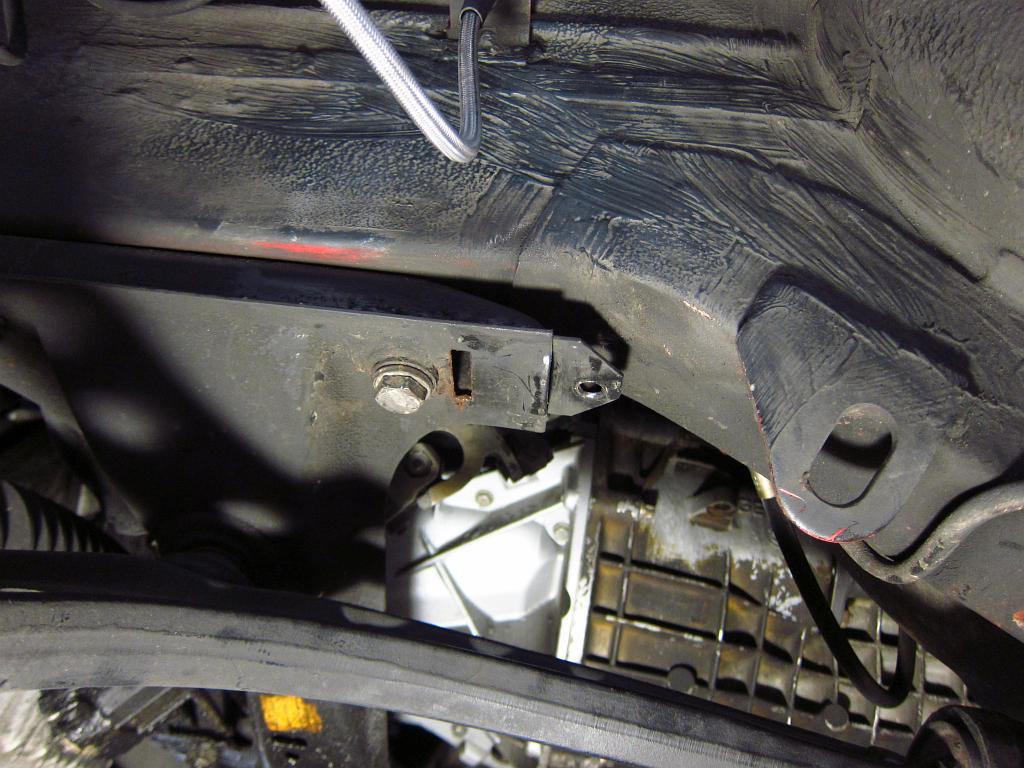
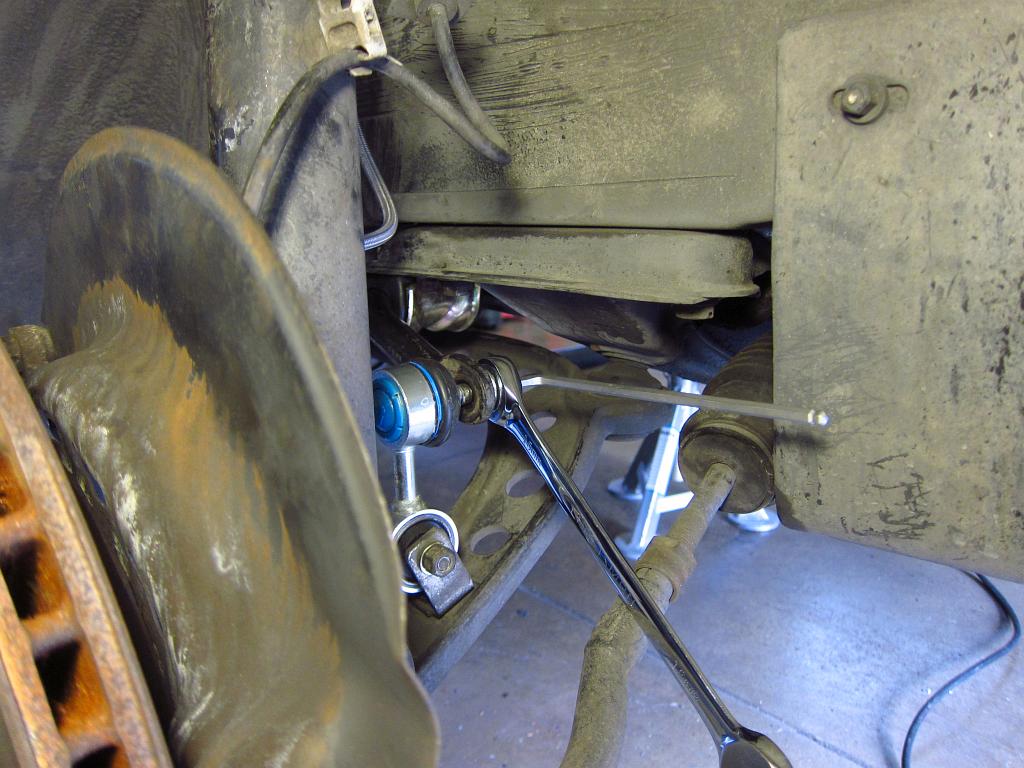
Getting the bar into place is super easy. You can unbolt one or both control arm lollipops to maneuver it into position.


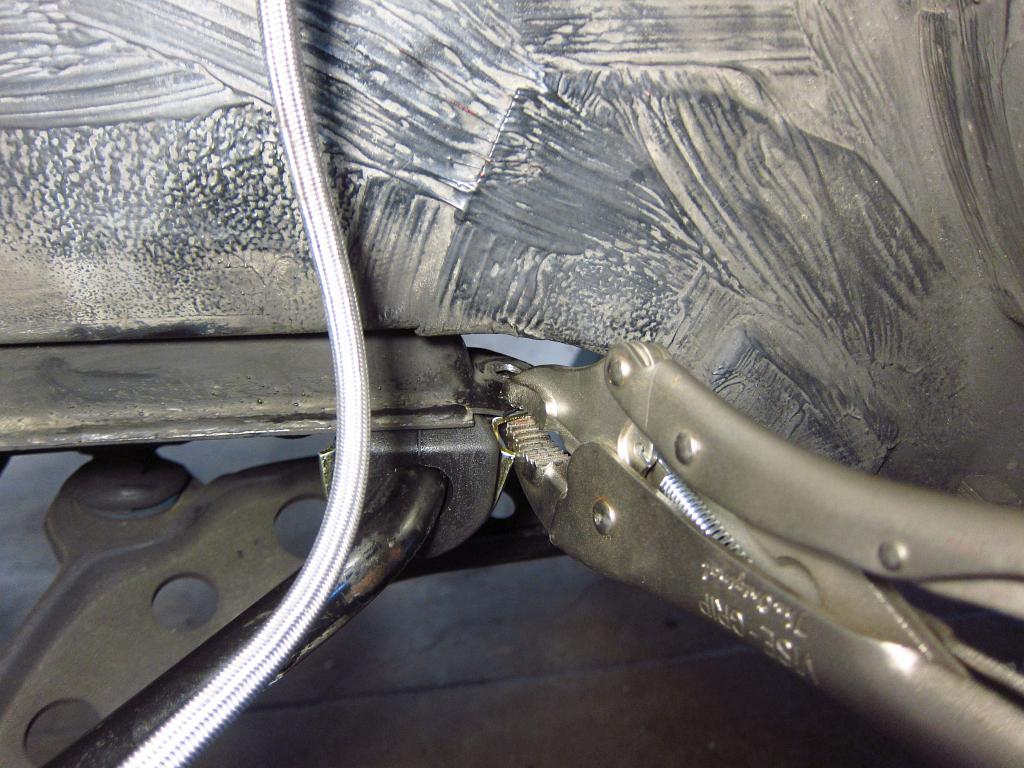
Getting the shackle into place is a little bit of a chore. I have had great success (/Borat) using a floor jack (with pad removed) and vise grips. Just pay close attention to the tab that inserts into the subframe and make sure that it stays in. Once the jack has the shackle going into place a bit, use some vise grips to hold it in place. After that just install the nut & bolt! Make sure to check the shackle's tab to make sure that it looks fully engaged. Also don't push too hard with the jack because you don't want to bend the shackle.


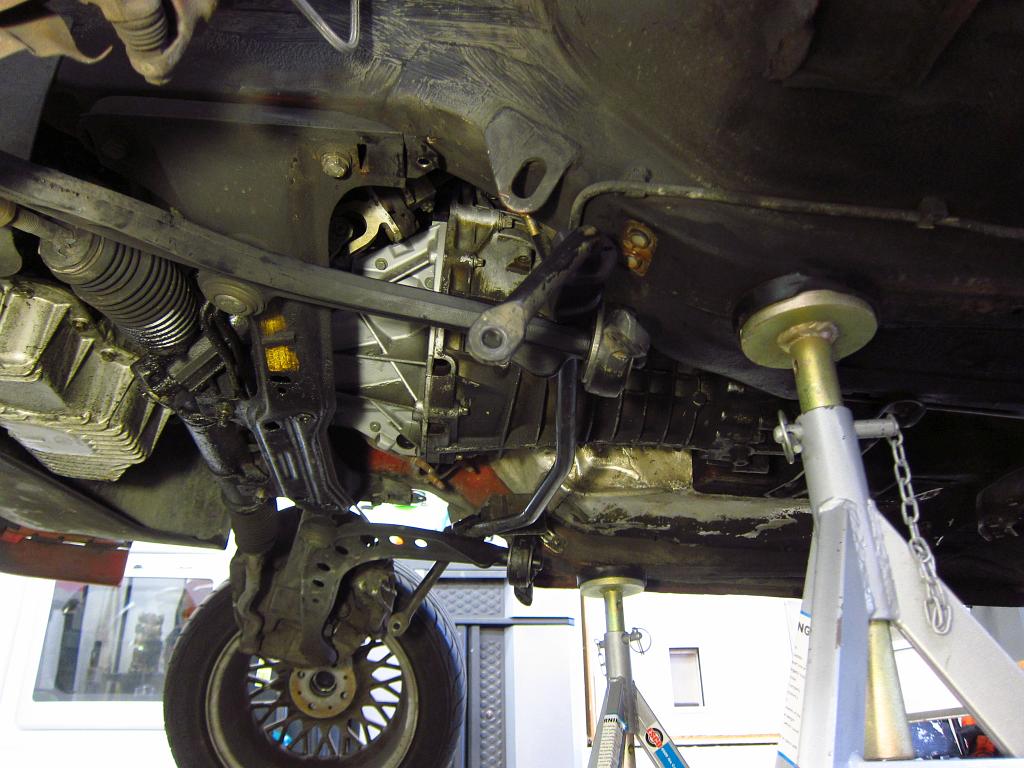
The rest is pretty trivial. Install the linkage and call it done. In this case I opted to use Meyle HD drop links, and they can accommodate a 5mm allen key in the end which makes tightening the staked nut very easy. Others I have seen require you to jam a combo wrench up against the boot which sucks.


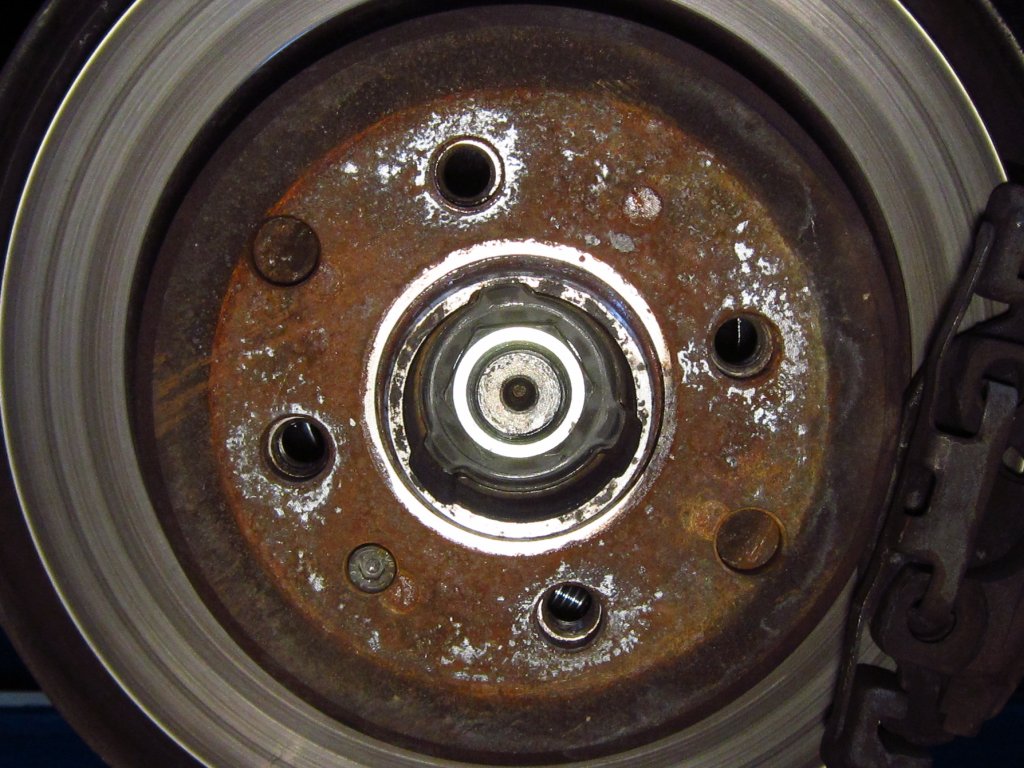
The other big items that I finished were the rear wheel bearings. I did these with the wheels off and the car up on stands so that no load would be placed on the bearings while the big 30mm axle nuts were tightened. Putting the car into gear and applying the parking brake was more than enough to hold things still while I applied the specified 145 ft-lbs of torque. Remember to apply some oil or grease to the flange n the back of the nut. This is called for in the factory procedure!


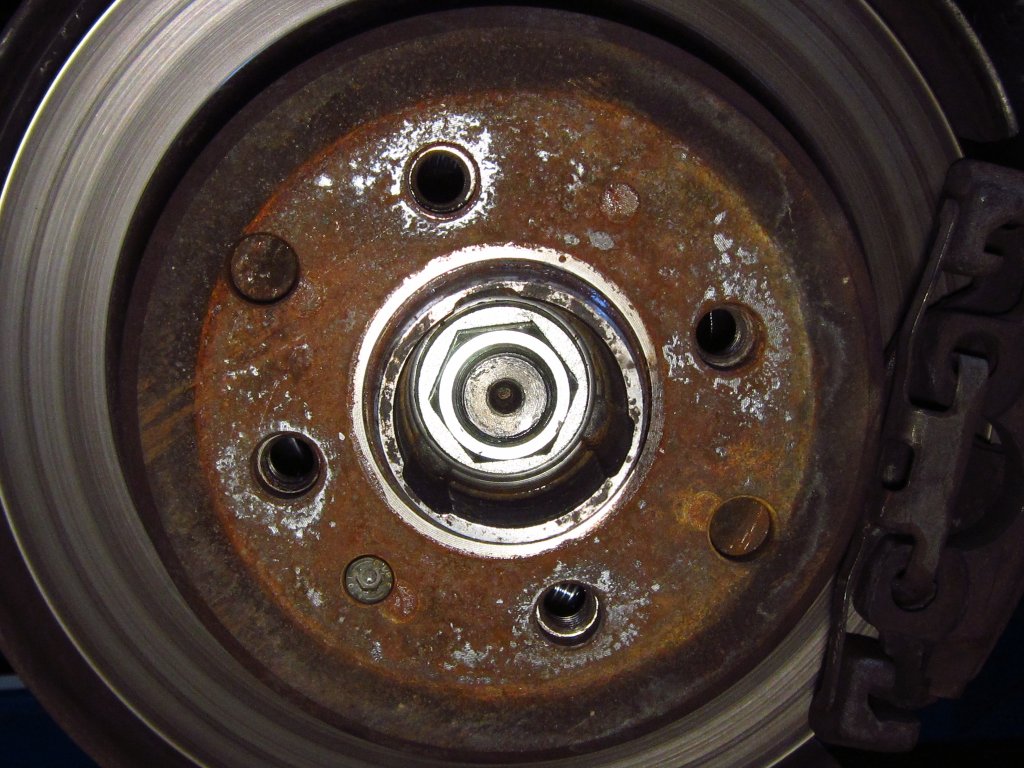
After that I installed the lock plates. You can do this with a rubber mallet, 1/2" extension, 32mm socket and 30mm socket. Do not use a metal hammer, despite the fact that it may seem easier.


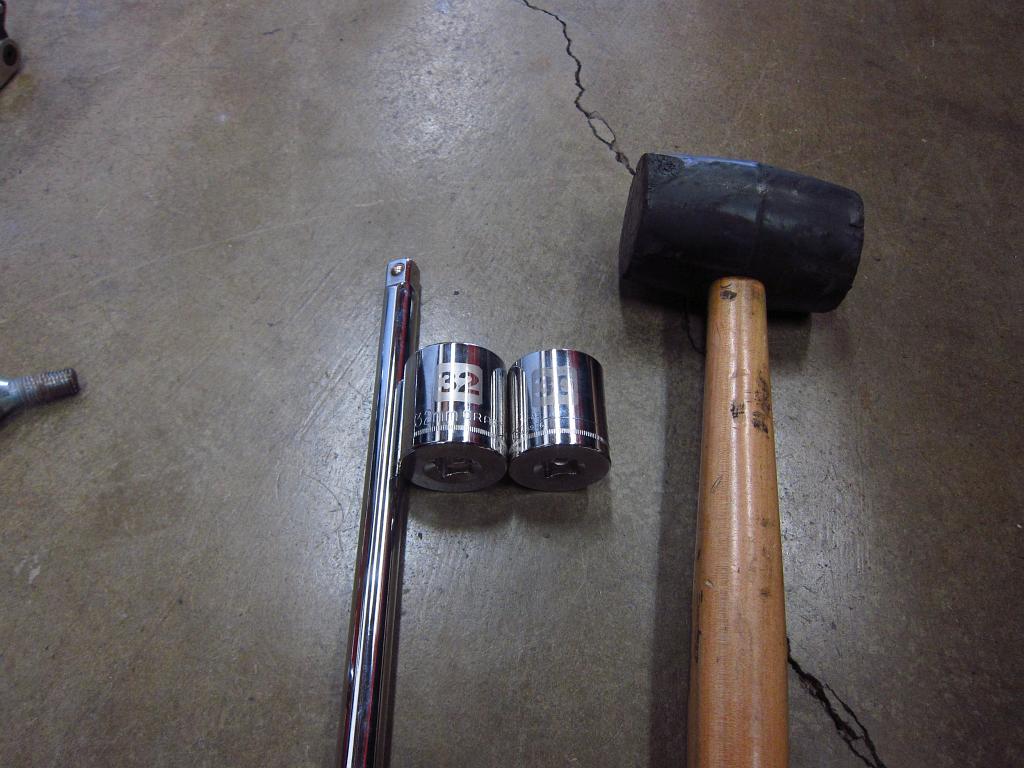
Slide the lock plate into the bore.


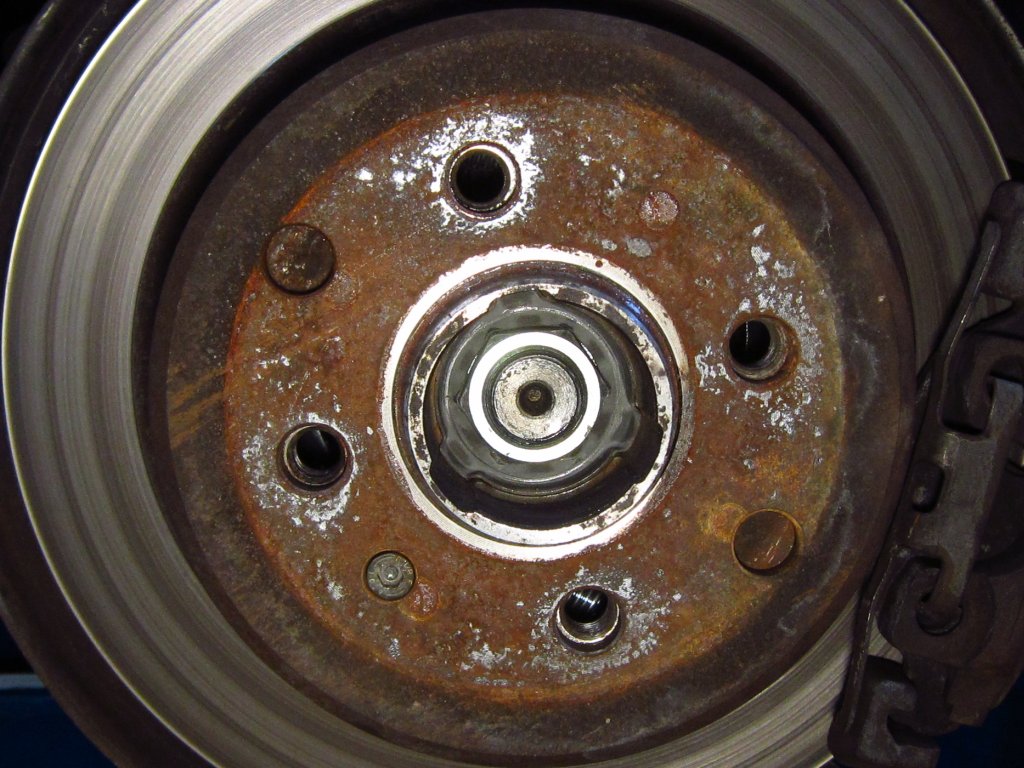
Use the 32mm socket and mallet to form the lock plate onto the nut.


Then use the 30mm socket and mallet to get the lock plate to bite down tightly onto the nut.


That's that. Other than that I just had to adjust the parking brake cables inside the car a little and bleed the brakes (did all four corners twice). Then it was test drive time. Overall, I LOVE it. The car rides a hell of a lot better and hugs corners much more tightly than before. Shredded subframe mounts were not helping anything before lol. I also really like the stock sway bars. The car feels a lot more balanced and less prone to understeer. Funny thing...it's almost as if BMW knew what they were doing when they designed these things!

Drivetrain noise is also greatly reduced. I have the iX VLSD in the car now, and while I don't plan to run it for very long, it is in a lot better shape than the small case LSD that was in there. It sounded like a coffee can full of rocks! The newly balanced driveshaft, new half shafts and all new wheel bearings probably also contribute to the smooth and quiet feel the car has now.

So I would say that this a big success overall, and it was well worth the hours of toil. Having owned an E30 with stiffer/lower shocks and springs, all poly bushings and mounts and beefy sway bars, I am going to say that an almost-completely stock suspension is best on the street. The car is pleasant to ride in both in terms of vibration and noise, it absorbs bumps easily and it handles fantastically. It just feels perfectly balanced and planted. While body roll has increased a little in my switch back to stock sway bars, it is made up for with what I think is improved grip (granted, some of that is probably because I have new subframe bushings and stuff). On a track, I would say that sure, go for stiffer bushings and a ride height drop because those things will pay off on nice perfect asphalt. On the street where the pavement typically sucks, however, I am a believer in a mostly-stock setup. The items that I think are worth upgrading / beefing-up are the shocks (Bilstein HD), the front CAB's (E36 M3 centered solid rubber) and the diff mount (E30 325iX solid rubber). I also have beefed up and reinforced rear shock mounts since the stock ones are known to be poop. Other than that though, the OEM bits are just fine.

I hope that people have found this thread useful and that maybe it will save people some time and effort. Everything is pretty straightforward with these maintenance items, it just requires some patience, careful thought about the order in which you do things, and more patience (and money...parts aren't getting any cheaper lol).

06/05/2011 - 212,354 miles
Visit HERE for a plethora of 318iS stuff and some other randomness.  Would you say I have a, plethora, of pinatas?

bmwman91

  • Administrator
  • Legendary
  • *****
  • Thank You
  • -Receive: 33
  • Posts: 2798
    • View Profile
    • http://www.e30tuner.com/
Re: Suspension and Driveline Overhaul 2016 (Photo Log)
« Reply #17 on: March 13, 2016, 12:14:56 AM »
Quick follow-up, regarding the torque spec for the rear axle nuts. If you look around online and in shop manuals, it seems to vary from 145 ft-lbs to 185 ft-lbs to 210 ft-lbs. Most places seem to list it as 185 ft-lbs. However, I believe that this is incorrect for most or all E30's. My trusty Chilton's Manual for the E30 lists it as 145 ft-lbs. Beyond that, SKF has a technical guide that covers this, and it seems to explain why there are different values!

http://www.skf.com/binary/79-66360/457377.pdf

The specs for the wheel bearings used on the E30, E36 and E46 are on page 4 in the upper-right (all in one line item). The fronts are 214 ft-lbs (290 Nm) as expected. For the rear bearings, there is a reference to note 40. Scroll to page 26 and look near the bottom for note 40. There are 3 specs listed, and they vary by thread size.
M22 thread = 147 ft-lbs (200 Nm)
M24 thread = 184 ft-lbs (250 Nm)
M27 thread = 221 ft-lbs (300 Nm)

I got my calipers out and measured the major diameter of the threads on my old half-shafts (which are the same as the new ones I just installed). The outside of threads measure 21.80mm in diameter, which means that this is an M22 thread, and hence 147 ft-lbs is the correct answer. Looking through RealOEM, it appears to be the case that the E30 and E36 compact/ti models use the M22 nut.
http://www.realoem.com/bmw/enUS/part?id=AF93-USA-10-1990-E30-BMW-318is&mg=33&sg=25&diagId=33_0470&q=33411125664

The SKF technical guide has a blurb at the beginning regarding tightening torques. Basically, you want to do it to-spec (duh). Too loose and the bearings will have slop between the balls and races, so they wear out faster. Too tight and the balls will be jammed into the races, they get excessively hot, so they wear out faster. Do your best to hit the torque spec because you will just be screwing yourself if you don't! Hopefully this puts things to rest and will help people in the future.
« Last Edit: March 13, 2016, 01:17:33 PM by bmwman91 »

06/05/2011 - 212,354 miles
Visit HERE for a plethora of 318iS stuff and some other randomness.  Would you say I have a, plethora, of pinatas?

bmwman91

  • Administrator
  • Legendary
  • *****
  • Thank You
  • -Receive: 33
  • Posts: 2798
    • View Profile
    • http://www.e30tuner.com/
Re: Suspension and Driveline Overhaul 2016 (Photo Log)
« Reply #18 on: April 28, 2016, 11:25:10 PM »
OK E30 party people, prepare your butts. I have finally received a suitable rear end for my car. Originally, I had planned to install a 4.10 Quaife unit that I bought, but stuff happened and I ended up putting in a viscous 325iX rear end while I decided what to do. Well, I decided to have our very own Wanganstyle build me a Wavetrac diff! This sucker is going in the car in a couple of weeks since I need to order up a fresh gasket and a couple of other odds and ends.

The Wavetrac units are basically Quaife diffs, but with a patented mechanism in the middle that eliminates the main problem with Quaife and Torsen units. That main problem is total loss of torque when one wheel lifts or is on ice...those diffs require a minimum amount of traction on both wheels in order to function. The Wavetrac unit does not have this limitation, while at the same time not using clutch plates. It is still a gear diff, so it will run cool and quiet. Wavetrac was actually started by ex-Quaife employees, so it is no coincidence that it is very similar in some ways.

Anyway, here's the prize.


I'll take some pics and give my thoughts on it once it is in the car and I have a chance to test the hell out of it lol.

06/05/2011 - 212,354 miles
Visit HERE for a plethora of 318iS stuff and some other randomness.  Would you say I have a, plethora, of pinatas?

Delta

  • Newbie
  • *
  • Thank You
  • -Receive: 2
  • Posts: 30
  • Freshly Registered!
    • View Profile
Re: Suspension and Driveline Overhaul 2016 (Photo Log)
« Reply #19 on: April 29, 2016, 12:08:17 PM »
Ooo, very nice! I would love to find a small case LSD to swap into my old diff, the spider gears went to hell but the ring and pinion look good. Mfactory makes them but theyre a little pricey...

bmwman91

  • Administrator
  • Legendary
  • *****
  • Thank You
  • -Receive: 33
  • Posts: 2798
    • View Profile
    • http://www.e30tuner.com/
Re: Suspension and Driveline Overhaul 2016 (Photo Log)
« Reply #20 on: April 29, 2016, 11:17:40 PM »
You can pick up small case LSD's pretty cheap these days, but it's anyone's guess what condition they are in. If you have $2000 laying around, you can get a Wavetrac diff built by a guy on r3v. It isn't cheap by any means, but it is still a heck of a lot less than you would pay at a big-name shop like VAC or Edge. I believe that you can also pick up Z3 torsen units for $500 or less, which are essentially bolt-ins if you swap output flanges.

06/05/2011 - 212,354 miles
Visit HERE for a plethora of 318iS stuff and some other randomness.  Would you say I have a, plethora, of pinatas?

bmwman91

  • Administrator
  • Legendary
  • *****
  • Thank You
  • -Receive: 33
  • Posts: 2798
    • View Profile
    • http://www.e30tuner.com/
Re: Suspension and Driveline Overhaul 2016 (Photo Log)
« Reply #21 on: May 07, 2016, 02:07:39 AM »
Good news, everyone!


I got the diff installed after work today. It was a nice and easy job which took all of 3 hours, with me taking my sweet sweet time. Getting the 325iX viscous LSD out was fast and was a fast 45 minute job. It's 21 fasteners and does not require you to remove the exhaust or anything. Just 21 fasteners and a few basic tools. There were a couple of extra ones in my case since one of the studs in the driveshaft flange was loose and would spin without some vise-grips on it.


With the old diff out, I drained it and removed the cover since that had a nice new (and $$$) solid rubber OEM mount in it. A new gasket got some Permatex high tack gasket spray, I dumped 2L of Fuchs-Titan 75W-90 Sintopoid gear oil, and then I buttoned the new diff up.

Reinstallation was the reverse of removal, for the most part. I did drop the rear portion of the exhaust system and unbolt the heat shields because I needed to get at the driveshaft's coupling. This was part of "doing it right." The new diff's input flange wasn't in the same position as the old one's, so the proper installation really called for loosening the driveshaft coupling and letting it slide to a nic neutral position once the new diff was fully bolted into place. After the diff was 100% secure (4 19mm top bolts, 1 big chassis bolt, 12 half-shaft bolts fully tightened), I tightened the driveshaft coupling and reinstalled the exhaust.

A quick test drive was had around town and things are good. The rear end has a couple of new noises, which are probably just this diff's characteristic sounds. Different types of diffs seem to have different sounds. It feels super solid powering into/through/out of corners, and I look forward to putting it through its paces at AutoX this summer!

06/05/2011 - 212,354 miles
Visit HERE for a plethora of 318iS stuff and some other randomness.  Would you say I have a, plethora, of pinatas?