Author Topic: DIY DC bench power supply  (Read 7356 times)

DesktopDave

  • Administrator
  • Legendary
  • *****
  • Thank You
  • -Receive: 60
  • Posts: 5076
  • Lives in the 80s
    • View Profile
    • The Iconic BMW
DIY DC bench power supply
« on: October 31, 2012, 02:44:44 PM »
The weather is pretty dreary here now, so I  figured I'd spend some quality time converting an old, useless PC power  supply into a useful bench-top power supply.  I've been redoing the shop and a  bench P/S is a great diagnostic tool to have.  Often with electrical  parts, eliminating the unknowns can solve the problem.  With a good,  known, clean 12VDC you can eliminate all sorts of problems right off  the bat.

And you can do it in the comfort of your own man cave. ;)

It's  easy to do, but now for the warnings.  First, the capacitors inside any  modern PC P/S can store enough power to kill you.  Please keep this in  mind, and be safe.  Safety first!  Leave the power supply unplugged for a  day or two before taking it apart; only have one hand inside the box at  any given time, wear gloves, etc.  Second, while I've tried my best to  make sure this is typed up correctly, a typo or two could really be a  big problem.  I assume no responsibility for what you do with  this information...I'm just putting it out there to share since I'm a  (fairly) nice guy - I love to help out - but any  mistakes/misunderstandings/errors/guesses/estimations, etc. are entirely  your responsibility to double-check. :mad:
Having said that, I'm pretty confident it's all correct. :cool:

Tools I needed included a decent soldering iron (>20watt  does a great job), electrical pliers, cutting dykes and a cordless drill  with bits.
Supplies I used included 60/40 solder, shrink tube, small crimp-on loop terminals, "liquid" electrical tape & BMW-style fabric 'friction' tape.
Parts I needed include a working desktop PC ATX power supply (especially one with a dedicated power switch - free salvage :D), a set of 4-6 multicolored 4mm banana clip posts ($5 on Ebay :rolleyes:), a big 10 ohm resistor rated 10watts or better ($9 on Ebay).   I plan on adding a few LEDs and matching resistors just for kicks  later on.  So what did I get for a couple hours of research, a bit of  work and $14?  Well, one more useful tool.  And who ever has enough of  those? :D
« Last Edit: October 31, 2012, 02:55:31 PM by DesktopDave »
'08 Karmesinrot 128i 6MT
'86 Zinnoberrot 635CSi (M30B32/G265/3.46 torsen LSD)

Sold: '97 Montrealblau 318iS, '91 Brilliantrot 318i, '91 Brilliantrot 318iS

DesktopDave

  • Administrator
  • Legendary
  • *****
  • Thank You
  • -Receive: 60
  • Posts: 5076
  • Lives in the 80s
    • View Profile
    • The Iconic BMW
DIY DC bench power supply
« Reply #1 on: October 31, 2012, 02:46:49 PM »
Next, I'll get into the theory of the whole deal.  It's pretty simple.   All PC P/S output a variety of DC voltages to power the accessories in  any PC.  Those voltages include +12, +5, +3.3, -5 and even -12.   Combining these voltages can effectively test a lot of battery-driven  items, ranging from 3volt flashlights all the way up to small 24 volt  loads.  Just be sure not to exceed the output amperage you have  available.  It'll be posted on the side of the supply:

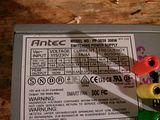
On  this supply, I can test 12v loads up to 120 watts  (12vdc*10amps=120watts).  I would test headlights or HIDs with this, but  not a starter motor.  However, testing 24v loads (connecting +12v to  the load's positive lead and connecting -12v to the load's negative  lead) maxes out at only six watts.  I won't be testing any golf cart  motors with this...

Furthermore, any decent quality P/S will have  resettable solid-state power protection (polyfuses), so a short won't  kill the P/S.  It should just turn itself off.  Keep in mind that  the Chinese kids that originally assembled these units aren't really  interested in your safety.  So safely clear the short, wait for the  polyfuse to cool off, cautiously power the P/S back up & test it for  proper output.  Then you should be ready to go.

The big downside  is that these P/S don't usually have any type of current limiting.   That's one of the many reasons why a decent bench-top supply costs so  much.  What does this mean to you?  Well, a short can put an entire  rail's rated wattage into your newly-created circuit.  So mixing this  P/S with parts of your body, puddles of water or the great outdoors is a  no-no.  If you complete a circuit with your own body...well...hopefully  you'll live & learn not to do that again.

The idea is  basically to cut all of the wires off the outside of the P/S and rewire  it in a safer way.  There are a few considerations to make sure the P/S  will function.  Most of my ideas came from this article; this one is even sweeter...here's an even better solution, and only $37 shipped!    Anyhow, there are about ten thousand other tutorials out there.  Read several  of them to be sure you have an idea of what you need to do.
1. Make  sure you have a generic ATX power supply.  Total wattage is not that  important...IMHO anything over about 150 watts will work just fine.   Although OEM parts like Dell and Apple can be made to work, they  occasionally do not follow international standards regarding wire colors  and patterns.  I'd avoid them.
2. All P/S will have a sticker on the  exterior rating the output of each voltage.  These are also called  'rails,' be sure you note which voltage carries the highest rating.   Typically it'll be the 3.3 or 5 volt rail.  Note whichever one it is -  the P/S usually needs a small load on that rail to properly regulate the  other rails.
3. All ATX P/S will have a dedicated wire that tells  the P/S when to leave standby and go to full power.  This is almost  always a green wire.  When grounded, this signal will power the unit up.
4.  Most all P/S will also have a brown or orange 3.3v 'sense' wire.  This  must be connected to the normal 3.3v bundle, or else the P/S will power  back down.
'08 Karmesinrot 128i 6MT
'86 Zinnoberrot 635CSi (M30B32/G265/3.46 torsen LSD)

Sold: '97 Montrealblau 318iS, '91 Brilliantrot 318i, '91 Brilliantrot 318iS

DesktopDave

  • Administrator
  • Legendary
  • *****
  • Thank You
  • -Receive: 60
  • Posts: 5076
  • Lives in the 80s
    • View Profile
    • The Iconic BMW
DIY DC bench power supply
« Reply #2 on: October 31, 2012, 02:47:18 PM »
OK - directions out of the way - onto the pictures!

Step one -  locate a decent P/S, test to see if the PC works, then leave it  unplugged for a few days.  Pull the P/S, cut the warranty labels (what,  no warranty on a fifteen-year-old P/S?), unscrew the top cover.  You'll  see something like this:


Next,  I decided that I was going to pull most of those wires out.  This was  an old unit so it still has decently sized 16-gauge wires.  Since  16-gauge can safely carry 14 amps @ 12 volts for short lengths (< 3 feet),  I figured two would provide a decent margin of safety but still be  reasonably easy to fit into the crimp-on loop terminals I had.  I  unscrewed the main circuit board screws and lifted the board out a bit.   I know it's overkill, but then I used a large screwdriver to short both  primary capacitor's leads under the board with one arm behind my back.   You can never be too sure about stuff like this - those big caps pack a  hell of a punch!

The wires we're interested in are the yellow  (12v), red (5v) orange (3.3v) and black (ground ,0v).  I needed one  extra red wire (load resistor) and two extra black wires (one for the  load resistor and one for the power-on signal).  Here's what it looks  like now:
'08 Karmesinrot 128i 6MT
'86 Zinnoberrot 635CSi (M30B32/G265/3.46 torsen LSD)

Sold: '97 Montrealblau 318iS, '91 Brilliantrot 318i, '91 Brilliantrot 318iS

DesktopDave

  • Administrator
  • Legendary
  • *****
  • Thank You
  • -Receive: 60
  • Posts: 5076
  • Lives in the 80s
    • View Profile
    • The Iconic BMW
DIY DC bench power supply
« Reply #3 on: October 31, 2012, 02:47:45 PM »
Next, we have to complete the internal mods so that the external power switch will turn on the unit.

First,  the green wire has to be spliced with a black ground wire.  I used a  lineman's splice, then soldered it, finally covered it with some nice  heatshrink tube (any black wire will do, BTW):


Then,  the load resistor has to be spliced into the primary rail.  On mine it  happened to be the 5v rail, so I ran a red wire to one terminal.  The  other terminal gets a black ground wire.  I looped the wires through the  terminals, soldered it firmly, and used a bit of heat-shrink tube to  insulate it nicely.  Finally, I screwed it onto the rear inner wall of  the case.  It needs to be screwed down as it will be dissipating a bit  of heat.  IMHO don't screw it into the heat sinks...those sinks are not  necessarily grounded, and in cheap P/S are barely sufficient to cool the  existing transistors.  Overheating those will kill the P/S and waste  all your work.  Here's a shot of the installed resistor:
'08 Karmesinrot 128i 6MT
'86 Zinnoberrot 635CSi (M30B32/G265/3.46 torsen LSD)

Sold: '97 Montrealblau 318iS, '91 Brilliantrot 318i, '91 Brilliantrot 318iS

DesktopDave

  • Administrator
  • Legendary
  • *****
  • Thank You
  • -Receive: 60
  • Posts: 5076
  • Lives in the 80s
    • View Profile
    • The Iconic BMW
DIY DC bench power supply
« Reply #4 on: October 31, 2012, 02:48:31 PM »
I'm planning on changing a few things once I make sure this all works,  so I left quite a few wires for later uses.  I sealed the ends with  liquid tape, then taped them up to prevent any shorts.

In case you're wondering, the wires are as follows:
Grey  is the "power good" signal - I'll be using that to light up a green  LED.  I didn't have the right 150ohm resistor on hand, so I left that  for later.
Purple is the "standby" signal line.  Likewise, I'll use that to light up a yellow LED.
Blue is the -12v line.
White is the -5v line.


You can also see that I've stripped & twisted the other pairs before I crimp & solder loop (eyelet) terminals onto them.
'08 Karmesinrot 128i 6MT
'86 Zinnoberrot 635CSi (M30B32/G265/3.46 torsen LSD)

Sold: '97 Montrealblau 318iS, '91 Brilliantrot 318i, '91 Brilliantrot 318iS

DesktopDave

  • Administrator
  • Legendary
  • *****
  • Thank You
  • -Receive: 60
  • Posts: 5076
  • Lives in the 80s
    • View Profile
    • The Iconic BMW
DIY DC bench power supply
« Reply #5 on: October 31, 2012, 02:48:52 PM »
I went the extra mile with these loop terminals, since they're not  really designed to carry larger loads.  First, I twisted two wires  together for each circuit. Then, I soldered these splices together.  Next, I crimped a loop terminal onto each one.  Finally, I filled the  terminals with solder.


Finally, I wrapped each circuit in fabric tape:


My next task was to prepare the case for the terminal lugs.  Clearance  was a problem - first off, I didn't want the lugs too close to each  other.  That creates the potential for shorting stuff out.  Also,  between the heat sinks, ventilation slots and internal components, I was  left with about a 2" x 2" space.  I drilled a few suitable holes &  threaded the lug posts nuts on.  Finally, I attached the circuits to the  posts, and tightened everything up.  Since I'm a really cheap bastid, I  had to be especially careful with those posts.  I managed to strip a  pinch nut on one and had to leave it out.  No -12v for me!  If you  consider the set I bought, I'd suggest getting two right off the bat.

'08 Karmesinrot 128i 6MT
'86 Zinnoberrot 635CSi (M30B32/G265/3.46 torsen LSD)

Sold: '97 Montrealblau 318iS, '91 Brilliantrot 318i, '91 Brilliantrot 318iS

DesktopDave

  • Administrator
  • Legendary
  • *****
  • Thank You
  • -Receive: 60
  • Posts: 5076
  • Lives in the 80s
    • View Profile
    • The Iconic BMW
DIY DC bench power supply
« Reply #6 on: October 31, 2012, 02:50:46 PM »
Finally...time to button it all up & test it out!  I shot some video, 'cause I was feeling special.  Here's a direct link to the whole album.

The  results?  3.37v...5.14v...11.96v  Even better, the case reports 0v.  :cool:  No shorts from the posts, plugs or leads either.   I'll report back on performance after I fire something  up with it.

Close enough for gov't work.  We have a winner! :D  I tested it by firing up a Lexus HID projector I had laying around.  Works just fine and  I didn't get shocked.

Feel free to post some replies if you have  questions, suggestions, or if you're an overachiever that's built a  better mousetrap.
:D :cool:
« Last Edit: October 31, 2012, 02:53:46 PM by DesktopDave »
'08 Karmesinrot 128i 6MT
'86 Zinnoberrot 635CSi (M30B32/G265/3.46 torsen LSD)

Sold: '97 Montrealblau 318iS, '91 Brilliantrot 318i, '91 Brilliantrot 318iS

keflaman

  • Administrator
  • Hero Member
  • *****
  • Thank You
  • -Receive: 35
  • Posts: 929
    • View Profile
DIY DC bench power supply
« Reply #7 on: November 01, 2012, 10:57:20 AM »
Nice work, Dave. Nothing beats having a power source with a couple different voltages handy.

Could this be used as the power supply for an electrolysis setup?

DesktopDave

  • Administrator
  • Legendary
  • *****
  • Thank You
  • -Receive: 60
  • Posts: 5076
  • Lives in the 80s
    • View Profile
    • The Iconic BMW
DIY DC bench power supply
« Reply #8 on: November 01, 2012, 03:12:27 PM »
I'd prefer to use a dumb battery charger, as they usually have built-in current limitation.  Given the relatively weak electrolyte, I don't see why it wouldn't work unless you were doing large surface area items like engine blocks or whole body panels.

The only safety concern I'd have is a hard short.  I'd definitely wire up a shunt ammeter/DMM in series to keep tabs on how much current the tank uses, or wire it off a protected GFCI circuit.
'08 Karmesinrot 128i 6MT
'86 Zinnoberrot 635CSi (M30B32/G265/3.46 torsen LSD)

Sold: '97 Montrealblau 318iS, '91 Brilliantrot 318i, '91 Brilliantrot 318iS

keflaman

  • Administrator
  • Hero Member
  • *****
  • Thank You
  • -Receive: 35
  • Posts: 929
    • View Profile
DIY DC bench power supply
« Reply #9 on: November 01, 2012, 09:16:15 PM »
I'm using a battery charger my dad bought back in the early seventies. It has an ammeter, but that's a good suggestion for the GFCI circuit.

DesktopDave

  • Administrator
  • Legendary
  • *****
  • Thank You
  • -Receive: 60
  • Posts: 5076
  • Lives in the 80s
    • View Profile
    • The Iconic BMW
DIY DC bench power supply
« Reply #10 on: November 02, 2012, 08:22:45 PM »
I should go over and pick up my Dad's old charger.  It's much better than my cheap "Schumacher" 30 amp buzz box.  It manages to be both noisy and inaccurate.
'08 Karmesinrot 128i 6MT
'86 Zinnoberrot 635CSi (M30B32/G265/3.46 torsen LSD)

Sold: '97 Montrealblau 318iS, '91 Brilliantrot 318i, '91 Brilliantrot 318iS