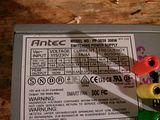
Next, I'll get into the theory of the whole deal. It's pretty simple. All PC P/S output a variety of DC voltages to power the accessories in any PC. Those voltages include +12, +5, +3.3, -5 and even -12. Combining these voltages can effectively test a lot of battery-driven items, ranging from 3volt flashlights all the way up to small 24 volt loads. Just be sure not to exceed the output amperage you have available. It'll be posted on the side of the supply:

On this supply, I can test 12v loads up to 120 watts (12vdc*10amps=120watts). I would test headlights or HIDs with this, but not a starter motor. However, testing 24v loads (connecting +12v to the load's positive lead and connecting -12v to the load's negative lead) maxes out at only six watts. I won't be testing any golf cart motors with this...
Furthermore, any decent quality P/S will have resettable solid-state power protection (polyfuses), so a short won't kill the P/S. It
should just turn itself off. Keep in mind that the Chinese kids that originally assembled these units aren't really interested in your safety. So safely clear the short, wait for the polyfuse to cool off, cautiously power the P/S back up & test it for proper output. Then you should be ready to go.
The big downside is that these P/S don't usually have any type of current limiting. That's one of the many reasons why a decent bench-top supply costs so much. What does this mean to you? Well, a short can put an entire rail's rated wattage into your newly-created circuit. So mixing this P/S with parts of your body, puddles of water or the great outdoors is a no-no. If you complete a circuit with your own body...well...hopefully you'll live & learn not to do that again.
The idea is basically to cut all of the wires off the outside of the P/S and rewire it in a safer way. There are a few considerations to make sure the P/S will function.
Most of my ideas came from this article;
this one is even sweeter...
here's an even better solution, and only $37 shipped! Anyhow, there are about ten thousand other tutorials out there. Read several of them to be sure you have an idea of what you need to do.
1. Make sure you have a generic ATX power supply. Total wattage is not that important...IMHO anything over about 150 watts will work just fine. Although OEM parts like Dell and Apple can be made to work, they occasionally do not follow international standards regarding wire colors and patterns. I'd avoid them.
2. All P/S will have a sticker on the exterior rating the output of each voltage. These are also called 'rails,' be sure you note which voltage carries the highest rating. Typically it'll be the 3.3 or 5 volt rail. Note whichever one it is - the P/S usually needs a small load on that rail to properly regulate the other rails.
3. All ATX P/S will have a dedicated wire that tells the P/S when to leave standby and go to full power. This is almost always a green wire. When grounded, this signal will power the unit up.
4. Most all P/S will also have a brown or orange 3.3v 'sense' wire. This must be connected to the normal 3.3v bundle, or else the P/S will power back down.