JP 91iS

Author Topic: JP 91iS  (Read 83705 times)

318isfolife

  • Full Member
  • ***
  • Thank You
  • -Receive: 0
  • Posts: 111
    • View Profile
JP 91iS
« Reply #30 on: March 13, 2009, 02:57:58 PM »
we always steam clean engines in our shop i have done it probably every other oil change to my engine bay. so it won't harm anything but you just take some spray nine dilute it with water 50:50. then spray it every where in your engine. then take a low pressured water sprayer if you have a compressor just hook it to the air line, and spray away. next spray just air so you clean all the water off. and hit it up with wd-40 every where the more the better. start up the engine and let it burn the excess wd-40 off. results are super clean engines in about 1 minute!

JP 91iS

  • Hero Member
  • *****
  • Thank You
  • -Receive: 0
  • Posts: 500
    • View Profile
JP 91iS
« Reply #31 on: March 13, 2009, 06:27:37 PM »
Quote from: Jimmy Lewis;68241
Looks very very nice man.

It's amazing how much tidier the engine bay looks with a nice clean valve cover and clean timing cases. Brilliant cam locking tool as well. ;)

Thanks - I like cleaning as I work on stuff.  There is still some crud behind/under the power steering pump and alternator.  I'll get that out whenever I swap to an e36 rack and (probably) delete the power steering.  Hopefully I don't get lazy down the road and let it get all covered with shit again, but I probably will.

As for the cam locking tool, I read about it somewhere on here.  Somebody mentioned it as if it was a common method but I had never heard about it other than from that guy.  So someone out there had a brilliant idea but it wasn't me :cool:.
-JP
Project M42: generating funds

JP 91iS

  • Hero Member
  • *****
  • Thank You
  • -Receive: 0
  • Posts: 500
    • View Profile
SuperSprint Exhaust
« Reply #32 on: March 15, 2009, 05:45:51 PM »
Installed my cat-back SuperSprint Exhaust - its awesome.  I took some videos and I'll upload them later.  But I also took some pictures:


Old Exhaust


New Exhaust


Tail Pipe


Tail Pipe

The pipe between the cat and the muffler needs to be rotated since the way I mounted it causes it to hang too low.  The car sounds so much quieter now that there aren't any holes in the exhaust.  It feels great on the road too.  After the timing chain work and this exhaust the car feels like a new animal.  I can't wait to see how it feels after I put the chip and eventually a single-mass flylwheel.  I'm also going to open up the air intake a bit for better flow.

I also installed the COP kit but need to tidy up the wires a bit.  I also want to try and fit the spark plug cover, somehow.  It may be ghetto.
-JP
Project M42: generating funds

bcbimmer

  • Newbie
  • *
  • Thank You
  • -Receive: 0
  • Posts: 5
    • View Profile
JP 91iS
« Reply #33 on: March 19, 2009, 09:59:41 PM »
Where did you end up getting that exhaust,? there really hard to get now ?
Enjoyed reading about the progress your making congrads man

Aaron.

JP 91iS

  • Hero Member
  • *****
  • Thank You
  • -Receive: 0
  • Posts: 500
    • View Profile
JP 91iS
« Reply #34 on: March 20, 2009, 11:36:13 AM »
Quote from: bcbimmer;68601
Where did you end up getting that exhaust,? there really hard to get now ?
Enjoyed reading about the progress your making congrads man

Aaron.

Thanks.  I bought it from BMPdesign.com.  I ordered it in October, so they are somewhat difficult to obtain - mostly because you have to wait so long.  But they may still have some in stock from this last batch they got.  If you are interested in one you should call them and see if they still have any, if not bmwman91 is selling a used one on here.
-JP
Project M42: generating funds

bcbimmer

  • Newbie
  • *
  • Thank You
  • -Receive: 0
  • Posts: 5
    • View Profile
JP 91iS
« Reply #35 on: March 21, 2009, 02:39:15 PM »
what you pay for it. ?

JP 91iS

  • Hero Member
  • *****
  • Thank You
  • -Receive: 0
  • Posts: 500
    • View Profile
JP 91iS
« Reply #36 on: March 22, 2009, 09:52:10 AM »
Quote from: bcbimmer;68669
what you pay for it. ?

$525
-JP
Project M42: generating funds

JP 91iS

  • Hero Member
  • *****
  • Thank You
  • -Receive: 0
  • Posts: 500
    • View Profile
Electric Fan
« Reply #37 on: March 22, 2009, 08:58:00 PM »
Finished off my electric fan conversion.  I used a fan from a 92 Volvo 960 - it came with the shroud so I modified that to fit.  Turned out pretty nice.  I also put in the lower temp switch (80°/88°) and have a lower temp thermostat.  I wired the fan into the auxiliary fan circuit and deleted both the clutch fan and the aux fan.


Fan installed


Shroud after I modified it.  It fit almost perfect when I turned it sideways so I cut it to the proper height and used some of the extra leftovers to fill the holes along the bottom.  I also had to trim a bit off one side.


Wiring route.  I ran it under the radiator then up the side through the holes in the frame and soldered it to the plug that used to run to the aux fan.  I had to extend the harness about a foot to reach the wires on the fan.


Here's a wider angle shot of the fan.  Also I installed the COP kit from robe30 (great kit btw).  I still need to cut the old coil bracket off and I'd like to make the coil wires look a little better.


And finally some cosmetic stuff.  I had my valence off so I pounded it with a hammer a bit to get it somewhat straight.  Then I popped on an "i" lip that I had sitting around.  Then I put on my summer wheels: 15" basketweaves from an ix.  Needs a drop, I know.
« Last Edit: June 02, 2009, 01:22:11 PM by JP 91iS »
-JP
Project M42: generating funds

B318M42W

  • Sr. Member
  • ****
  • Thank You
  • -Receive: 0
  • Posts: 376
    • View Profile
JP 91iS
« Reply #38 on: March 24, 2009, 09:07:06 PM »
great job! I've got the pleasant whine from the new chain too, hope it's normal. (changed the same parts in the timing as you did, arround the same time too)
[SIGPIC][/SIGPIC]
M90 Blown M42 :cool:

RidingSimple

  • Jr. Member
  • **
  • Thank You
  • -Receive: 0
  • Posts: 95
    • View Profile
JP 91iS
« Reply #39 on: April 19, 2009, 03:03:55 AM »
wow, great attention to detail!  Your engine bay looks amazing!  You still have plans to do the P/S delete to clean it up further?

JP 91iS

  • Hero Member
  • *****
  • Thank You
  • -Receive: 0
  • Posts: 500
    • View Profile
JP 91iS
« Reply #40 on: April 19, 2009, 11:54:30 AM »
Quote from: Nimble;70377
wow, great attention to detail!  Your engine bay looks amazing!  You still have plans to do the P/S delete to clean it up further?

Thanks! Yeah I'm going to run without Power Steering when I swap in an E36 rack.  I'll get to that along with a suspension upgrade, brake work and single-mass flywheel after I restore the interior.
-JP
Project M42: generating funds

reggie 318is

  • Newbie
  • *
  • Thank You
  • -Receive: 0
  • Posts: 17
    • View Profile
JP 91iS
« Reply #41 on: May 08, 2009, 01:53:43 PM »
wow good job m8 lookin well :)

bondos

  • Newbie
  • *
  • Thank You
  • -Receive: 0
  • Posts: 37
    • View Profile
JP 91iS
« Reply #42 on: June 02, 2009, 07:44:08 AM »
keep progress : )

psyyambmw

  • Jr. Member
  • **
  • Thank You
  • -Receive: 0
  • Posts: 52
    • View Profile
JP 91iS
« Reply #43 on: June 03, 2009, 01:19:12 AM »
Subscribed!

Good write up, love all the pics, help me a lot :rolleyes:

JP 91iS

  • Hero Member
  • *****
  • Thank You
  • -Receive: 0
  • Posts: 500
    • View Profile
Hardcore Update -Interior
« Reply #44 on: June 29, 2009, 01:24:20 AM »
I meant to load progress as it happened, but realized I was better off spending my free time working on the project rather than writing about it.

I replaced my dash, deleted all the airbag stuff, installed Mark D 91 chip, cruise control, fully functional 13 Button OBC, maplight mirror, recovered rear deck, installed BMW premium sound and stock headunit Alpine CM 5908, new set of used door panels, upgraded to a leather Mtech II steering wheel, ZHP weighted shift knob, leather shift and ebrake boots, leather ebrake handle, custom floor mats, replaced carpet.  Damn that's a big list!  I also just replaced my windshield wiper motor.

On to the pictures:


Old interior Nasty carpet - in addition to the garbage you see here there were 20oz bottles of tobacco spit.  Cracked dashboard with a sticky pool of coins and spilled soda.  Crazy wires hanging out of the empty radio slot, phantom central locking, lumpy door panels, wrecked center console.  Definitely needed some work.


Old cracked dashboard and molested stereo


Old dash removed


Wiring mess beneath the dashboard  
I cleaned this all up by wrapping the wiring harnesses up with hockey tape - it has the same sticky cloth texture as the stock wire wrap.  The car came with an aftermarket Alpine alarm system with remote keychain.  I found the installation and owners manuals online in pdf format so was able to check the installation.   I ended up repairing a few solders and rerouting the original choice of grounds.  I reprogrammed the unit and got rid of the annoying lock-doors-after-10-seconds-of-driving function.  But I had the siren/horn working and now it doesn't so I'll need to recheck that part of the wiring.  Its a pretty cool basic alarm/keyless entry.  I think it was a popular dealership install since I have seen quite a few other people with the tell-tale red LED on a switch blank.


Doing some electrical testing.  You can see the goods I've installed - stock radio, cruise and 13 button OBC.  Also I deleted all the airbag components and wiring and wired in the stock BMW Premium Sound system.


New dashboard installed


Rust free floor!


Old Carpet


New carpet
 I tried removing and power-washing my old carpet but it didn't come out as clean as I'd liked.  It wasn't total shit so I just swapped it out with the nicer one from my 86 325es.


Bavarian Autosport custom floormats and Airbag Dash Panel I had some custom "318is" floormats made from BavAuto.  I think I used charcoal fabric and silver block stitching.  The charcoal matches the carpet color better than black.  Also I initially reinstalled the old drivers side knee panel that is beefier for some reason on the airbag equipped models.


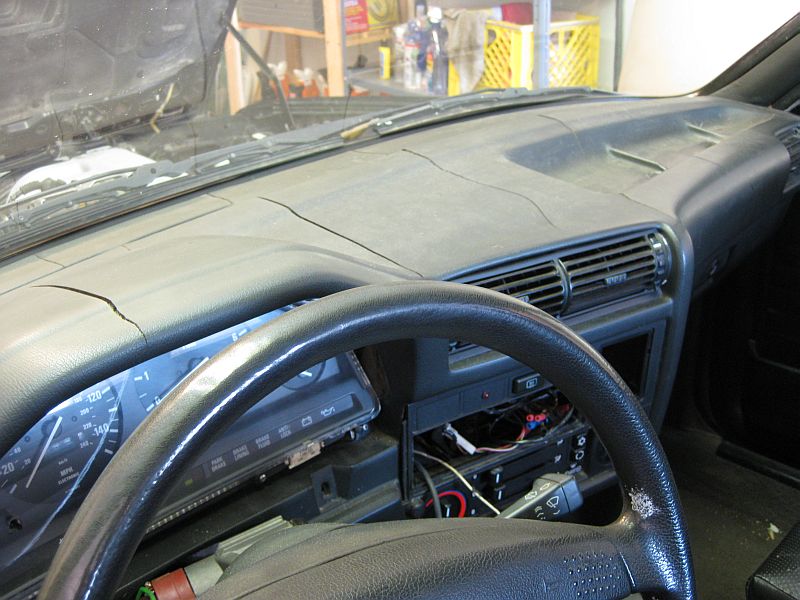
New dash with Non-Airbag Dash Panel and Center Console  The non-airbag underdash panel has a larger cutout for the steering column since the airbag columns have a different angle.  I filled the gap with single-sided sticky foam (aka topper tape).  Actually I used a lot of that foam to reduce and squeaks and rattles from the dash.  Also replaced the glove box door with a non dented one. New pedal pads.


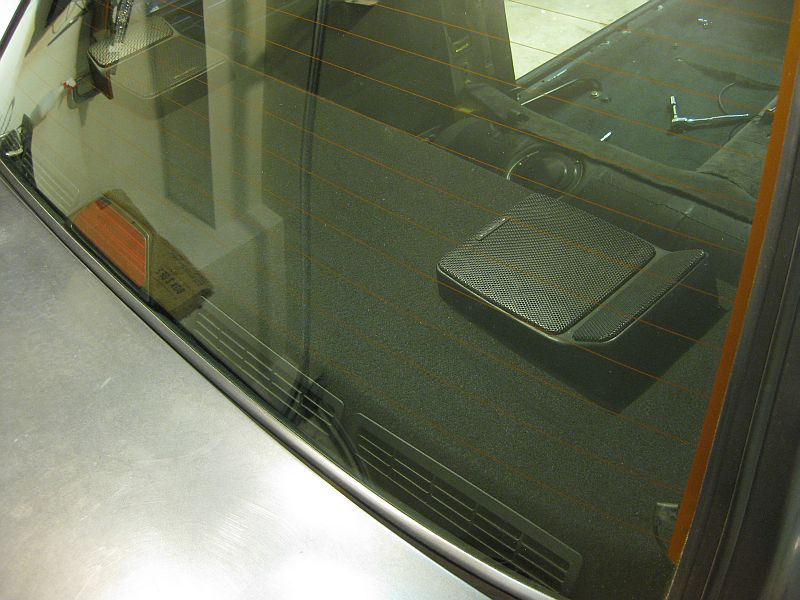
Recovered rear deck and Premium Speakers  I recovered the rear deck from a premium sound model with black felt from WalMart.  Later found out that if you want to get serious, worlduph.com sells the actual deck fabric.  Put in the rear speakers with tweeters that I bought from Nomad.


Rear deck again I'm really happy with the way it turned out.


Shifter and Center Console Installed the ZHP weighted leather shift knob and bought a leather shift boot from a member on R3v.  I wanted a 2-button center console to get rid of the window lock switch.  I consider it a useless function so just hid the switch beneath the console and deleted the button slot.


Leather emergency brake handle Bought a leather ebrake handle (e28? I can't remember) and a leather ebrake boot from members of r3v.  The boot was a pair with the shift boot and both required reusing the trim rings.  To me this looks a thousand times better than the stock plastic pieces.


Mtech II Steering Wheel The cherry on top is this steering wheel.  Feels awesome.  Only thing is that the leather color is more like Anthracite than black.  I figure it will wear-to-match with age.


New controls  Basically I replaced all the ways the driver interacts with the car.  Has a much better feel than the crusty, rattly, dusty old interior.


New used set of door panels Have the dumb crank holes.  Oh-well will do for now.


Maplight Mirror First one I bought had the wiring ripped in half and was irreparable.  Bought 2 more from ebay and picked the best one.  The spare I have didn't have the stablizing bar on the back so I'm not sure what model it is from.
-JP
Project M42: generating funds