Author Topic: Installing HID Lights  (Read 11252 times)

bmwman91

  • Administrator
  • Legendary
  • *****
  • Thank You
  • -Receive: 33
  • Posts: 2798
    • View Profile
    • http://www.e30tuner.com/
Installing HID Lights
« on: September 26, 2007, 10:21:21 PM »
Alrighty, I promised pics and stuff in another thread (on Bimmerforums), and am finally delivering.  This is a very brief article about how I got mine to fit, and my plans to do it "right" as soon as McMaster gets me my stuff.  I will make an official article on my site ( http://bmw.e30tuner.com/ ) once version 2 is complete.  It will likely include most of the text found here, because I am a lazy SOB.

Tools & Parts:
- Various drill bits, up to 3/4" diameter (1 5/16" for version 2)
- Hot glue gun (or silicone RTV for the patient people)
- Connector crimpers, the standard kind you find at Home Depot/Radio Shack
- Plastic-housed 3/16" spade terminal receptacle (female-side)
- Euro ellipsoid lights (no idea how it goes on the US ones)
- Apexcone 35W 4500K kit (+$25 lifetime warranty on bulbs & ballasts, seriously, do it)
- Some balls, you have to cut shit, and there is NO going back (pardon my French)

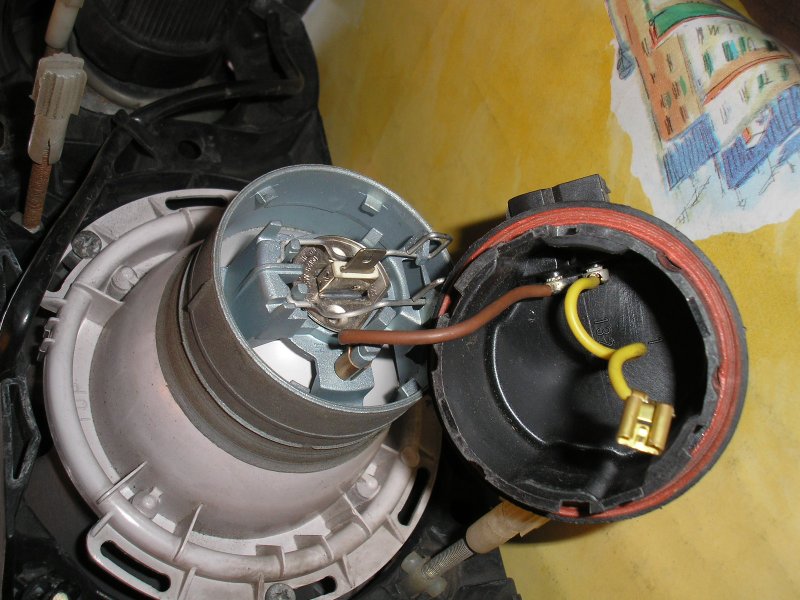
So, let's first look at what we start with.  Yank the headlight units, it is easiest to do it off the car.  You have a standard H1 bulb here.


The H1-based bulbs I got from the Apexcone kit (from understeer.com) obviously take a little thinking to fit in.  The instructions that came with them must refer to H1 installations on cars that I have never seen.  You are on your own here (well, I guess this will help).


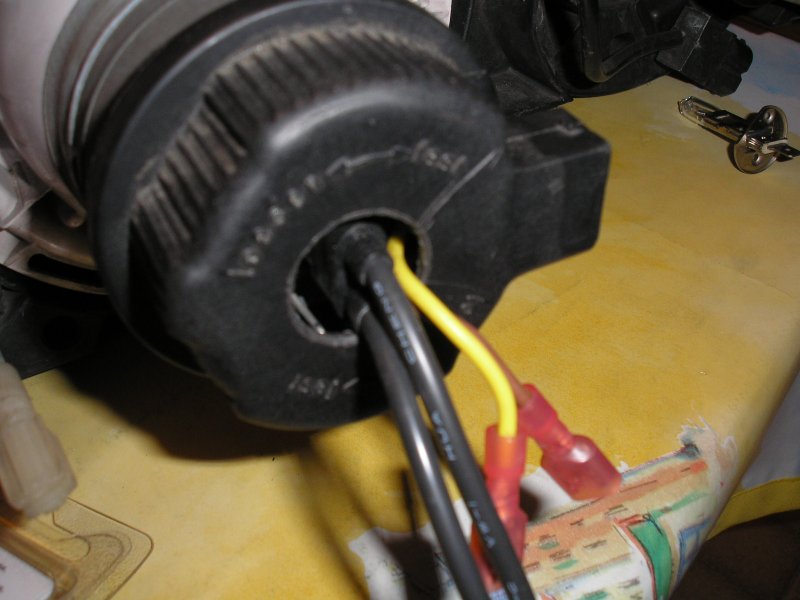
There is a right way and a wrong way to do this.  The wrong way is in the following picture.  Fires are unlikely, but problems are to be expected leaving things exposed like this.  You will be burning up fuses every 1/4 mile on a rough road like this.  Getting the round end of the brown wire off is easy, you almost don't need pliers.


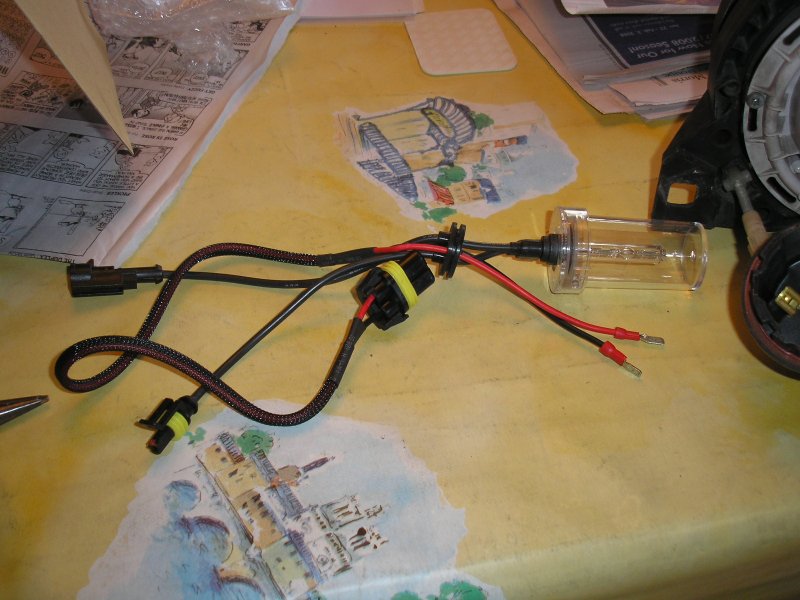
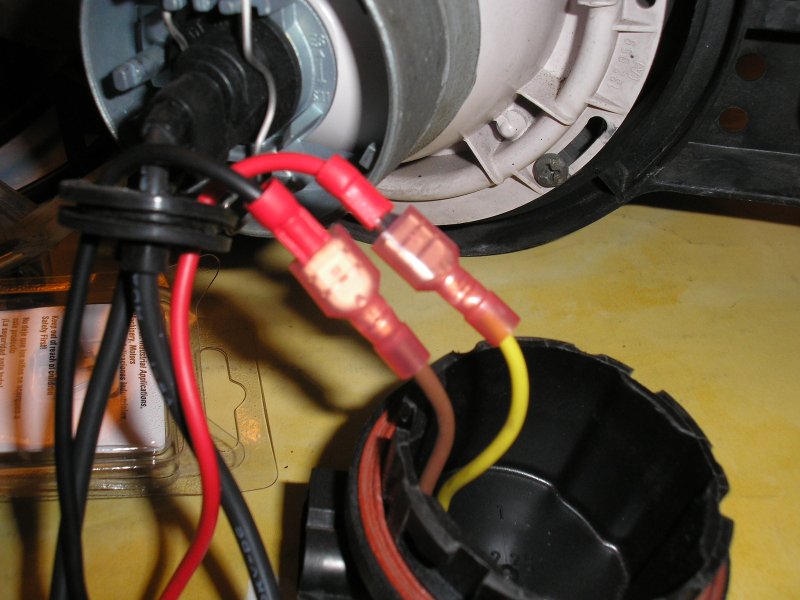
You will need to cut the internal wires.  Sorry weekend-warriors, there is not really a safe way to do this without cutting them (you could always smoosh the round one onto the terminal and put plastic sheathing over them...but then you would be lazy).  Anyway, go to Home Depot and drop the $0.97 on the shielded connectors.  Here is where you will want those crimpers I mentioned.


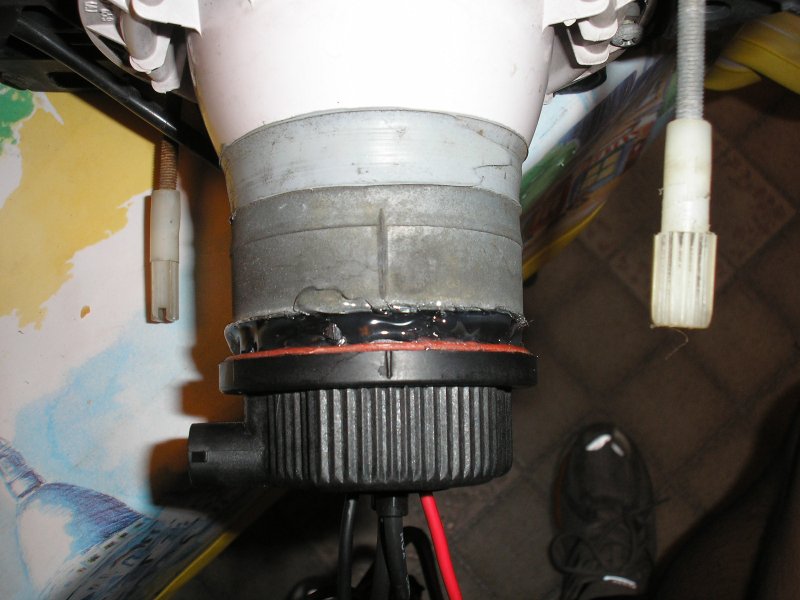
You are probably wondering where that round grommet is supposed to go (the one on the bulb harness).  Well, here is where you need some experience drilling big holes in plastic things that cannot be clamped.  DO THIS IN STEPS!  I promise you, the cap will be destroyed (and you will bruise your hands at the least) if you try to do all-out in any less than 5 steps.  Drill the hole as perfectly centered as possible.  If it is more than 1/8" off-center, you are going to have issues with the harness (next segment details it).


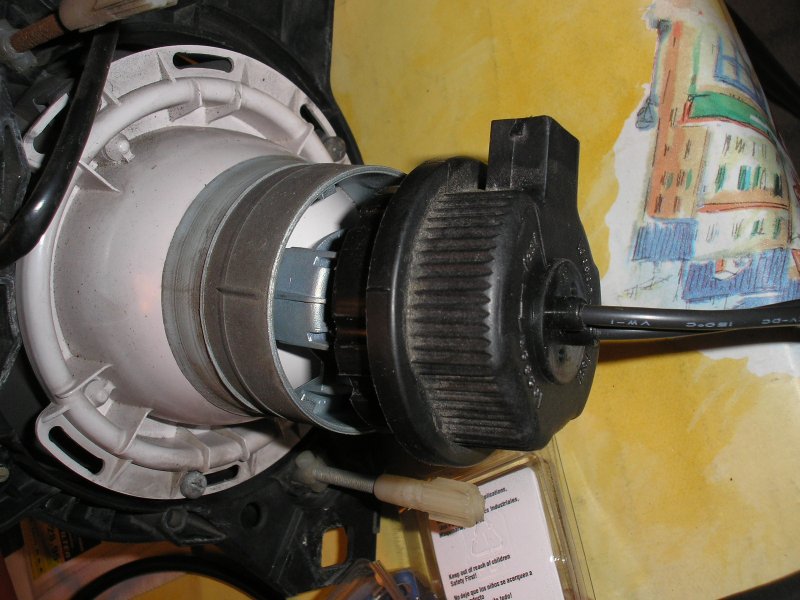
Here is a shot with the light cap locked-on all the way.  Hmm...does not look like the grommet will fit (it can, but you better buy that warranty on the bulbs).  I found it annoying that the wires are encased in a rubber relief that shoots straight off.  Maybe other H1-using light fixtures are roomier...the E30 just likes to be a pain.  Oh, and to get the stuff through the hole properly, you will need to yank the bulb-harness's power leads (spade-ends) through the grommet, then reinsert them after positioning the bulb wires through the hole.  It is pretty easy, don't be timid about it.


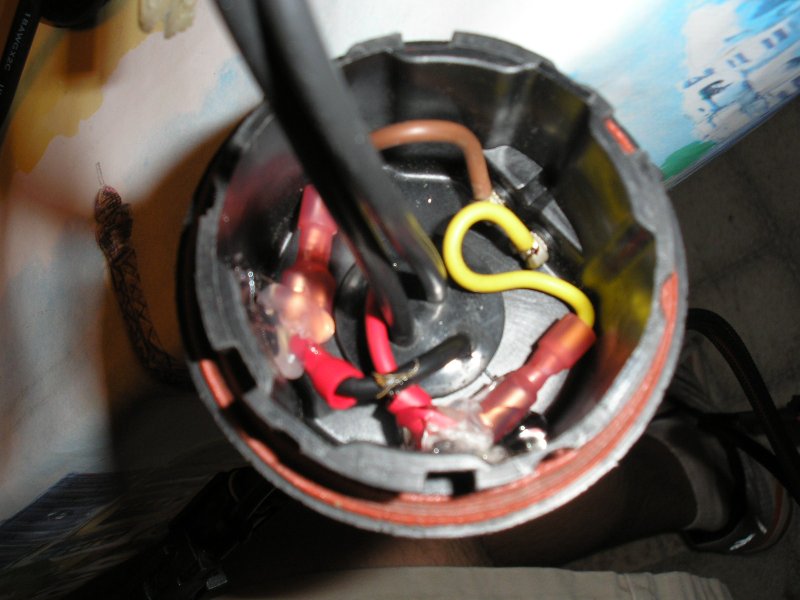
So, once you have the stuff positioned right, I HIGHLY suggest using some non-conductive adhesive to secure the power connections to the inside.  You do not want them moving around.  Hot glue is fine, it is not like anybody sees inside here.


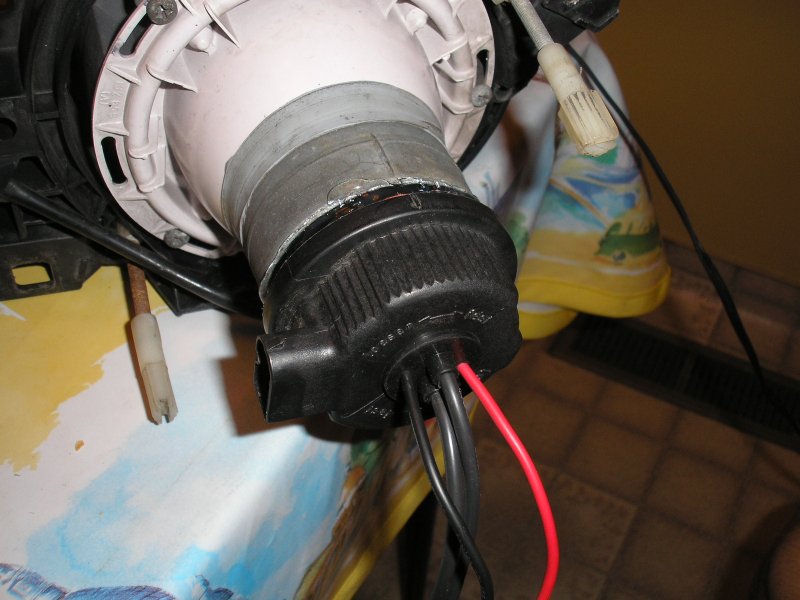
Here is the hokey part that has me talking about a Version 2.  Since I want it waterproof, AND not damaging the wires I had to come up with a quick solution (unless I wanted to drive to work before sunrise with no lights).  Yup, I stuffed the covers on without locking them.  This bought me about 1/4" of room inside, which was plenty for the time-being.  A little more hot glue and patience (as well as stuffing my pride under the sofa) got it water-tight.  I now give you permission to snicker.


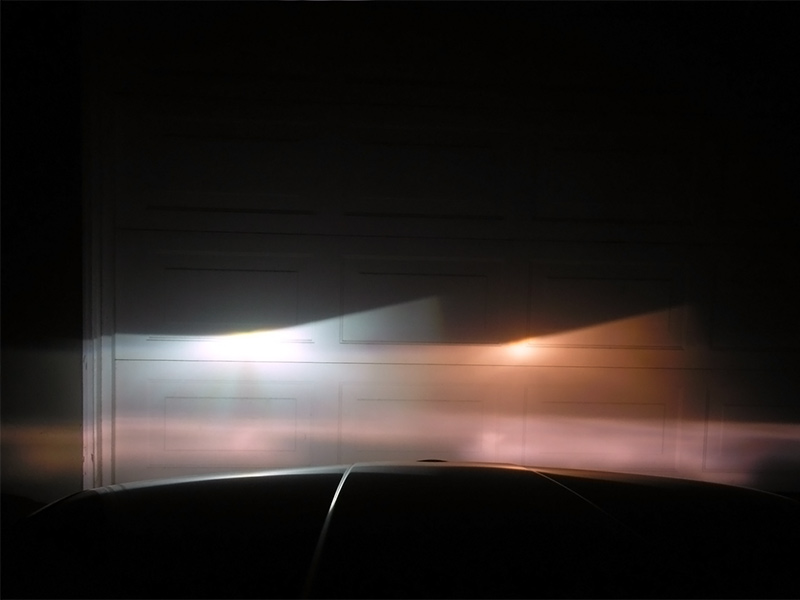
So, how do they compare?  None to shabby, AND they still have the same beam pattern!  No blinded drivers or wasted light, thankfully.


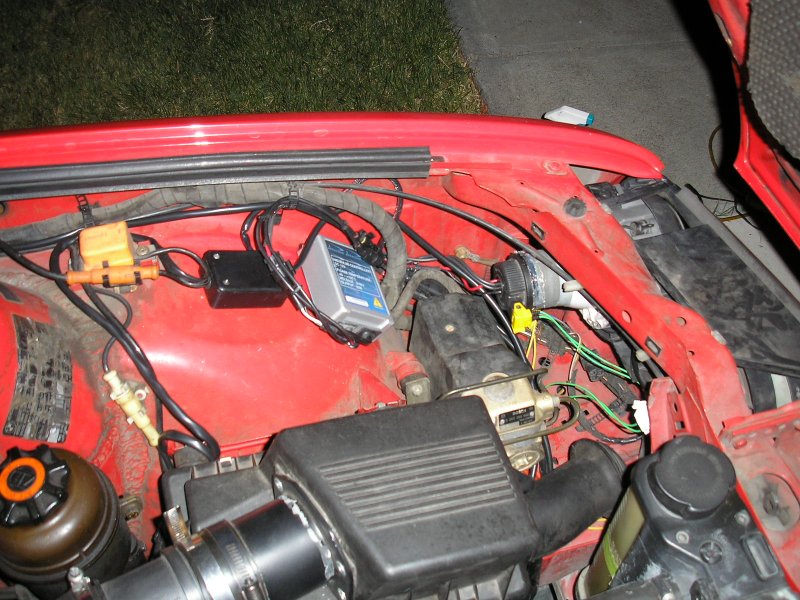
The under-hood installation is not the prettiest bit, but I am beyond the point where I care much.  Once I finish version 2 I will modify the plastic covers that used to be in there and rid myself of that hot glue.  My MAF converter module sits right where I wanted to put the ballast on the driver's side.  Stupid MAF conversion.


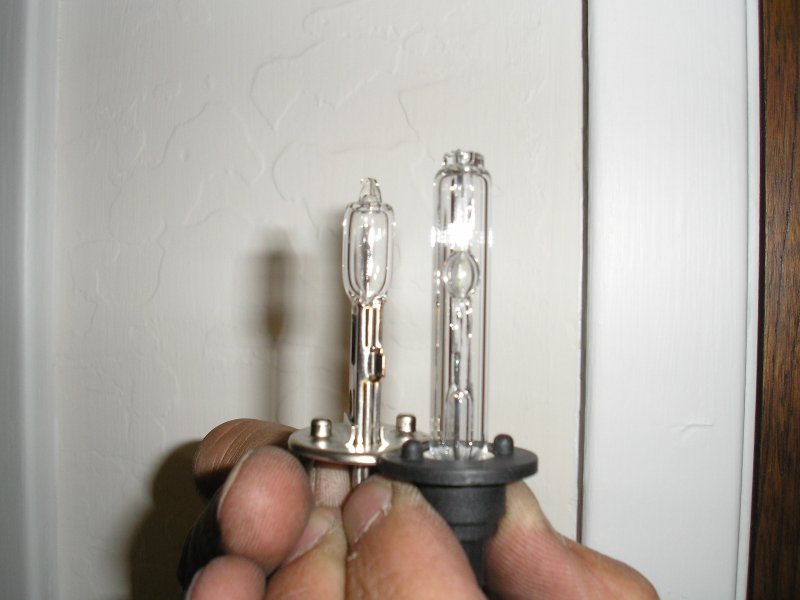
For reference, here are the 2 bulbs.  As you can see, the HID bulb's arc chamber is in the same position as the H1 bulb's filament.  They really are exactly alike...the angle of the picture distorts it a little.

06/05/2011 - 212,354 miles
Visit HERE for a plethora of 318iS stuff and some other randomness.  Would you say I have a, plethora, of pinatas?

bmwman91

  • Administrator
  • Legendary
  • *****
  • Thank You
  • -Receive: 33
  • Posts: 2798
    • View Profile
    • http://www.e30tuner.com/
Installing HID Lights
« Reply #1 on: September 26, 2007, 10:21:37 PM »
So, what will version 2 do to eliminate the embarrassing-glue?  I will enlarge the hole in the light covers to 1 5/16" and put this part through.  I ordered some Nylon rod from McMaster, and happen to have access to a decent machine shop back in my parents' garage.  Nothing like a home cooked meal and some lathe action.  It goes through the hole, sits on the shoulder, and has a snap-ring hold it in.  I will use some black Silicone RTV to seal it up...only a little so it is not goopy.  Originally I thought about trying some empty film canisters...but nah.  I want this to outlive me.


For anyone who is interested, here is a quick technical drawing.

NOTE:
The 1/16" dimension that goes between the shoulder and the circlip groove is for reference ONLY!  I have not gone out and taken the actual thickness of the cap plastic.  This dimension is a guess.  Use this at your own risk until I get out there and check.


If someone wants a printable PDF of this for an A-size drawing (8.5x11) let me know.  It would be easy to export, and would make the stated scale a bit more useful lol.
« Last Edit: September 27, 2007, 12:19:16 AM by bmwman91 »

06/05/2011 - 212,354 miles
Visit HERE for a plethora of 318iS stuff and some other randomness.  Would you say I have a, plethora, of pinatas?

jpod999

  • Hero Member
  • *****
  • Thank You
  • -Receive: 0
  • Posts: 620
    • View Profile
Installing HID Lights
« Reply #2 on: September 26, 2007, 11:38:26 PM »
Hehe, my ballasts are covered.  You pop my hood and won't know I have HID's until I turn my lights on.


Thanks to Brad at http://img443.imageshack.us/img443/7567/ticevalleysiggv7.jpg">Shutterflick.com for editing the sig.

bmwman91

  • Administrator
  • Legendary
  • *****
  • Thank You
  • -Receive: 33
  • Posts: 2798
    • View Profile
    • http://www.e30tuner.com/
Installing HID Lights
« Reply #3 on: September 27, 2007, 12:20:35 AM »
I put in a new drawing that was not complete crap.  As noted by a member in bimmerforums who found my first one quite offensive (to be plain about it), and upon actually looking at it, it had problems.  The new one is as good as it gets.

jpod999, how did you cover yours?  High beam caps?

06/05/2011 - 212,354 miles
Visit HERE for a plethora of 318iS stuff and some other randomness.  Would you say I have a, plethora, of pinatas?

FL318is

  • Legendary
  • ******
  • Thank You
  • -Receive: 0
  • Posts: 1042
    • View Profile
Installing HID Lights
« Reply #4 on: September 27, 2007, 09:42:02 AM »
THANKS for the DIY.  HIDs are my next project and this will be a great help.  It apperas as though your headlights are US.  Mine are euro elips but I think the "procedure" would work.

bmwman91

  • Administrator
  • Legendary
  • *****
  • Thank You
  • -Receive: 33
  • Posts: 2798
    • View Profile
    • http://www.e30tuner.com/
Installing HID Lights
« Reply #5 on: September 27, 2007, 09:52:44 AM »
Mine are the Euro non-smilies by Bosch.  Hella put the smile bit in theirs.  The US ones used 9006 bulbs or something.

06/05/2011 - 212,354 miles
Visit HERE for a plethora of 318iS stuff and some other randomness.  Would you say I have a, plethora, of pinatas?

FL318is

  • Legendary
  • ******
  • Thank You
  • -Receive: 0
  • Posts: 1042
    • View Profile
Installing HID Lights
« Reply #6 on: September 27, 2007, 10:08:12 AM »
WHEW!  LOL!  Yeah, I know the difference between night and day!  Now give me that screw driver, I know what I'm doing.

So then, based on the fact that yours are euro non smiles and mine are euro non smiles, it should be the same.  I did notice how yours are a plastic headlamp cone while mine are a green metal.

How 'bout this, fly down here and I will buy you a beir (or 2) and you can do my euro HID conversion? :cool:

bmwman91

  • Administrator
  • Legendary
  • *****
  • Thank You
  • -Receive: 33
  • Posts: 2798
    • View Profile
    • http://www.e30tuner.com/
Installing HID Lights
« Reply #7 on: September 27, 2007, 11:21:35 AM »
Haha, I am all about traveling.  And beer.

Apparently, Stuck has said that the covers are unnecessary.  He ran without them (using D2S bulbs for whatever reason, and modifying the housing to accept them), and never had water problems.  The same might work for the H1 based ones, but I would use some silicone RTV at the least.

If no cover is used, the install should take all of 30 minutes.  Otherwise, maybe we can look into shipping the lights and HID stuff to me and I could do it for you for a nominal fee lol.  Let's wait & see how the cover extensions work out first though.

06/05/2011 - 212,354 miles
Visit HERE for a plethora of 318iS stuff and some other randomness.  Would you say I have a, plethora, of pinatas?

jpod999

  • Hero Member
  • *****
  • Thank You
  • -Receive: 0
  • Posts: 620
    • View Profile
Installing HID Lights
« Reply #8 on: September 27, 2007, 04:47:52 PM »
FL318iS.  You're making it harder than it actually is.  I did the same thing.  

-take off the lowbeam cap
-drill a hole in it
-connect the positive and negative to their respective wires on the HID harness
-put the grommet in the hole
-mount the ballast
-install bulb
-connect new HID harness to bulb
-enjoy your HIDness.

HID's work on all ellipsoid headlights.  Euro spec ones, whether it be smiley or non smiley uses an H1 bulb.  US spec ellipsoids use H4 bulbs.  The temperature that car companies use for their HID's is 4300k, this projects a yellow tinted light but when you look at the headlight it looks blue.  I am running 6000k which projects a white light with a blueish tint and looks very blue when looking at the headlight.  Let me go get pictures of my ballast install.


Thanks to Brad at http://img443.imageshack.us/img443/7567/ticevalleysiggv7.jpg">Shutterflick.com for editing the sig.

bmwman91

  • Administrator
  • Legendary
  • *****
  • Thank You
  • -Receive: 33
  • Posts: 2798
    • View Profile
    • http://www.e30tuner.com/
Installing HID Lights
« Reply #9 on: September 27, 2007, 05:06:08 PM »
jpod, I tried it like that and the back of the bulb harness was smacked up against the grommet if I screwed the cap all the way on.  Did you just run it like that anyway?  I am just afraid of having to deal with an RMA if the harness craps out or something.

06/05/2011 - 212,354 miles
Visit HERE for a plethora of 318iS stuff and some other randomness.  Would you say I have a, plethora, of pinatas?

jpod999

  • Hero Member
  • *****
  • Thank You
  • -Receive: 0
  • Posts: 620
    • View Profile
Installing HID Lights
« Reply #10 on: September 27, 2007, 06:14:05 PM »
Here are the pics:

1.


2.


3.


4.


Sorry, I don't know what an RMA is.


Thanks to Brad at http://img443.imageshack.us/img443/7567/ticevalleysiggv7.jpg">Shutterflick.com for editing the sig.

bmwman91

  • Administrator
  • Legendary
  • *****
  • Thank You
  • -Receive: 33
  • Posts: 2798
    • View Profile
    • http://www.e30tuner.com/
Installing HID Lights
« Reply #11 on: September 27, 2007, 06:59:28 PM »
Return to Manufacturer.

06/05/2011 - 212,354 miles
Visit HERE for a plethora of 318iS stuff and some other randomness.  Would you say I have a, plethora, of pinatas?

jpod999

  • Hero Member
  • *****
  • Thank You
  • -Receive: 0
  • Posts: 620
    • View Profile
Installing HID Lights
« Reply #12 on: September 27, 2007, 09:37:42 PM »
So are you wary of leaving it with some bent wires?


Thanks to Brad at http://img443.imageshack.us/img443/7567/ticevalleysiggv7.jpg">Shutterflick.com for editing the sig.

bmwman91

  • Administrator
  • Legendary
  • *****
  • Thank You
  • -Receive: 33
  • Posts: 2798
    • View Profile
    • http://www.e30tuner.com/
Installing HID Lights
« Reply #13 on: September 27, 2007, 10:18:29 PM »
Sorta.  I do not like placing unnecessary loads on wire looms.  The loom on yours looks a little different than mine anyway.  Yours looks a little shorter, so you are probably home free.

06/05/2011 - 212,354 miles
Visit HERE for a plethora of 318iS stuff and some other randomness.  Would you say I have a, plethora, of pinatas?

FL318is

  • Legendary
  • ******
  • Thank You
  • -Receive: 0
  • Posts: 1042
    • View Profile
Installing HID Lights
« Reply #14 on: September 28, 2007, 09:25:24 AM »
I love this place!  

FYI, I am the kind of mechanic who reasoned that, if rectracting the vert top manually was a slow process, I could enhance it by using a cordless 18v hammer drill with the now modified OEM allen crank...

The rest is $700.00 history.

Thanks for all the help.  This is proof positive that this place is a valuable resource.  Other sites would hand you your head.