Author Topic: My LC-1 Installation Guide  (Read 15203 times)

bmwman91

  • Administrator
  • Legendary
  • *****
  • Thank You
  • -Receive: 33
  • Posts: 2798
    • View Profile
    • http://www.e30tuner.com/
My LC-1 Installation Guide
« on: May 09, 2012, 09:41:57 PM »
EDIT:
I no longer recommend the use of the LC-1. I have some suspicions about quality and accuracy of the unit, and Innovate shut down their user forums a while back which is also a red flag. This is just my experience though.

------------------------------------

OK, I finally condensed years of messing around with one of these wide band sensor setups into a few images. There is really ONE right way to install & configure this thing, and a large number of wrong ways (many of which I discovered over the years lol).

OK, so first you need to physically install the thing. The cable that comes with the Bosch LSU4.2 sensor is a bit short, and the best place I have found for the controller is under the battery tray with zip ties. I stuck them through the various screw holes & holes where the old O2 sensor connector clipped (it will either be cut-off or moved).

OK, so here is the stock wiring that is related to the O2 sensor in the 318iS.
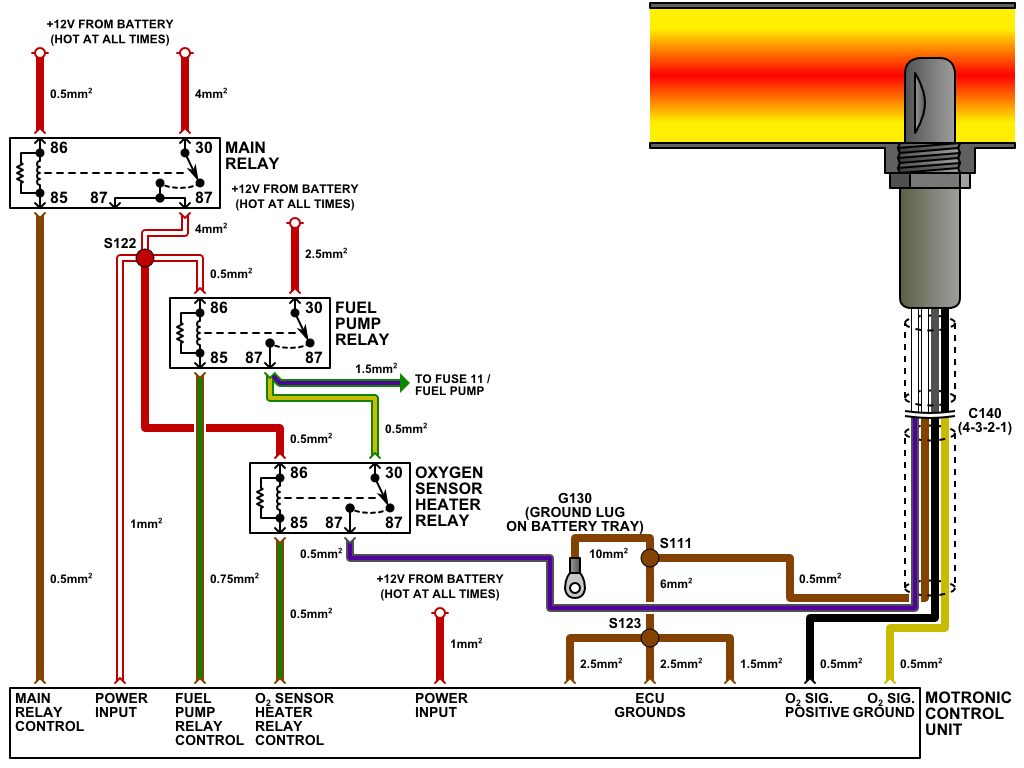

To wire in the LC-1, you will have to do a fair amount of cutting & splicing. All of the needed connections are shown in the second diagram. I opted to run the LC-1 cable into the glove box, as well as the remnants of the stock O2 sensor harness. All connections were made with fully insulated spade connectors, and while you CAN use butt crimps, I would advise the use of something that you can easily service/disconnect.
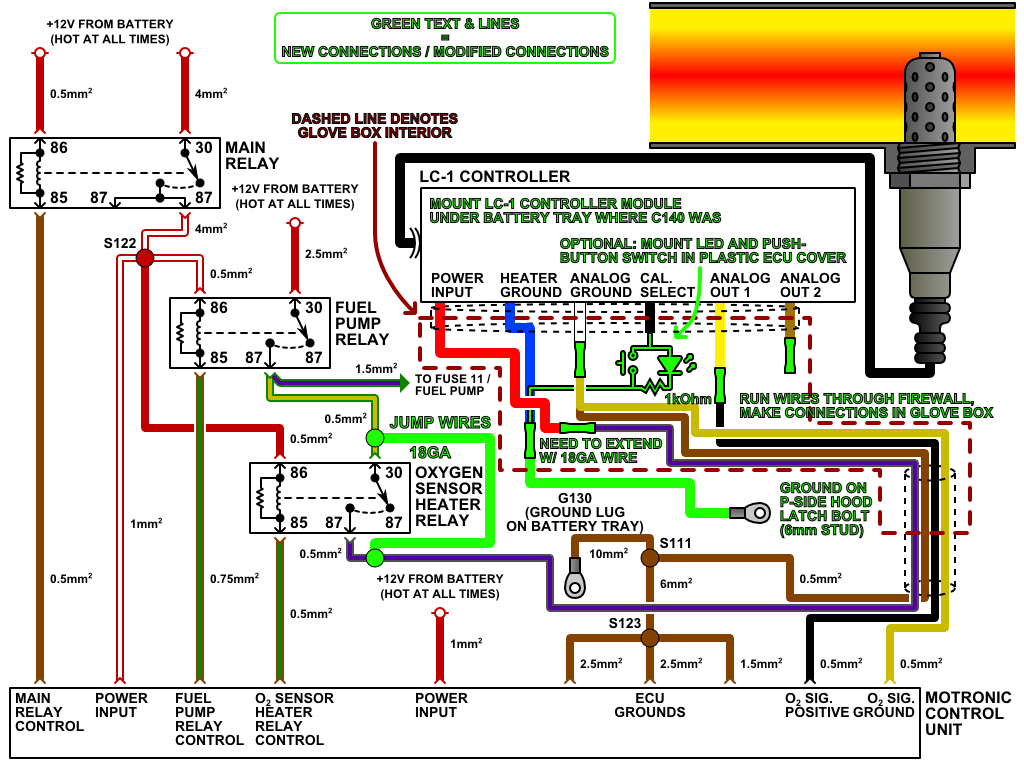

The installation of the LED and push-button is optional. I did it because I want to be able to re-calibrate the sensor easily and be able to see the device's status. I did this by getting a momentary push button, LED and resistor at Radio Shack, mounting them in some holes that I drilled in the plastic ECU cover in the glove box, and soldering them together.

Please note that the heater ground from the LC-1 is NOT, and SHOULD NOT be grounded by the ECU. I tried this originally and it caused a 100mV DC offset at the ground which really screwed things up. Buy a 1/4" ring terminal and run the heater ground to the hood latch bracket, or some other chassis ground if you prefer. Just don't use the lug where the ECU is grounded. The analog ground MUST be connected to both the stock O2 sensor ground AND the ECU's O2 signal ground lines. This is critical.

As far as jumping the O2 sensor relay goes, that is not optional either. The ECU cuts power to the O2 sensor under full throttle, which isn't good for the sensor, and a problem if you plan to actually USE it! The easy way to do it is to just jump the wires by cutting them and joining them with a butt splice or insulated spade connectors.

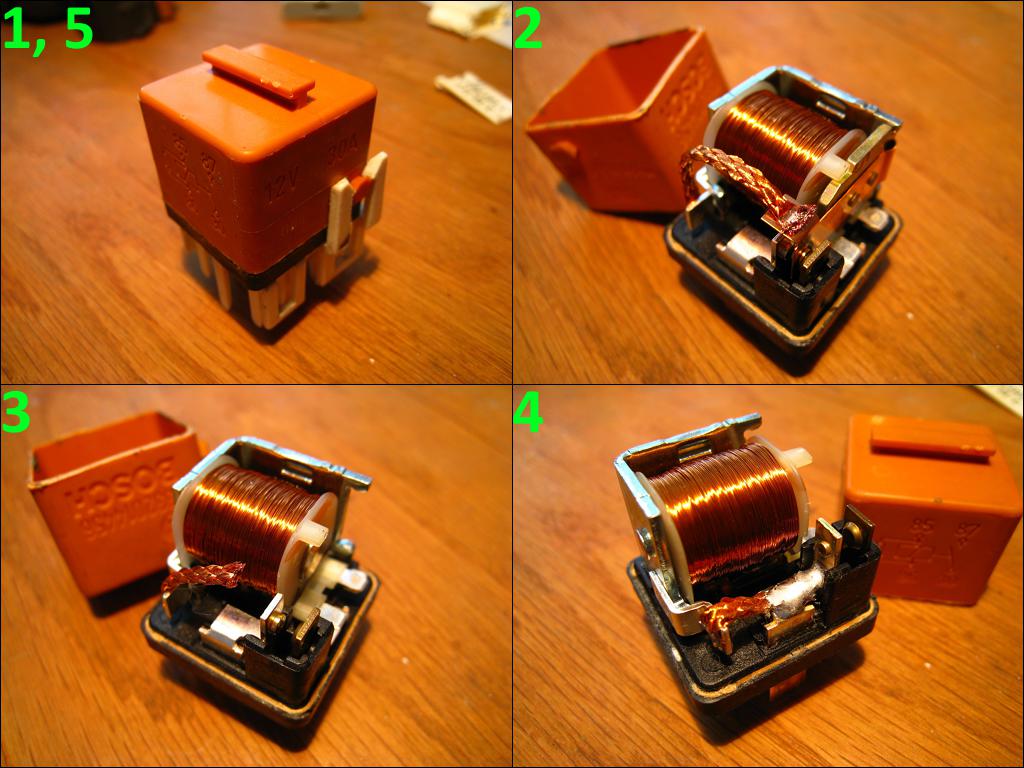
There is a better way though. Bust open the relay and modify it! It's clean, and you won't get any check engine lights. I sealed the cover back on with some plain old super glue. If you are bad with a soldering iron, then just cut & splice the wires externally. Doing this means that you do NOT need to splice the 30/87 wires outside of the O2 heater relay.


Anyway, with it all wired in you will need to calibrate it. I recommend doing this with the sensor not installed in the exhaust yet. If it is, you can unplug the fuel injectors, press the gas pedal all the way down and run the starter for 5-10 seconds to get fresh air into the system.

With it wired the way that it is, the LC-1 is not powered when the key is in the accessory position (and for good reason). Use a piece of wire to jump Fuse 10 to the slot for terminal 87 of the O2 sensor relay, put the car in accessory mode and run the calibration. When done, remove the wire & put the relay back. You do not want to do this with the car running because a) the sensor will be in exhaust gas, and b) the LC-1 stops its output when being programmed, which makes the ECU angry.

The last order of business is setting up the output. If you are using this with a stock ECU, you will need to make adjustments. The thing comes programmed as follows:
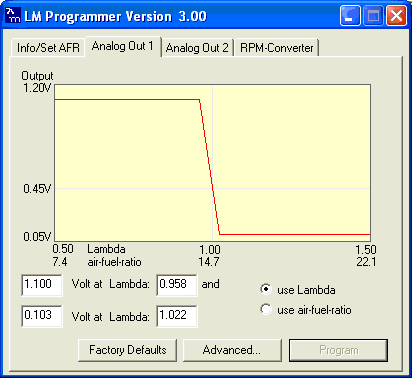

This won't work well with the Motronic. The Motronic expects a ~100mV - ~900mV input from the sensor, and will toss a CEL if it sees too high of a voltage. Set up the LC-1 so that it matches the shot below.


That's it. It is a lot of work to install one properly, I won't lie. There are tougher projects out there, but this one involves a very critical part of the engine controls and MUST be done properly. If it isn't, you will get bad mileage, reduced power and CELs.
« Last Edit: September 24, 2014, 12:24:59 PM by bmwman91 »

06/05/2011 - 212,354 miles
Visit HERE for a plethora of 318iS stuff and some other randomness.  Would you say I have a, plethora, of pinatas?

Hey-u

  • Full Member
  • ***
  • Thank You
  • -Receive: 0
  • Posts: 106
    • View Profile
My LC-1 Installation Guide
« Reply #1 on: May 11, 2012, 07:41:44 PM »
Can this be used for installing Mega Squirt?

bmwman91

  • Administrator
  • Legendary
  • *****
  • Thank You
  • -Receive: 33
  • Posts: 2798
    • View Profile
    • http://www.e30tuner.com/
My LC-1 Installation Guide
« Reply #2 on: May 12, 2012, 12:24:50 PM »
Yes, the LC-1 works fine with Megasquirt. You wouldn't use the narrow-band output emulation though. You could do something like have the output vary linearly from 0-5V across an AFR range of 10-20.

06/05/2011 - 212,354 miles
Visit HERE for a plethora of 318iS stuff and some other randomness.  Would you say I have a, plethora, of pinatas?

doitover

  • Sr. Member
  • ****
  • Thank You
  • -Receive: 2
  • Posts: 260
    • View Profile
My LC-1 Installation Guide
« Reply #3 on: May 14, 2012, 02:06:41 PM »
Thanks, it would be nice to have this made sticky somewhere.

wazzu70

  • Nasty Nick
  • Hero Member
  • *****
  • Thank You
  • -Receive: 18
  • Posts: 671
    • View Profile
My LC-1 Installation Guide
« Reply #4 on: May 14, 2012, 04:00:29 PM »
Very nice writeup. Did you make the wiring diagrams yourself from the Bentley schematics? I like the use of color here.
-Nick
91 E30 M42 with VEMS

bmwman91

  • Administrator
  • Legendary
  • *****
  • Thank You
  • -Receive: 33
  • Posts: 2798
    • View Profile
    • http://www.e30tuner.com/
My LC-1 Installation Guide
« Reply #5 on: May 14, 2012, 05:09:58 PM »
I drew the diagrams in Inkscape (free open source vector art program...as good as Illustrator!). Yeah, I pulled the colors and stuff from a Chilton's guide.

06/05/2011 - 212,354 miles
Visit HERE for a plethora of 318iS stuff and some other randomness.  Would you say I have a, plethora, of pinatas?

E301000

  • Newbie
  • *
  • Thank You
  • -Receive: 0
  • Posts: 20
    • View Profile
My LC-1 Installation Guide
« Reply #6 on: May 24, 2012, 12:05:18 PM »
Will this wideband make realtime changes to to vehicle's ECU as it would if it was installed on a standalone engine management since the original ECU was designed to use a narrow band O2 seneor.

bmwman91

  • Administrator
  • Legendary
  • *****
  • Thank You
  • -Receive: 33
  • Posts: 2798
    • View Profile
    • http://www.e30tuner.com/
My LC-1 Installation Guide
« Reply #7 on: May 24, 2012, 12:35:02 PM »
The LC-1 in narrow-band emulation mode will look just like the stock sensor to the stock ECU. SO, your car will run about the same, but with a less expensive O2 sensor. While the wide band sensor & controller are an order of magnitude faster & more accurate, the ECU isn't designed to take advantage of that lol. To be honest, there isn't really too much of an advantage to running this on a stock car.

06/05/2011 - 212,354 miles
Visit HERE for a plethora of 318iS stuff and some other randomness.  Would you say I have a, plethora, of pinatas?

axisofjustice

  • Jr. Member
  • **
  • Thank You
  • -Receive: 0
  • Posts: 95
    • View Profile
My LC-1 Installation Guide
« Reply #8 on: June 14, 2012, 12:54:43 AM »
This isn't an old post, why are the pics down? Anyone got em saved?

bmwman91

  • Administrator
  • Legendary
  • *****
  • Thank You
  • -Receive: 33
  • Posts: 2798
    • View Profile
    • http://www.e30tuner.com/
My LC-1 Installation Guide
« Reply #9 on: June 14, 2012, 01:14:18 AM »
No, my hosting service is basically holding my domain hostage. It expired, but they seem to have nobody working there and no way for me to renew it. I have been freaking out ever since I got the notice of expiration last week since the assholes won't answer emails or their phone. It was set to auto-renew on a credit card that expired & was replaced a few months ago...forgot to update the info! I am HOPING to get in contact with them somehow, or else it'll be like 90 days until the domain goes up for public availability, at which time a bot will probably snatch it & try to sell it back to me at some exorbitant price. I can't transfer it without them giving me the auth code either, so it is truly stuck inactive now.

06/05/2011 - 212,354 miles
Visit HERE for a plethora of 318iS stuff and some other randomness.  Would you say I have a, plethora, of pinatas?

axisofjustice

  • Jr. Member
  • **
  • Thank You
  • -Receive: 0
  • Posts: 95
    • View Profile
My LC-1 Installation Guide
« Reply #10 on: June 14, 2012, 02:04:17 AM »
Wow, my friend, that sucks. Sorry, I feel like a demanding jerk now! I'm just very new and was hoping this would be a good resource for learning how to properly install my LC-1. My newness to this causes me so many headaches and setbacks. I want to get this project car to the next step so badly though, it's worth it.

For a new guy to tuning, would i be smarter to have a bung welded and just use this LC-1 for one purpose (monitoring and logging afr)?
« Last Edit: June 14, 2012, 02:08:54 AM by axisofjustice »

bmwman91

  • Administrator
  • Legendary
  • *****
  • Thank You
  • -Receive: 33
  • Posts: 2798
    • View Profile
    • http://www.e30tuner.com/
My LC-1 Installation Guide
« Reply #11 on: June 14, 2012, 01:01:34 PM »
No worries man, it's understandable.

Anyway, I got a hold of the admin and my domain seems to be functional now. Enjoy!

06/05/2011 - 212,354 miles
Visit HERE for a plethora of 318iS stuff and some other randomness.  Would you say I have a, plethora, of pinatas?

Hey-u

  • Full Member
  • ***
  • Thank You
  • -Receive: 0
  • Posts: 106
    • View Profile
My LC-1 Installation Guide
« Reply #12 on: June 14, 2012, 01:47:32 PM »
Would this schematic work for install on an M44?

bmwman91

  • Administrator
  • Legendary
  • *****
  • Thank You
  • -Receive: 33
  • Posts: 2798
    • View Profile
    • http://www.e30tuner.com/
My LC-1 Installation Guide
« Reply #13 on: June 14, 2012, 03:35:57 PM »
I am not sure. The general idea should be the same, but the wire colors are most likely different. Find some M44 wiring diagrams (E36 wiring diagrams are easy to find on Google) and see how different they look.

06/05/2011 - 212,354 miles
Visit HERE for a plethora of 318iS stuff and some other randomness.  Would you say I have a, plethora, of pinatas?

axisofjustice

  • Jr. Member
  • **
  • Thank You
  • -Receive: 0
  • Posts: 95
    • View Profile
My LC-1 Installation Guide
« Reply #14 on: June 14, 2012, 03:45:18 PM »
Wow, just in time. Pics have been saved, hope you don't mind. I won't share them without permission.