Zoso's how-to pages are so good I had to temporarily post them on our site. Hopefully Zoso will get his site back up...but until then (if that's OK with everyone) I'll leave it up on M42Club.
E30 318i Repair -
Accessory Belt Replacement Replacing the three belts on the M42 is something that should not be overlooked. I neglected mine for too long and the belt the powers the alternator and water pump broke 60 miles from my house, leaving me stranded. I had to shut the engine down as the heat was building due to no flow of coolant. This was in the middle of the winter and I ended up having the car towed all the way home where I replaced the broken belt in the freezing cold.
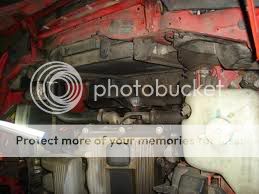
Unlike more modern engines (including the M42 in the E36), our M42 uses three belts to power the alternator, water pump, fan, power steering, and air conditioning compressor. The belts must be put on in order:
Inner most belt = Alternator, Water pump, Fan
Middle belt = AC
Outer belt = Power Steering
Back in the winter, I couldn't figure out how to get the AC and Power Steering belts off so I simply cut them. It was dark, cold, and the driveway was covered in snow so my patience was limited. It's the spring now and I want my power steering and AC back. Driving with no power steering is miserable. The car really tramlines on the highway - it will get pulled into the grooves and imperfections on the highway and it feels like I'm constantly fighting and adjusting the steering wheel to keep it straight.
Require Parts and Tools:
Replacement Belts - I used Goodyear Gatorback Belts from my local AutoZone.
Various sockets and wrenches
Let's begin the procedure! Remember that my 1991 318i may be slightly different than your car. Double check that the part numbers are the same for your exact car.
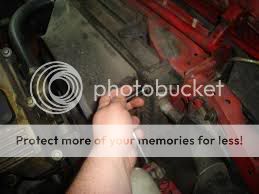
First, remove the fan cowl. It's held on by two 10mm bolts. Once out of the way, you can see what you're working on.
Get under the car and also remove the underbody panel. This job is easier with lower access. I'm sure it can be done without removing this panel, but I think it makes the job easier and removing the panel isn't tough.
If any old belts are still on the car, cut them or remove them and save them as spares. Let's begin with the alternator belt. This one was a real pain on my car and I'm not sure if it is because there is something wrong with my tensioner bracket or if all are the same way. I'll tell you the technique that worked best for me.
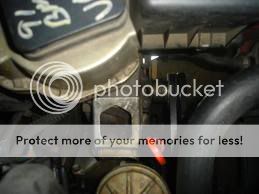
Loosen the tensioner nut (the one on the opposite side as the oil level dip stick. Use a wrench and turn the tensioner bolt to crank down the tension so you can remove the old belt and but a new one on. Use the wrench to retighten it. I found that I can't really crank up the tension as the teeth on the tensioner bolt slip so I took the butt of a large hammer and wedged it in the hole in the top of the alternator bracket and pried the alternator tighter. Then retighten the nut.
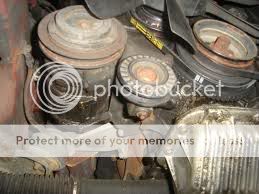
Now add the AC belt. This one has a pulley type tensioner (it's the middle pulley that hangs lowest). To loosen the pulley tensioner, you need to pry off the center cap (mine was already missing) and loosen the bolt). Then use an allen wrench to loosen the screw that is mounted vertically. Replace the belt and retighten everything.
(Note I had the power steering belt on the middle pulley - the middle pulley where the AC belt goes.)
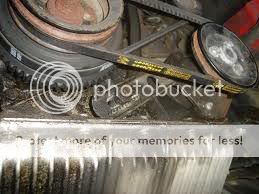
The power steering belt is tightened using a similar tooth and bracket method as the alternator. Simply turn that nut and it'll push the power steering pump farther away or closer.
(Please note that in this picture, I accidentally put the power steering belt on the wrong pulley.. it should go on the outermost pulley from the engine - I forgot to retake a picture with the belt on the correct pulley)
Performed: May 6, 2006
Mileage 191,200
Conclusion: This car is so much more enjoyable with power steering!
I wanted to make a note about belts. The car came with the typical belt and when I replaced the belts, I decided to use the
Goodyear Gatorback belts. This belt is advertised as being stronger and quieter than typical belts and it features a diagonal pattern instead of the normal tooth pattern. The result with my car (as compared to the worn belts) was much quieter operation and a significantly smoother idle. Before I'd the idle vibration would even be felt in the steering wheel. The Goodyear belts a bit more money, but I'm so happy with the reduced noise and idle vibrations that I'd get them again.
Difficulty: 1 /5
Disclaimer:[FONT="] I am not a professional mechanic. Information this page should be used at your own risk and discretion. Different models and model years may be different than my 1991 318i. Read: If you screw your car up following my instructions, sorry. Isn't it sad that in this sue crazy world you have to put a disclaimer on your web page? [/FONT] Topic: Zoso's Accessory Belt Replacement (Read 4497 times)