Author Topic: E30 Audio Overhaul - My Project Details  (Read 42134 times)

bmwman91

  • Administrator
  • Legendary
  • *****
  • Thank You
  • -Receive: 33
  • Posts: 2798
    • View Profile
    • http://www.e30tuner.com/
E30 Audio Overhaul - My Project Details
« on: May 12, 2010, 04:57:37 PM »
This will be updated as the project progresses (so, it will be slow).

I rarely post on r3v, but I lurk frequently since there is a lot of decent information here. Since a member here gave me a lot of help via PM, I suppose that I should try to add what I can here through the course of my project. Here it goes...

Well, it all began with me making an uninformed purchase on eBay of a CD43 head unit. For those who don't know what the CD43 is, it is basically the last (and best) DIN-sized head unit produced for BMW by Blaupunkt. It is also called the "BMW Business CD" head unit. Anyway, I say that it was an uninformed decision because I planned to just run the speakers directly from it. I wanted stock equipment in the dash again, and supposedly the unit has better distortion specs than most after-market HU's.

While one CAN run the speakers from it directly, it is apparently not entirely recommended. The CD43 was always used in conjunction with an amplifier in factory installations, and was meant to supply low-power audio signals to that rather than to speakers. So, I looked at amplifiers. Then decided to see what would be required for a "proper" setup, combining things I have wanted for a long time and knowledge I have acquired from my home audio projects.

The cost of the equipment comes in a bit above what I want to spend, so I am still considering a passively crossed over system. That would take almost 40% off of the price (no need for the 6XS or dedicated sub amp). The diagrams below show what I WANT to install. I suppose that I should do it now, because a year from now I will have mortgage payments to make & a lot less cash for fun projects!

11/5/2010
I have put in new, accurate diagrams of the system. Click the images to see the full-sized versions.


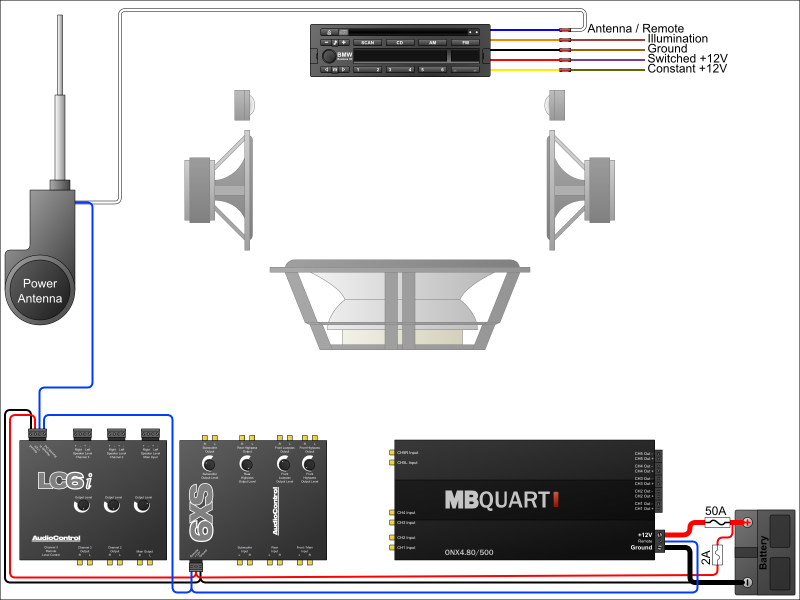
Power wire to the amp is 8ga, and LC/XO power wires/remote are 14ga.


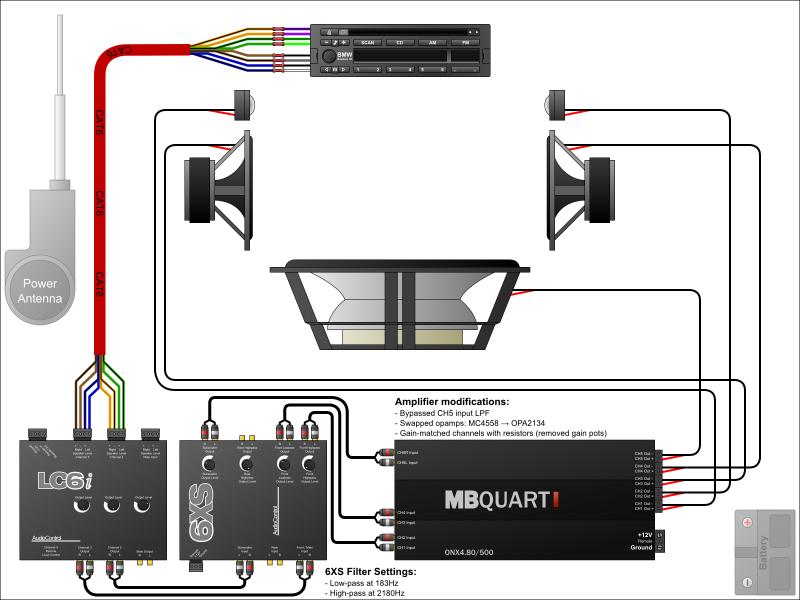
Speaker wire is 14ga. I switched to CAT6 cable for the signal running from the HU to the LC6i. It has better noise-rejection properties than the multi-conductor car-audio junk I tried at first. Note that this will ONLY make a difference if you are running differential signals into a device that has differential inputs!

Subwoofer = SB Acoustics SW26DAC76-4, mounted in the ski-pass hole.
Front woofers = SB Acoustics SB17NRXC35-4 7" drivers
Front tweeters = Seas Prestige 27TAFNC/G 1" tweeters
LC6i = Audio Control line level converter, model LC6i
6XS = Audio Control active crossover, model 6XS
MB Quart ONX4.80/500 = 5 Channel amp to drive everything (my "space saver" solution)

I will not be running rear speakers, other than the sub. Rear signal lines will be LPF'ed, summed in the amp & fed to the sub. Some people like having rears, I don't. Personal preference, there.

One big trick will be getting 75mm deep woofers mounted up front. The existing cavities are only 69-71mm deep. I might try some hammering, as well as a few mm of Damplifier stacked for spacing under the driver frame.

Anyone have any comments or critiques? Thanks!
« Last Edit: November 30, 2012, 12:42:47 PM by bmwman91 »

06/05/2011 - 212,354 miles
Visit HERE for a plethora of 318iS stuff and some other randomness.  Would you say I have a, plethora, of pinatas?

bmwman91

  • Administrator
  • Legendary
  • *****
  • Thank You
  • -Receive: 33
  • Posts: 2798
    • View Profile
    • http://www.e30tuner.com/
E30 Audio Overhaul - My Project Details
« Reply #1 on: May 18, 2010, 01:38:06 AM »
I have been making more preparations for the build. I received my tweeter pods & have been "cleaning" them in preparation for the tweeters I want to install.

To get the stock drivers out, use a small flat-blade screwdriver to pry the metal body out. You can crank on the plastic ring around it & mess it up because it is coming out next.


Getting the ring out is a little more work. Needle-nose pliers are a good tool for the job. Grab the ring from behind & lever inward to break the glue holding it into the pod. I found that getting it nice and hot with a blow drier helped soften the (ancient) glue. Just work carefully, and once the glue cracks in one or two places you can probably yank it out.


I used some small cutters & a Dremel with a flexible sanding disk to remove the inner molded ring. I wanted the inside surface nice and flush for the installation of the tweeter.


A little closer...


Don't judge me...engineering is a disease. Sometimes I catch myself folding a towel before tossing it into the hamper. Anyway, I want this planned out 100% before buying drivers.


The important dimensions are added. That inner lip is best cut off. If you don't want to cut it, it sticks up 1.4mm past the inner surface, and is 1mm thick.


Just in case you were wondering how much room you get (depth), here are the important domensions on the tweeter. I am not sure how much more space you have beyond this, and I have no intention of modeling the whole door!


So there I am for now. I just need to figure out if there is any way to get a 75mm deep woofer into the front cutouts. I measured 69-73mm from the mounting surface. Spacers are not really an option since I want minimal interference with the covers. Does anyone know if there is anything behind the metal? I can easily "engineer" some additional depth with a 2x2 & a big rubber mallet, as long as I am not hitting the fender or something.

06/05/2011 - 212,354 miles
Visit HERE for a plethora of 318iS stuff and some other randomness.  Would you say I have a, plethora, of pinatas?

bmwman91

  • Administrator
  • Legendary
  • *****
  • Thank You
  • -Receive: 33
  • Posts: 2798
    • View Profile
    • http://www.e30tuner.com/
E30 Audio Overhaul - My Project Details
« Reply #2 on: May 18, 2010, 11:49:17 AM »
I emailed Audio Control asking them about running the CD43 outputs directly to the 6XS. The inputs are unbalanced, so the device only uses the "+" input, and the "-" input runs to ground. This means that the connection to the CD43 will ONLY use one of the outputs per channel, and the 6XS "-" input will be grounded to the chassis. If you run the "-" output from the CD43 to the 6XS, it would basically short to ground.

They also mentioned that I could use their level converter to take the CD43 inputs (+ & -) & run that to the 6XS, but I don't really see the point if the level converter is just turning the CD43 outputs into unbalanced ones, since the 6XS could just use one output directly. The 6XS can handle inputs of up to 15V before clipping occurs on the input stage, so I do not have any qualms about running the CD43 to it directly.

One advantage to using the level converter is that running the differential signals to the trunk would improve noise immunity. Then I would only be running an unbalanced signal a few inches from the LCO to the 6XS. I can always add that later on.
« Last Edit: May 18, 2010, 11:51:34 AM by bmwman91 »

06/05/2011 - 212,354 miles
Visit HERE for a plethora of 318iS stuff and some other randomness.  Would you say I have a, plethora, of pinatas?

bmwman91

  • Administrator
  • Legendary
  • *****
  • Thank You
  • -Receive: 33
  • Posts: 2798
    • View Profile
    • http://www.e30tuner.com/
E30 Audio Overhaul - My Project Details
« Reply #3 on: May 19, 2010, 02:27:54 AM »
Today's updates:

- Fixed the drawings in post 1. Somehow I deleted the block with the CD43 in the signal drawing. So I fixed that, and updated the signal/ground wiring to the current plan.

- I ordered the drivers from Madisound. I updated the OP to list the ones I purchased. Now I am committed to fitting 75mm deep woofers up front, whether I like it or not lol.

The sub ended up being a low-profile unit from SB Acoustics for a couple of reasons. For one, I want to be able to fit all of my climbing gear & pads in the trunk still. Second, the SBA sub has ~90dB sensitivity and a nice flat response. The SP10 & WQ-1858 had bumpy response curves & only had ~82dB sensitivity & the woofers/tweeters have ~90. That would have meant running 8x the power to the sub to keep the system response flat (or 1/8 to everything else).

According to WinISD, the SBA sub I chose will have an f3 at ~33Hz with the E30 trunk as the enclosure (all theoretical of course, reality will probably be a lot different). That should be more than enough bump capacity.

06/05/2011 - 212,354 miles
Visit HERE for a plethora of 318iS stuff and some other randomness.  Would you say I have a, plethora, of pinatas?

bmwman91

  • Administrator
  • Legendary
  • *****
  • Thank You
  • -Receive: 33
  • Posts: 2798
    • View Profile
    • http://www.e30tuner.com/
E30 Audio Overhaul - My Project Details
« Reply #4 on: May 21, 2010, 09:45:22 PM »
Today's update:

- I decided to switch to 5 channel MB Quart amplifier. I want to save some space, and have less power wiring to deal with. I was looking at the PPI 5 channel one as well, I was sort of suspicious of it since I am having a really hard time finding documentation / information on their products. I suspect that they may be one of the many companies that is riding its name form back when it was reputable. MB Quart is probably just as guilty, and maybe I threw away an extra $170 on their amp, but there is a lot more technical info available that suggests that they are still at least somewhat reputable. Can anyone dish out some information on the reliability of their current electronics?

See the OP for updated plans / schematics.

- I have ordered all of the stuff that I cannot pick up locally. In a week or two I should have it all in my living room. As with many car projects, I will probably have a couple buddies over to slave away on the E30 in exchange for some beer & BBQ. One of them probably still hasn't forgiven me for when I had him help me install Damplifier lol.

Here's the 99% complete list of stuff I had to buy for this.
EDIT:
This list is sort of outdated. I added an LC6i level converter & improvised some mounting stuff. I also don't feel like updating it lol.

The various connectors I bought from Sherco are the crimp & solder type that also have adhesive-impregnated heat-shrink sheaths. I might not survive a nuclear war, but the wire connections will.
« Last Edit: November 07, 2010, 09:59:49 PM by bmwman91 »

06/05/2011 - 212,354 miles
Visit HERE for a plethora of 318iS stuff and some other randomness.  Would you say I have a, plethora, of pinatas?

1991 E30 M42

  • Hero Member
  • *****
  • Thank You
  • -Receive: 0
  • Posts: 835
    • View Profile
E30 Audio Overhaul - My Project Details
« Reply #5 on: May 22, 2010, 12:10:07 AM »
looks great, keep it coming

bmwman91

  • Administrator
  • Legendary
  • *****
  • Thank You
  • -Receive: 33
  • Posts: 2798
    • View Profile
    • http://www.e30tuner.com/
E30 Audio Overhaul - My Project Details
« Reply #6 on: May 23, 2010, 12:08:34 AM »
Today's update:

I got in the trunk & took a bunch of measurements. The amplifier will take some work to mount...it won't fit on the rear bulkhead with the sub. I will probably mount it under the rear parcel shelf (in the trunk). Things should work out nicely back there.

I have also been messing around with ways to mount the CD43 in the HVAC panel. I picked up an extra at a local yard for $4 to hack up. This one is clean enough that I will probably just use it. JB Weld is the best stuff ever. Here is how it fits in. The flash, combined with the light behind it, really accents the gaps. Obviously it will look a lot better inside the nice dark dashboard. I am seeing if I can find a way to get some 1/8" foam in the gaps to prevent the dash backlighting from leaking through, and to prevent rattles.


It took some adjustment, but I got the edges to sit pretty flush.


If you haven't been told this yet, then listen carefully. Don't ever, EVER, set a box on the car's roof while you load stuff. You will forget and drive off with it up there. My punishment for being so stupid will be looking at this every time I am in the car. Luckily, in the car it won't be nearly as noticeable. Cameras & fluorescent light make things look a lot worse than they actually are. Still...STUPID!


How was it done? Yes, JB weld & some 20ga sheet steel. The one over by the OBC was easy. I just snipped the plastic & bent it over to the right position, and then reinforced it with some steel & JB Weld.


The other side was a bit of a pain. We'll see how long this lasts. I can crank pretty hard on it, to the point that the plastic deflects. It seems pretty strong. I want to try this route before I go messing with little fasteners up behind the unit like others have.


I spent the better part of the day doing some other maintenance though. The sunroof guide rails were shot so I replaced them. I also had some exhaust leaks, so I got out the steel hot glue gun (MIG welder) & took care of them.

Later this week I need to design the baffle that the sub will sit in behind the ski pass hole. I will also get into the front fenders & see how much depth a big mallet can buy me.
« Last Edit: May 23, 2010, 01:00:53 AM by bmwman91 »

06/05/2011 - 212,354 miles
Visit HERE for a plethora of 318iS stuff and some other randomness.  Would you say I have a, plethora, of pinatas?

bmwman91

  • Administrator
  • Legendary
  • *****
  • Thank You
  • -Receive: 33
  • Posts: 2798
    • View Profile
    • http://www.e30tuner.com/
E30 Audio Overhaul - My Project Details
« Reply #7 on: May 23, 2010, 03:23:51 AM »
Well, it looks like Christmas came in May. I got home tonight & found that a delivery had been made.

Behold, a box of speakers.


The 6" mid, from the rear...


The 6" mid...from the front...


A pair of Seas tweeters.


The neat low-profile subwoofer.


This thing is nice. The frame castings are top-notch!


Looking more closely at the tweeters...


These are a bit deeper than I had anticipated. I will probably need to cut out the front diffuser to make them fit, but I will only do that as a last resort. It's there for a reason.


I also got a nifty tool. By now I have probably cut 20 holes using an MDF router base & drilling holes in it to pivot from. It is going to be sooo nice to not have to make a new jig every time I want to cut a hole!

06/05/2011 - 212,354 miles
Visit HERE for a plethora of 318iS stuff and some other randomness.  Would you say I have a, plethora, of pinatas?

bmwman91

  • Administrator
  • Legendary
  • *****
  • Thank You
  • -Receive: 33
  • Posts: 2798
    • View Profile
    • http://www.e30tuner.com/
E30 Audio Overhaul - My Project Details
« Reply #8 on: May 26, 2010, 02:48:19 AM »
Today's update:

I finished modifying the tweeters to fit in the pods. It was pretty easy...making the fixture was more work than modding the tweeters lol.

Since putting ferrofluid-filled tweeters into a lathe & spinning them really fast seemed like a bad idea, I decided to make a fixture that would hold them on a rotary table. There the cuts could be made with a mill.


The tweeter is held onto the fixture with an M4x0.7 x 16 machine screw. There is a boss on the back that fits tightly into a bore in the rotary table, thus making it easy to center it on there. I made the jig from a D2.5" 6061 aluminum bar scrap.


The milling operation was simple. I chopped off the flange and knocked a little material off of the front to a diameter of 38mm so it would fit nicely into the existing tweeter pod hole. Obviously, I didn't want to cut too much off or else the nice diffuser would fall off, and probably end up destroying the dome in the process. I held a shop-vac hose next to the cutter during the process to keep chips out of the thing.


Here they are, all chopped up.


Fitted into the pod...


There is about 2mm of clearance between the diffuser & the grill...perfect! I stuck them in the car and there is like 10mm of extra room behind them. That is good, because I would have been pissed if they weren't going to fit!
« Last Edit: May 26, 2010, 02:52:08 AM by bmwman91 »

06/05/2011 - 212,354 miles
Visit HERE for a plethora of 318iS stuff and some other randomness.  Would you say I have a, plethora, of pinatas?

bmwman91

  • Administrator
  • Legendary
  • *****
  • Thank You
  • -Receive: 33
  • Posts: 2798
    • View Profile
    • http://www.e30tuner.com/
E30 Audio Overhaul - My Project Details
« Reply #9 on: May 29, 2010, 03:38:17 AM »
I have almost all of the parts & hardware now. The supplier of all the marine-grade splices & terminals messed up & sent me fewer connectors than I ordered, so I need to wait for the rest.

Anyway, the plan for the weekend is mainly to mount the amplifier & XO, and to build the sub baffle. I won't be tearing the interior out until I am 100% prepared to do the electrical stuff & knock it all out.

In the spirit of the build, I will be going overboard with the mounting scheme on the electronics. It will be a vibration-isolated setup using some nice neoprene rubber foam blocks. Electronics & vibration don't mix well in the long-run, so I want to make sure everything lives a long & happy life.

I also got the tweeters done & installed. I had to bend some metal tabs in the door to grab them better, and get creative with a file to get them in right, but they look good now. I still need to find some 1/8" open-celled foam to put under the tweeter grills so that they don't look special to thieves.

Yeah, it is not super clean, but nobody sees it. You can see where I had to get the file out so that the plastic body of the tweeter could clear the door frame.


This is the amp. It is big as hell and mounting it will be a chore. Overall, I am totally underwhelmed by it. For $380 it is almost a joke considering the quality of home-amplifiers you can get for $200. The mounting flanges are plastic, the adjustment pots aren't totally straight and one of the warranty stickers was slightly cracked. I was bench-testing it to set the gain earlier, and it is sort of shitty. Ch1 & 2 share a gain potentiometer, and there is a ~12% difference between the channels for any given gain setting (that's a "feature" right, since the right speakers are further away from me?). They should have made adjustment pots for EACH channel.

Here's the amplifier.


The crossover unit at least seems to be of reputable quality. I set the sub/mid LPF at 183Hz, and the HPF for the tweeters is at 2180Hz. Ignore the color bands on the resistors in the pics...they are wrong (as I later found out). It turns out that the "front LPF" part is actually a HPF (that should be set at the same value as the sub LPF), and when coupled with the tweeter HPF (HPF for the tweeter, LPF for the mid) forms a band-pass filter for the mids. The documentation doesn't explain this, probably because it would lead to at least as much confusion. Burn test tones that are solidly in the pass-bands of each filter section & test them. All the planning in the world won't save you if you don't realize you made a mistake. Testing is your friend!


It is very nice that they made the unit in a fashion that allows precise custom settings. I bought a bunch of 0.1% tolerance resistors on DigiKey for this. It is important that the resistors be as close as possible in value to maintain as much noise rejection & phase-coherence as possible.
« Last Edit: November 05, 2010, 09:14:01 PM by bmwman91 »

06/05/2011 - 212,354 miles
Visit HERE for a plethora of 318iS stuff and some other randomness.  Would you say I have a, plethora, of pinatas?

bmwman91

  • Administrator
  • Legendary
  • *****
  • Thank You
  • -Receive: 33
  • Posts: 2798
    • View Profile
    • http://www.e30tuner.com/
E30 Audio Overhaul - My Project Details
« Reply #10 on: May 30, 2010, 02:07:12 AM »
Today's update:

I got the front woofers installed. This was a real bitch. The speaker pods are part of the door jamb, so you really cannot pound the metal out much unless you don't plan to open your door all the way. I plan to open it all the way, so I pounded it out as much as I could without interfering with anything. This bought a few millimeters.

My favorite tool!


The rear of the pole piece does contact the back of the pod when installed. To avoid buzzing and scraping problems, I put some 1/8" closed cell foam on the back of the drivers. They don't sit completely flat in the back, so the pole piece vent is not blocked off. The foam piece is glued on so it won't go "walking."


Since the surface that they mate to was pulled out a little, and the woofers are reasonably thick, the kick panel cover needs to be spaced out so as not to rest on the cloth surround. I turned out some screw spacers on my trusty lathe from some Delrin bar stock. The cover sits on the screw heads now, and there is Damplifier/foam on the back of it so there is no buzzing. I still need to fasten the front of it (up in the footwell) so that it does not stick out so far into the foot area. I only had to make a minor cut to an edge on the glove box so that it won't scrape on the cover. It is totally out of sight, which is nice.


The driver's side took a bit more work. I chopped off the portion of the kick panel cover that goes under the hood release latch since that wasn't going to fit anymore. I also had to make a small cut-out in the knee bolster cover, which is conveniently out-of-sight. The hood release latch needed to be spaced out to accommodate the new position of the cover, so I made some 10mm Delrin spacers and it works like a fucking charm! I was sweating the installation at first, wondering if I might have to use different drivers, but the BFH (big f*****g hammer) & some fearless chopping got the job done. I will seal their perimeters completely when I run the new signal lines.

Thankfully, that was probably the last of the super tricky stuff. I will be working on the sub baffle & electronic hardware mounting next. I opted to use some cabinet-grade Baltic Birch plywood over MDF for this. Plywood does a lot better with heat & moisture in the long run, and since I am not building an enclosure I don't really need to worry about wall resonance.
« Last Edit: May 30, 2010, 12:51:22 PM by bmwman91 »

06/05/2011 - 212,354 miles
Visit HERE for a plethora of 318iS stuff and some other randomness.  Would you say I have a, plethora, of pinatas?

longtallsally

  • Sr. Member
  • ****
  • Thank You
  • -Receive: 0
  • Posts: 255
    • View Profile
    • http://www.longtallsallygs.smugmug.com/
E30 Audio Overhaul - My Project Details
« Reply #11 on: June 06, 2010, 11:54:25 AM »
I was following your thread on R3V as well on this, so I'm glad you posted here.

I'm going to eventually enhance what I've got to include a sub but, like you, I don't want to sacrifice any trunk space.  That and my days of ear drum destroying bass are over.  That said, could you give a few more details on where/how you plan on mounting your sub?  I think you mentioned putting it in the ski pass hole and using the entire trunk as the enclosure.  Are you merely bolting it up to the bulkhead there?  In addition, are you using a center arm rest rear seat to make use of the ski pass enclosure?

bmwman91

  • Administrator
  • Legendary
  • *****
  • Thank You
  • -Receive: 33
  • Posts: 2798
    • View Profile
    • http://www.e30tuner.com/
E30 Audio Overhaul - My Project Details
« Reply #12 on: June 08, 2010, 07:32:39 PM »
Quote from: longtallsally;93299
I was following your thread on R3V as well on this, so I'm glad you posted here.

I'm going to eventually enhance what I've got to include a sub but, like you, I don't want to sacrifice any trunk space.  That and my days of ear drum destroying bass are over.  That said, could you give a few more details on where/how you plan on mounting your sub?  I think you mentioned putting it in the ski pass hole and using the entire trunk as the enclosure.  Are you merely bolting it up to the bulkhead there?  In addition, are you using a center arm rest rear seat to make use of the ski pass enclosure?


I will be mounting a piece of cabinet-grade plywood behind the bulkhead, and the sub will be attached to that. Yes, I have an arm-rest rear seat in the car. I don't think that the setup would work well at all without it.


Time for an update:

I have spent a good few days reverse-engineering the amplifier's input stages. My main reason for this is bypassing the active filtering on channel 5 since the amp was designed without a bypass for it. CH5 uses a class-D power stage, and this one was only designed to do lower frequency stuff. Since I will be using a higher-order, nicer, external crossover before CH5, I feel that I can safely bypass it. The external cutoff frequency isn't too much higher than the limit on the amp's dial anyway.

I have succeeded in bypassing this and basically jumped the output of the gain-setting op-amp to the input of the final output buffer / RF filter. With 12V powering the amplifier, CH5 is close to clipping with the minimum gain setting and the expected maximum input level from the 6XS. I am going to change out one or two resistors to allow the gain to be adjusted lower than it otherwise would be in the input stage.

The other order of business will be to install some nicer op-amps. The unit currently uses some STMicro MC4558 units, which are OK for hobby type stuff, but are not really great for audio. Since the power stages probably aren't world-class or anything, I am not going to go dropping serious coin on ridiculous op-amps that headphone enthusiasts like, but I will put in ones with lower noise figures & such. I have ordered some OPA2134's to put in (same pin-outs). They are a good balance of performance and price. You also would not want to put in op-amps with >10MHz bandwidth because there is a lot of high-speed switching circuitry generating RF EMI in there, and you don't want that amplified.

What is the typical battery voltage in an E30 with a good battery when the car is not running? The power rails vary in voltage depending on the input (+/- 23V for Ch1-4 & +/- 41.4V for CH5 with 12V in, +/- 27.3V for Ch1-4 & +/- 48.4V for 14V input). As such, I want to set the gains to be just on the verge of clipping with the lowest reasonable battery voltage present in case I crank it up with the engine off. I am not after absolute maximum power or anything like that...just maximum power under worst-case conditions.

Oh yeah, and once I get the gains dialed in I am removing the potentiometers & putting in regular resistors in their place (of the right value). Cheap pots tend not to hold their setting, especially in an environment like a car, and more-so when mounted near a sub! That, and the dual-pots in there aren't very symmetric, so the gains between CH1/2 & CH3/4 differ a bit for a given position on the pot. Resistors will take care of that.

06/05/2011 - 212,354 miles
Visit HERE for a plethora of 318iS stuff and some other randomness.  Would you say I have a, plethora, of pinatas?

bmwman91

  • Administrator
  • Legendary
  • *****
  • Thank You
  • -Receive: 33
  • Posts: 2798
    • View Profile
    • http://www.e30tuner.com/
E30 Audio Overhaul - My Project Details
« Reply #13 on: June 16, 2010, 12:51:01 AM »
Alrighty, I got the opamps today. I will install them in the lab at work tomorrow at lunch lol.

I also returned that circle-cutter jig and bought a Router Buddy instead. It looks like it will be a very useful little tool!

Oh, and baltic birch plywood burns like a bitch when cutting with a router. Freaking annoying, I wrecked a bit a couple days ago. MDF was easier to work with than this stuff, which is sort of surprising.

06/05/2011 - 212,354 miles
Visit HERE for a plethora of 318iS stuff and some other randomness.  Would you say I have a, plethora, of pinatas?

DesktopDave

  • Administrator
  • Legendary
  • *****
  • Thank You
  • -Receive: 60
  • Posts: 5076
  • Lives in the 80s
    • View Profile
    • The Iconic BMW
E30 Audio Overhaul - My Project Details
« Reply #14 on: June 16, 2010, 07:55:59 AM »
Never worked with the birch before.  I've only seen it made into furniture that had no large holes.  MDF is easier to work with but you're right about vibration & water resistance.  Sealing or veneering it helps a bit, but not much.  Once you have water in the substrate it's done.
'08 Karmesinrot 128i 6MT
'86 Zinnoberrot 635CSi (M30B32/G265/3.46 torsen LSD)

Sold: '97 Montrealblau 318iS, '91 Brilliantrot 318i, '91 Brilliantrot 318iS