Author Topic: monty23psk  (Read 140948 times)

monty23psk

  • Legendary
  • ******
  • Thank You
  • -Receive: 17
  • Posts: 1291
    • View Profile
Re: monty23psk
« Reply #255 on: February 15, 2016, 04:36:41 PM »
I had work today but got the pilot bearing tool. I research the bread method and it worked like a charm. Only took a slice and a half of white bread. I used the BMW plastic tool and just used the Dremel to cut of the ring which you use to pull. Then used the 2.5lb hammer and about 25 good smacks it popped. Cleaned out the inside and then added the new BMW pilot bearing using a 22mm long socket and a regular hammer to tap it in. The old one was ok but it wasn't smooth like the new one.

Here it is installed. Next up is the FW install with clutch kit.

Alex  88 m5 | 91 318is | 19 Subaru Ascent
BMW Tool Rentals & Fender Roller

monty23psk

  • Legendary
  • ******
  • Thank You
  • -Receive: 17
  • Posts: 1291
    • View Profile
Re: monty23psk
« Reply #256 on: February 27, 2016, 01:24:33 PM »
I have been traveling for the last 2 weeks so everything went on hold. Today I went by to pick up the flywheel from the machine shop. All looks good and then when I came home, I did a mock up before I send it out for lightening/balance/resurfacing.

All fits like a glove. The machine show which is only 10 blocks from my house was about to remove the ring from the m42 flywheel and add it to the m20 one. They did have to shave a little from the diameter of the m20 fw. Then I requested they add the 8mm TDC and 180 degree TDC holes so I can still use my flywheel lock pin. With this, I can use my m42 starter and no modification needed. Also, no need to buy the m20 start. The lightening/resurface cost will surely be more expensive than what I paid.

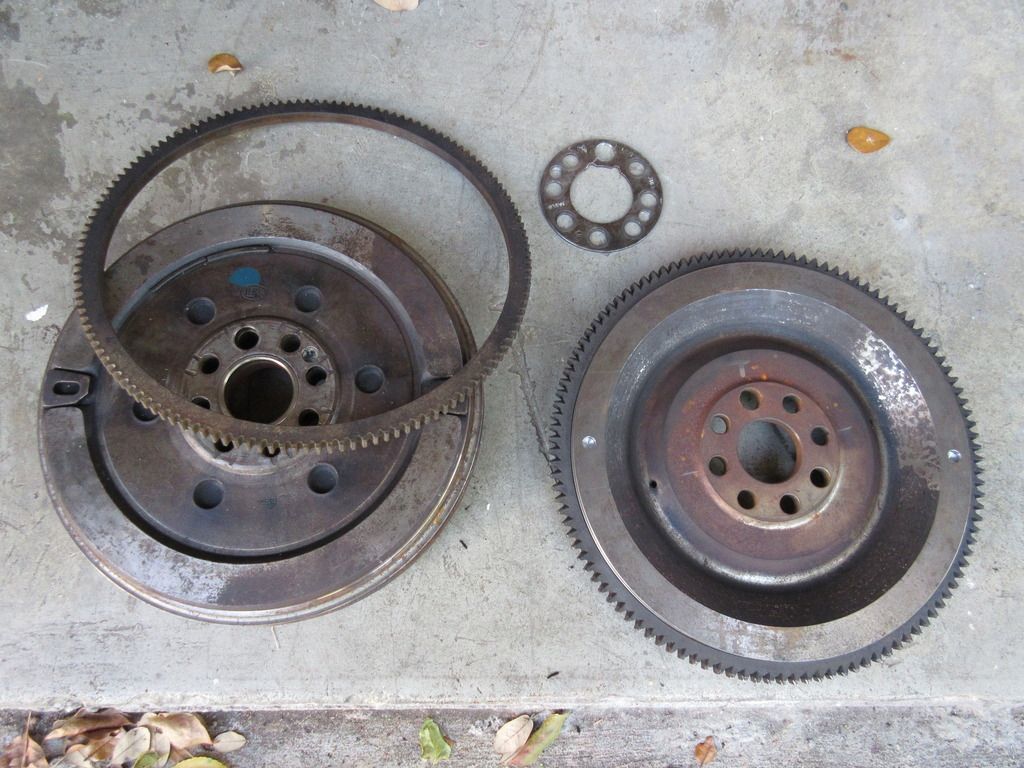
One thing to note is that the spacer plate that needs to be removed from the m42 flywheel by drilling through the rivets, will need one hole widen to fit the rear crank hub guide. The TDC hole is the one in between the two dimples on the inner hole.

Monday I take it to the clutch place. Will keep cleaning items ans start to work on the seals for the transmission. I am in town for the next month so I really hope I can finish it by then.

Here is a picture of the m42 fw on the left, the loose m20 ring gear, the spacer with the widen hole and the m20 flywheel, with TDC marks and the ring gear installed.

Something to note, the new BMW provided m20 flywheel bolts already come with yellow threadlocker applied.

Alex  88 m5 | 91 318is | 19 Subaru Ascent
BMW Tool Rentals & Fender Roller

monty23psk

  • Legendary
  • ******
  • Thank You
  • -Receive: 17
  • Posts: 1291
    • View Profile
Re: monty23psk
« Reply #257 on: March 06, 2016, 12:02:58 PM »
Today I installed my lighten, about 3 lbs, resurfaced and rebalanced m20 flywheel. I installed it with stock BMW m20 bolts. Torqued it to factory spec. It is nice to have the flywheel lock pin to hold it in. THen I installed the ClutchMasters stage1 m20 clutch kit with new BMW torx bolts. Torqued that to spec as well. Just need to finish cleaning up the bellhousing and replacing the seals, and replace the ATF.

Flywheel installed:


New Kit:


Clutch aligned and installed:
Alex  88 m5 | 91 318is | 19 Subaru Ascent
BMW Tool Rentals & Fender Roller

monty23psk

  • Legendary
  • ******
  • Thank You
  • -Receive: 17
  • Posts: 1291
    • View Profile
Re: monty23psk
« Reply #258 on: April 12, 2016, 09:40:43 PM »
Adding a few more pics of the process. Replaced the transmission input seal. I reused the metal casing and just swapped in a new seal. I also got new bolts and washers from BMW. All buttoned up with Blue Hylomar for extra sealant power. I did also clean up in the inside of of the bell-housing as much as possible, wire wheel and plastic pic/scraper. The outside is about 80% clean as well. Next is the new bronze guide pin, output seal and selector rod bushing. It was this plastic piece that sheared off and started this whole process.


Alex  88 m5 | 91 318is | 19 Subaru Ascent
BMW Tool Rentals & Fender Roller

monty23psk

  • Legendary
  • ******
  • Thank You
  • -Receive: 17
  • Posts: 1291
    • View Profile
Re: monty23psk
« Reply #259 on: April 13, 2016, 09:01:11 PM »
Here is the AGA bronze clutch pin installed:

Alex  88 m5 | 91 318is | 19 Subaru Ascent
BMW Tool Rentals & Fender Roller

monty23psk

  • Legendary
  • ******
  • Thank You
  • -Receive: 17
  • Posts: 1291
    • View Profile
Re: monty23psk
« Reply #260 on: December 12, 2016, 07:50:12 PM »
Another update and it has been very slow due to lots of traveling for work and then family time when I am home with the little ones. I plan on having it back on the road before the end of the year as I am not on vacation until 2017. Here are some shots of the prep and now installed tranny. Working on DSSR with UUC as the 215mm is too short and will probably need the 283mm from an e39 m5. Waiting on call back from Rob at UUC but in an old thread from SimonS which the same car, that is what he needed to do.

On to the pics:

new parts, output seals and bushing:


Seals installed, forgot to take on of trans output seal before installing the coupler:


Tranny installed, boy it was heavy to do it by yourself but I got it. I used new bellhousing bolts.


I now have the slave cylinder installed and starter in, just need to bolt it. I need to finish working on the DSSR but I have the EVO3 SSK installed. Clutch pedal has no bidding, now need the lever to test throws before turning it on.
Alex  88 m5 | 91 318is | 19 Subaru Ascent
BMW Tool Rentals & Fender Roller

monty23psk

  • Legendary
  • ******
  • Thank You
  • -Receive: 17
  • Posts: 1291
    • View Profile
Re: monty23psk
« Reply #261 on: December 23, 2016, 11:34:44 AM »
Here is a picture of the SSK installed from the bottom including the DSSR and a shifter arm rear mount from BMW. The DSSR originally sent from UUC is too short. It is 215mm in length. I measured the original one and it has a longer length of ~274mm. UUC has an e39M m5 that is 273mm. SimonS back in the day stated you need this longer one. I spoke with Rob, we got it exchanged and all is good. What a solid feeling shifter. Also the throws are much nicer being short.  Thanks UUC and for those m42 owners with the longer rod, use the e39 m5 one.

Alex  88 m5 | 91 318is | 19 Subaru Ascent
BMW Tool Rentals & Fender Roller

DesktopDave

  • Administrator
  • Legendary
  • *****
  • Thank You
  • -Receive: 60
  • Posts: 5076
  • Lives in the 80s
    • View Profile
    • The Iconic BMW
Re: monty23psk
« Reply #262 on: December 24, 2016, 01:03:11 PM »
Great info, thanks for posting it. I had an older model UUC short shifter in my old E23, it was a really nice piece. Great feel, due to the truly high-quality materials they used.
'08 Karmesinrot 128i 6MT
'86 Zinnoberrot 635CSi (M30B32/G265/3.46 torsen LSD)

Sold: '97 Montrealblau 318iS, '91 Brilliantrot 318i, '91 Brilliantrot 318iS

monty23psk

  • Legendary
  • ******
  • Thank You
  • -Receive: 17
  • Posts: 1291
    • View Profile
Re: monty23psk
« Reply #263 on: December 28, 2016, 07:02:40 PM »
While waiting for some new bolts for the driveshaft from the dealer, I decided to cleanup the 2 heat shields.

Here is the rear section which has some surface rust but overall for its age its in very good condition. I took a wire wheel to it and then painted it with a matt black spray paint from Rustoleum to help prevent more rust and it is designed for very high temps, I got it at Walmart.


Here is the larger shield cleaned. I forgot to take a picture of it before I started. Also, the sheild looks to have blotches but that is because it has just cleaned it and was still wet.


Here is the first piece painted with 2 coats. Will let it sit to cure. I will paint the other piece and post pics. I ran out of sun light due to some work on the e39. Its has a deeper black in person.


Alex  88 m5 | 91 318is | 19 Subaru Ascent
BMW Tool Rentals & Fender Roller

monty23psk

  • Legendary
  • ******
  • Thank You
  • -Receive: 17
  • Posts: 1291
    • View Profile
Re: monty23psk
« Reply #264 on: December 29, 2016, 03:23:47 PM »
Here is the other piece painted: (My daughter's bike box with blue and pink gives a nice contrast, lol)


Alex  88 m5 | 91 318is | 19 Subaru Ascent
BMW Tool Rentals & Fender Roller

monty23psk

  • Legendary
  • ******
  • Thank You
  • -Receive: 17
  • Posts: 1291
    • View Profile
Re: monty23psk
« Reply #265 on: January 14, 2017, 09:49:03 PM »
Once the heat shields were dried, I went to install the new driveshaft and realized the 4 knurled bolts at the rear end knuckle were not there. I had to order them from BMW and finally installed them on the knuckle and installed the driveshaft in the car for a test run before installing all the shields and exhaust.

Here are the new bolts. Hammered them in with a ratchet extension.


Bolts installed:


All shields installed with support bar and some new hardware as I was missing some or they were too corroded for my taste. The all black looks cleans it up a little.


I then have a few new parts for the exhaust installation. I cleaned up the hanger bracket, tranny bracket and installed new rubber mounts:


I then took here for a spin. Big smile on my face. No issues, shifts smoothly and the short throws are just amazing. But with a new clutch and the SS, it was like driving stick for the first time. My timing is off. The clutch engages so close to the top like a new car and I have been use to it engaging midway to all the way down. Also, it has been a year since I drove her an only about 2 weeks worth of manual with rentals in Europe. I will keep driving it and maybe look into a clutch stop, who knows. Just glad to have the car back on the road. Need to finish the tranny protection plate install and a good car wash and she is 100% complete for this project.
Alex  88 m5 | 91 318is | 19 Subaru Ascent
BMW Tool Rentals & Fender Roller

monty23psk

  • Legendary
  • ******
  • Thank You
  • -Receive: 17
  • Posts: 1291
    • View Profile
Re: monty23psk
« Reply #266 on: January 23, 2017, 05:54:26 PM »
Driving the car is awesome. But with the new soft pedal and quick engagement, I decided to get a clutch stop. With UUC being so great with me recently and having a credit, I decided to get the v3 Big Boy clutch stop. I got it got it today and its beefy. I have installed and and so far it seems great preventing the longer throw of the clutch pedal. I might adjusted it 1 or 2 more times to dial it in but already feel the difference in its current setting. Here are some pics of it as it arrived and after the install. It is much bigger compared to the old one which is just a little bigger than a quarter.


Alex  88 m5 | 91 318is | 19 Subaru Ascent
BMW Tool Rentals & Fender Roller

monty23psk

  • Legendary
  • ******
  • Thank You
  • -Receive: 17
  • Posts: 1291
    • View Profile
Re: monty23psk
« Reply #267 on: February 05, 2017, 10:16:44 PM »
Finally got back from a work trip and received my new hardware to install the BMW e30 transmission protection plate. The plate is really for an m20 as the O2 sensor does hit the plate. I had to develop a bracket  to lower it enough, about 1.5 inches so that it would strike the O2 sensor. Maybein the future if something changes with the exhaust, I will put the O2 in a different area.

Here is the OEM plate, still available and not that expensive:


Here is all the hardware which I had to guess and figure out in the ETK. I ended up using the goldish flower looking nuts as the blind rivets wouldn't really stay in place. Was afraid it would eventually fall. I wanted to make the install of the plate in way that it would be easy to remove in needed for any repairs. I couldn't find any instructions or part numbers for the install so I made by own using the parts that look to be used by BMW. The rear section is just more square nuts the fit in the slots just like the rear tranny mounting brace. I had to drill out the holes with a dremel to widen it for these nuts. Bolts and washers worked great. If anyone would like blind rivets, let me know. If they would have expanded, it would have been the best. Other option is the thread the whole for an m11 or m12 short bolt. I can supply PNs if needed.


Here are a few shots of it installed, and no issues or vibration noises after a few runs. You can see the straight place that I used to mount the rear passenger side. It does look to sit lower but it is at the lever of the 2 small rubber mounts under the tranny that has the bracket that clamps onto the exhaust. Better view of it in the 2nd picture.


Alex  88 m5 | 91 318is | 19 Subaru Ascent
BMW Tool Rentals & Fender Roller

monty23psk

  • Legendary
  • ******
  • Thank You
  • -Receive: 17
  • Posts: 1291
    • View Profile
Re: monty23psk
« Reply #268 on: March 05, 2017, 11:55:40 AM »
I was getting a little water in the trunk in the bottom area of where the car jack. I found the culprit to be the rubber grommets for the rear side marker lights were cracked and allowing some water in.  While fixing that as I can't get new ones unless I order e30 M3 rear side markers, I decided to order some new seam sealer as I found the original cracked, common fault on the e30 and water has seaped through and rusted out a small section above the rear lights. I did a quick repair with Rust Bullet, I heard its better that POR-15. I did the repair on the both side, and also replaced the trunk gasket as it is 10 years old and back then I sent with the URO brand. I know better now and went with BMW. Right now all is sealed perfect after a test of running water with a hose for over 5 minutes while I was in the trunk with a flashlight.  I will touch up the silver paint with the red top coat when I have the car painted.

Here is the grommet I mentioned. I used an RTV sealant to plug the grommet for now. Worked well and would recommend all e30 owners to do so.


Here are the before:


Here are the after:


I found a small patch on the inside of the rear license place light. Will touch that up when I touch up some spare tire wheel well on the e39 in 2 weeks.
Alex  88 m5 | 91 318is | 19 Subaru Ascent
BMW Tool Rentals & Fender Roller

monty23psk

  • Legendary
  • ******
  • Thank You
  • -Receive: 17
  • Posts: 1291
    • View Profile
Re: monty23psk
« Reply #269 on: March 06, 2017, 10:24:22 PM »
I received the 3M seam sealer today and the main reason I went with it, it is clear in color. Basically used to seal the cracks until I get the car painted. It worked great and will hold me off. Highly recommend it and just make sure the bead is thick enough which is hard to gauge with it being clear. I offered to help my dad with his e28 which has a humid trunk. He probably needs all new gaskets. If you are local to me, you are more than happy to take some.

Pic of seam sealer:


The before shots and you can surely see the cracks in the seam sealer.


Here is a pic of sealer applied. Dries in under an hour and can be painted in 40 minutes per instructions.
Alex  88 m5 | 91 318is | 19 Subaru Ascent
BMW Tool Rentals & Fender Roller