Show post that are related to the Thank-O-Matic. It will show the messages where you become a Thank You from an other users.
 Messages - tjts1
Pages: [1]
All 92-98 volvo 940, 960, 850 will have this same fan.
Phil has updated the procedure with an excellent summary of all our collective knowledge thus far. Thanks Phil! 
For those still interested this was the original post that got this whole thing started.
This is a continuation of my renovation thread for my 318i
http://www.m42club.com/forums/showthread.php?t=2676
At this point I'm in the process of eliminating the Medusa of hoses under the intake.
Here it is in all its ugly glory.

138k miles and 17 years.

Lets count the leaks.


Virtually every hose is split at both ends.

None of this stuff is going back into the car.

I'm sure this is a familiar sight to many of you.

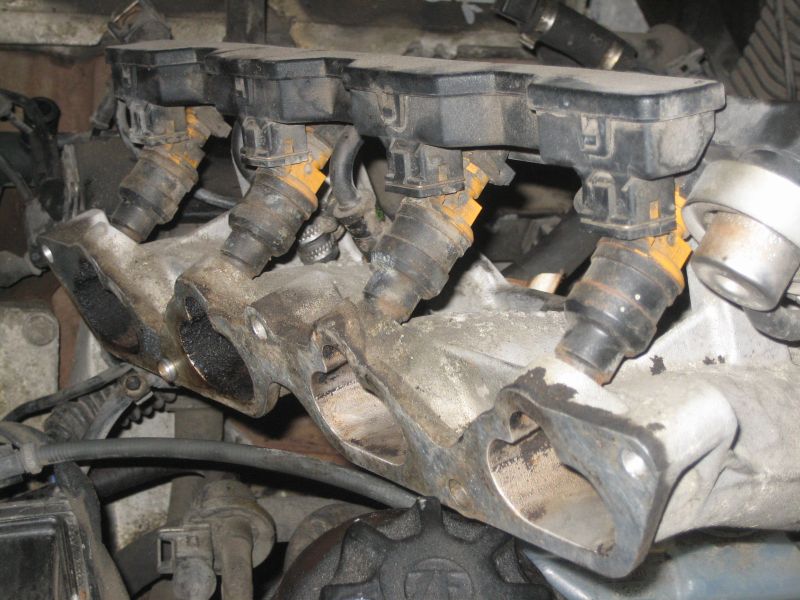
This is the #1 port after cleaning out about 1/4" thick layer of sludge all around the port.

For contrast: 2 clean ports in the foreground and 2 dirty in the background. The picture doesn't do it justice. That stuff is nasty, thick sticky and smelly. I will add a catch can to the new vent hose in order to separate the oil oil before it hits the intake.
Freshy fresh parts from FCPgroton and Pelican. The first one to name all the parts correctly gets a special prize.

Quote from: teh Phil;74524
Parts you will need:
• Plastic Coolant Pipe from Block (Part # 11531714738) (Diagram Link)
*NOTE: Make sure this is OEM! Aftermarket pipes have been found to leak, as noted here*
• O-Ring for Pipe (Part # 11531709157)
• Throttle Body Gasket (Part # 13541743261) (Diagram)
• Upper – Lower Intake Gasket (Part # 11611717761) (Diagram)
• Lower Intake – Block Gasket (Part # 11611734684) (Diagram)
• BMW Antifreeze (Part # 82141467704)
Or whatever brand you choose, of course.
• 5/8” Coolant Hose
• 5/16” Fuel Hose (Make sure it is fuel INJECTION hose, not fuel hose for a carb)
• 19/32” Vacuum Hose
I found all three hoses at Advance.
*NOTE: DO NOT use fuel hose for vacuum hose or vice versa. If improper lines are used they could expand or collapse.*
Under the manifold, as pictured in this thread, there is a mess of hoses.
In addition, you get rid of the throttle body heating plate, which as many have said, is of no use. Most of the hoses are unnecessary, and we’re getting rid of them as well as rerouting the vacuum lines to make future maintenance easier, and limit the number of possible leak points. Most importantly, you’re getting rid of the two junctions. You’re replacing the plastic coolant pipe because it’s relatively cheap, and they tend to crack over time on M42s. In the end you’ll have three hoses:
• One vacuum hose from the valve cover to the intake elbow.
• One vacuum hose from the idle control valve to the intake elbow
(the other side of the idle control valve will go to the same place, but you can extend the hose if you’d like to make the ICV easier to access.)
• One coolant hose from the coolant pipe’s outlet to the nipple on the head. This is a personal preference; some have simply plugged the two holes. Read more here.
These two hoses are NOT the same size. Even though I trust the results found here, I'm still wary of my head cracking, so I thought I would connect the two just to be safe. A local plumbing supply store rigged this up for me, and I haven't had any leaks. It's not pretty, but it works.
I'll report back in a few months, but it seems fine. Just in case I do find a leak, I ran this just outside of the lower intake, so I can plug the lines with some bolts if necessary.
When you’re done, don’t forget to bleed the cooling system! Here’s how.
Other things to think about while you’re down there…
• Are the two rubber coolant hoses that meet the plastic pipe we’re replacing in good shape? (#s 4 and 22 here)
• Do you want to install a catch can? It’s really not necessary if you use synthetic oil, but some have put one in line between the valve cover and the throttle body.
• Is it time to upgrade your injectors? Many have upgraded to Ford’s 4 pistil injectors (as opposed to our 1 jet) for better atomization of fuel. Read more here.
• If you don’t want to change out your injectors, at least give them a clean! Pelican Parts explains how.
• The rubber hoses going into the hard lines on the lower intake. You have to buy some short pieces that lead from the hard lines to the fuel rail, so you might as well do a little preventative maintenance and buy a few feet. (#s 15 and 16 here)
• Clean out your AFM sensor!


For those still interested this was the original post that got this whole thing started.
This is a continuation of my renovation thread for my 318i
http://www.m42club.com/forums/showthread.php?t=2676
At this point I'm in the process of eliminating the Medusa of hoses under the intake.
Here it is in all its ugly glory.
138k miles and 17 years.
Lets count the leaks.
Virtually every hose is split at both ends.
None of this stuff is going back into the car.
I'm sure this is a familiar sight to many of you.
This is the #1 port after cleaning out about 1/4" thick layer of sludge all around the port.
For contrast: 2 clean ports in the foreground and 2 dirty in the background. The picture doesn't do it justice. That stuff is nasty, thick sticky and smelly. I will add a catch can to the new vent hose in order to separate the oil oil before it hits the intake.
Freshy fresh parts from FCPgroton and Pelican. The first one to name all the parts correctly gets a special prize.
| Pages: [1] |