Show post that are related to the Thank-O-Matic. It will show the messages where you become a Thank You from an other users.
 Messages - DesktopDave
I'd think it's a bad driver. It's a semiconductor normally...if internal damage like overheating has caused higher resistance the voltage has to drop. They're all supplied from the same output circuitry, so if any drivers are good the voltage supply is most likely good. These drivers run pretty high current, and they run pretty hot.
Forgot to add in my previous post...I wouldn't suggest running thinner oil. I loved the higher mileage but my used oil reports had very high iron & chrome readings indicating insufficient piston lubrication. I'm keeping it at BMW's recommended weights depending on temperature for now. I am trying out some of the high-mileage formulations, I'll report on that once I get some more miles on the car.
GTX is a great choice, I used that for years. You might pick up a little with synthetics in the engine, transmission & diff but it's unlikely that you'll gain enough to pay for the higher cost unless you run really high intervals like I do. I tend to go about a year between filters & top-ups...10-15K miles between oil changes are OK based on my UOAs.
I've heard great things about RedLine. I also really like the MolyLube LiquiMoly products, although IMHO they're too pricey for our humble little Bimmers. On a (possibly) related note, I can highly recommend Ford Motorsport XT-M5-QS gear lube. It's a dedicated MTF that massively helped with shifting notchiness in my brother's NC Miata 6-speed. I'm unsure if it's a bit thin for our old Getrags or has other compatibility issues with brass synchros.
I skipped out on the rear brake work, but I have a good excuse...
...just bought a '97 M3! It's likely the worst one for sale in America. Automatic, sedan, black and (worst of all?) it's pretty rusty.

For future reference, USB iBus emulator and other related hackery like NavCoder.
...just bought a '97 M3! It's likely the worst one for sale in America. Automatic, sedan, black and (worst of all?) it's pretty rusty.
For future reference, USB iBus emulator and other related hackery like NavCoder.
The oil leak is most likely from the o-ring & gasket at the oil filter housing. It tends to leak down the side of the block and around the lower pan. Replacing that gasket & o-ring is a little more involved than the intake. The intake & alternator both need to be removed, which means disconnecting the battery. You might as well do the oil pan and an oil change all at the same time.
Dropping the lower oil pan to check those upper pan bolts is for an entirely different reason. It's probably already been done to your car so don't worry too much. It's recommended to check for this sooner rather than later...maybe during your next oil change? Here's why: the upper bolts tend to work loose over the years due to vibration. This will cause the upper pan gasket to fail at the primary oil pump feed passage. That's pretty bad....the oil pump stops supplying oil to the engine, and is rapidly fatal to the cams & main bearings. Those are very small M8 bolts and can't take much torque. We've always recommended using a thread locking compound such as Loctite Red to prevent this from happening. Speak of the devil...here's a fresh post about that very problem!
Do you have any history on the car? It'll save you a bunch of work if you know what's been done over the decades. Once you've chased down all the vac leaks, checked the upper pan bolts, sealed up any pressure leaks in the cooling system, these engines will last for a LOOONG time. Mine's been parked for a while, but it's done 293K or so miles on the original motor without any overhaul whatsoever. Previous owners had done significant work on the car over the years...I was tremendously lucky to get almost every service receipt along with the car...it came to $10.5K worth of work having been done since the car was delivered to the customer on Oct. 27, 1990.
Just a few things off the top of my head...I don't want to sound pedantic so ignore anything you already know. It's not that hard, but I recall having the same anxiety when I pulled mine apart the first time.
I like to use a penetrating oil like PB Blaster or even WD40 to make disassembly easier.
You'll only need to replace the middle gasket, as mentioned. You likely won't need to disconnect the throttle cable, just put a rag on your windshield and rest the intake up there.
Once you get the manifold apart, stuff two shop rags/t-shirts/paper towels into the intake tubes. Dropping a washer or nut into the lower intake isn't a lot of fun.
I like to use a single-edge razor blade to remove what's left of the paper gasket but a gasket scraper might be a better idea since the steel blade will easily scratch the manifold surface.
The gaskets are only thick paper, you'll put them on dry. They don't have a top & bottom, ignore any printing. I avoid silicone RTV (make-a-gasket) whenever possible unless recommended by the manufacturer.
Be sure when you reassemble the manifold that you set the upper part onto the locating dowels properly before you start to tighten fasteners. There are two of them, part #6 on the drawing. Kudos for getting into RealOEM, BTW!
After you have the upper manifold pre-assembled onto the dowels properly, tighten the fasteners in steps...like get them all hand-tight, then go ever them all again with a ratchet wrench to do the final tightening. They are small fasteners, you won't need much strength to tighten them properly. I believe the spec for high-strength M7 & M8 fasteners (like those on the upper manifold) is only about 15 foot-pounds. Measure your wrench & estimate the force. A 12" long wrench will only require 15 pounds at the end of the handle to properly secure the fasteners.
I know that the bolts use 10, 12 & 13 mm heads, but all metric fasteners are designated by the thickness of the threaded portion. Once you're done with this job...you'll be ready to head on under the car to loc-tite the upper oil pan bolts!
If you're in an area without many E36 around, welding is the only decent option. I've had good luck with frame and chassis welding over the years, I'd trust a reputable mechanic with mild steel welding like that subframe. I would suspect that a significant front wheel impact could cause damage like that, especially given the long lifespan of these cars. A few decades of metal fatigue and corrosion. BMW also tends to save a little weight on structural components compared with other manufacturers.
My E30 front subframe is solidly mounted to the chassis. No rubber except for the engine mounts. I'm 99% sure yours is the same way. The rear subframe is a completely different animal, rubber mounts all over. Perhaps that was what he was thinking about? We're pretty lucky with rust-free spare parts here in the USA. Shipping is expensive, but I've had luck with eBay salvage yards like Vines (in Georgia, USA?).
Hard to tell if that engine mount is compressed. They slowly collapse as they age, then the engine tilts a little from its original position. I wouldn't think that could cause exhaust cracking, but it's possible.
I just went through your build thread, holy moley!  That's incredible! It's nice to see an E36 Individual too, there couldn't have been very many of those built.
Sorry to thread-jack, just had to pass along the compliment. Please return back to your engine build.
That's incredible! It's nice to see an E36 Individual too, there couldn't have been very many of those built.Sorry to thread-jack, just had to pass along the compliment. Please return back to your engine build.
Complete car being parted out. Not mine, no affiliation. I can pull stuff if anyone needs it:
http://pittsburgh.craigslist.org/cto/5867028582.html
I'm getting those wheels for myself, seats are already gone, motor was overheated. Not much left, but I'm sure there are a few good parts left. I'm told the transmission and 4.27 LSD are both good. I'll post details later this week.
http://pittsburgh.craigslist.org/cto/5867028582.html
I'm getting those wheels for myself, seats are already gone, motor was overheated. Not much left, but I'm sure there are a few good parts left. I'm told the transmission and 4.27 LSD are both good. I'll post details later this week.
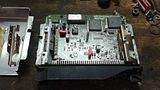
The coil drivers look like small black boxes sitting above the DME circuit board. They're a set of large capacitors under some clipped-on heat sinks. I'll take some pics of what you should be looking for, and update this thread later on today.
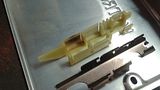
After you've removed the cover (unscrew the four hex-head screws on the cover, and bend the crimped tabs back). I've already removed the steel spring and plastic insulator from the coil drivers on the left side. You'll see this:
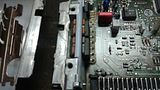
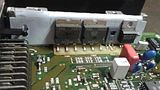
Closeups:
It's hard to see, but the left-hand driver in the first pic is burned-out. The singed plastic insulator definitely indicates that it overheated.
Replacing them is difficult unless you're handy with a high-wattage iron and a solder sucker. Solder joints have to be nearly perfect, since they switch a large amount of current at a high frequency. I was planning on salvaging good coil drivers from some cheap E36 EWS DMEs to replace them instead of researching a more expensive modern replacement. They're a high-current/high-temperature MOSFET Darlington transistor. Bosch does offer an updated part, popular in MegaSquirt installs, called a BIP373. Unfortunately it's not a direct fit, and I'm not sure it's even pin-compatible.
So we're stuck with an obsolete, non-standard, high-current transistor. Bosch never bothered to publish specifications; even an obsolete 30 year old part is part of their precious intellectual property.
After you've removed the cover (unscrew the four hex-head screws on the cover, and bend the crimped tabs back). I've already removed the steel spring and plastic insulator from the coil drivers on the left side. You'll see this:


Closeups:
It's hard to see, but the left-hand driver in the first pic is burned-out. The singed plastic insulator definitely indicates that it overheated.


Replacing them is difficult unless you're handy with a high-wattage iron and a solder sucker. Solder joints have to be nearly perfect, since they switch a large amount of current at a high frequency. I was planning on salvaging good coil drivers from some cheap E36 EWS DMEs to replace them instead of researching a more expensive modern replacement. They're a high-current/high-temperature MOSFET Darlington transistor. Bosch does offer an updated part, popular in MegaSquirt installs, called a BIP373. Unfortunately it's not a direct fit, and I'm not sure it's even pin-compatible.
So we're stuck with an obsolete, non-standard, high-current transistor. Bosch never bothered to publish specifications; even an obsolete 30 year old part is part of their precious intellectual property.
Definitely plug all the vac leaks before going any further. I'm not sure what that silver thing is mounted to the fender, but it looks like an aftermarket device. I'd be tempted to disconnect it and see if things improve. I've also seen some old BMWs with coolant temp vacuum switches that look like those paired vac tubes, but I have no idea why that'd be there like that. I'd be very strongly tempted to delete the throttle body heater and related vac tubing under the intake manifold. You'll need a new intake gasket but it's otherwise a pretty simple job.
I'd also test fuel flow & pressure. If your fuel filter is clogged (or fuel pump is on the way out) it'll starve the motor at high RPMs. The mystery plug on the firewall should be connected to enable the CO potentiometer in the AFM. I'm not sure your AFM even has a CO pot installed; our units over here did not. I'd leave it disconnected.
I'd also pull the cyl head cover to see if the cam gears look OK. You can easily check if the timing chain is loose and the cams are timed correctly. While you're in there, maybe pull the spark plugs and see if they look OK. Some light brown deposits are OK, sooty black deposits indicate too much fuel. Heavy black oily deposits could be bad news with valve or piston sealing. One or two washed plugs could indicate a blown head gasket.
Have you run any tests to see what the motor compression looks like? A leak-down test from a pro is usually pretty cheap and will give you a great baseline on motor health. If the motor has low compression, it will burn a lot of oil & plug up the catalyst. Used oil analysis is a useful tool too, if you have a sample of the motor oil with some mileage on it.
That does look like a very clean & presentable car, especially the interior. It's rare to find one so clean. I'm not sure about safety or emissions regulations in Greece, I'd recommend a professional pre-purchase inspection unless you're a pretty competent mechanic.
The weakest point on these cars is the cooling system; ask when the water pump, expansion tank and radiator were last changed. If the coolant level is low, or you find some goo under the oil fill cap, be sure to get a pressure test done on the cooling system. Cam chain can also cause problems, so it's good to see that he's refitted new cam gears and chain.
Otherwise they're straight-up E30 fun. Same problems that they all have - worn out suspension bushes, weak struts, cracked dashboards.
Thanks so much for your reply! What exactly do you mean by "drift" and "pick"? Is the pick just a type of extractor? I'm really hoping it won't have to be tapped, as hopefully the case's threads are still good... But I doubt it. I've tried pushing the tensioner in, but it won't budge. Maybe I'm too weak in this cold/can't get a good angle (the engine's in the car). I'll add some photos of the situation as it stands.
A drift is like a screwdriver, but with a blunt end. A nail-set is a drift, if you're more into carpentry. It's used for tapping or driving seals, plugs and suchlike.
BMWMan91 is completely right about the chain tensioner. It's just a spring-loaded tube that fills with oil via a very small hole. A one-way valve prevents the oil from flowing back out. As oil cannot compress, the tube is locked and prevented from retracting. With a good bit of pressure you can slowly force the oil back out of the fill hole. It takes a lot of time and a surprising amount of force. BMW requires that you retract a used tensioner before re-use, they suggest a c-clamp or bench vise.
There isn't a lot of space under there, unfortunately. I had thoughts about a similar sized hole saw (take the sheared head to match up the diameter), you could possibly get enough grip to twist it out. I also thought you could pick up a cheap set of chisels at Harbor Fright and use a correctly-sized one to tap into the sheared bolt shaft. If you could work a few notches into the bolt shank without messing up the timing case threads, you'd be in business.
I'm assuming that later year M42s are nearly the same? Would they still be a bolt in replacement? Only asking because this engine's mileage is unknown, has god knows what else that's going to fail on it next, don't have the time to rebuild it myself, and may potentially have the opportunity to get a rebuilt M42 from Bavarian Engine Exchange http://www.bavengine.com/engine.html
There are drastic torque rating changes between the 90-91 and the 92-93, 94-95 M42s on the linked page. What's the difference? I haven't heard or read anything about that before, and am having trouble finding anything.
The M42 went through one major redesign and a few minor changes. They are more or less bolt-in replacements. The blocks and heads are all the same, but the intake and accessories were updated several times. The E36 version also has a different oil pan, dipstick, etc. The later E36 model has an updated "DISA" intake manifold, knock sensors, and updated cam chain case, chain tensioner and a different accessory drive system. The later M44 is a closely related engine, as is the Euro-only M47 diesel.
I'd be tempted to get a pick in there and slowly rotate the stub of that hex-head plug out. I know the tensioner piston sticks out a bit, but if you pushed the piston in slightly with a drift or screwdriver you might just get lucky. I wouldn't use a hammer to drive the drift in there - you could crack the timing rail. Just use it to apply a little pressure to the hydro piston and unload the collar of that broken plug.
Otherwise...yep...it'll have to come apart. You might need a new case if a tap can't restore the threads.
You might have a bad bearing in the cam idler gear. Common problem with the older M42. Replacing it with the late-model M42 chain case eliminates the problem.
Otherwise...yep...it'll have to come apart. You might need a new case if a tap can't restore the threads.
You might have a bad bearing in the cam idler gear. Common problem with the older M42. Replacing it with the late-model M42 chain case eliminates the problem.
I get the same error on my phone....started about a week ago. No issues on my PC.
PM me if you can find your phone's IP, I'll unblock the whole subnet. I believe you can just google "what's my ip" from your device.
Sorry for any inconvenience, but we get 10-20 new spambots registering here every day.
| Pages: [1] 2 3 4 |